Designing an HTML Page for Report Display

In this section:

How to:

Reference:

Use the Dialogue Manager command -HTMLFORM to design the HTML page on which a report displays. You can control page style and format, and imaginatively enhance a report. A custom HTML page can include HTML elements such as frames, tables, and graphic images. It must be a complete HTML page with all required HTML tags. It also contains a special HTML comment that indicates where to insert the WebFOCUS report output.

You can do one of the following:

You can display one or many reports on a page. A report can be dynamic or static.

You can generate multiple HTML5 charts on a page if you generate the chart output without document-level HTML tags and load the JavaScript libraries required for interactive report and graph features. For more information, see Display Multiple HTML5 Charts on an HTML Page.

The following image shows multiple reports displayed on a custom HTML page.


For more information on -HTMLFORM and its capabilities, see Enhancing an HTML Webpage With a Procedure.

Reference: Usage Considerations for -HTMLFORM

  • Custom styling code specified within -HTMLFORM that creates an HTML page on which to display an HTML report can interfere with multi-drill, HFREEZE, Accordion, BYTOC, and On-demand Paging JavaScript-based reporting features. App Studio HTML Canvas is the recommended tool for creating an HTML page that displays one or more WebFOCUS interactive JavaScript-based features within a frame that requires specific styling, such as sizing of the area in which the report displays or scroll bar positioning.

Procedure: How to Display a Dynamic Report on an Existing HTML Page

  1. Create the HTML page that will incorporate the report output. Use the following comment to indicate where the output will display
    !IBI.FIL.report;

    or

    <!--WEBFOCUS TABLE report-->

    where:

    report

    Is the name of a virtual file that holds the report output. That file is generated in step 2.

    Note: The HTML comment line must be closed with the ---> characters or a single > character and should not have any other HTML tags within it.

    The Reporting Server must be able to locate the page using APP PATH or EDAPATH.

    When the page displays, the comment is replaced by report output.

  2. Create a procedure:
    1. Include the following command
      ON TABLE HOLD FORMAT HTMTABLE AS report

      where:

      report is the name of a virtual file that contains the report output. The name can be from 1 to 8 characters. Do not include an extension. This file is not saved to disk.

    2. At the end of the procedure, include the Dialogue Manager command
      -HTMLFORM filename

      where:

      filename is the name of the HTML page that will incorporate the report output. You create this page in step 1.

  3. Create a launch page from which a user can run the report. WebFOCUS incorporates the report output into the HTML page you designed, and returns a complete HTML file to the browser.

Example: Displaying a Dynamic Report on an Existing HTML Page

Note: For information on where to store the files created in this example, see Defining and Allocating WebFOCUS Files.

  1. Create an HTML page named RPTPG.HTM. The Reporting Server must be able to locate the page using APP PATH or EDAPATH. See WebFOCUS Application Logic for details on search paths.

    The letters on the left correspond to the notes explaining the code.

    HTML Page: RPTPG.HTM

        <HTML>
        <BODY BGCOLOR="#CCCCCC">
        <FONT FACE="Arial" COLOR="Black">
        <H2>Orders Summary</H2> 
    a.  !IBI.FIL.ORDERS;
        </BODY>
        </HTML>
    1. WebFOCUS reads the HTML comment and replaces it with the report output held in ORDERS (step 2).
  2. Create a procedure named ORDERS. The letters on the left correspond to the notes explaining the code.

    Procedure: ORDERS.FEX

       SET PAGE-NUM = OFF
       TABLE FILE GGORDER
       SUM QUANTITY AS 'Units Ordered'
       BY HIGHEST 1 ORDER_DATE AS 'Order Date'
       BY PRODUCT_DESCRIPTION 
    a. ON TABLE HOLD FORMAT HTMTABLE AS ORDERS
       END 
    b. -HTMLFORM RPTPG
    1. This command saves the report output to a virtual file in HTML format. The file is named ORDERS.
    2. This command sends the report output held in ORDERS to the HTML page named RPTPG.HTM (step 1).
  3. Create a launch page from which a user can run the report. The following simple launch page is named RUNRPT.HTM and it uses the Servlet.

    Launch Page: RUNRPT.HTM

    <HTML>
    <BODY>
    <A HREF="/ibi_apps/WFServlet?IBIF_ex=orders">Click here for the Orders 
    Summary report.</A>
    </BODY>
    </HTML>
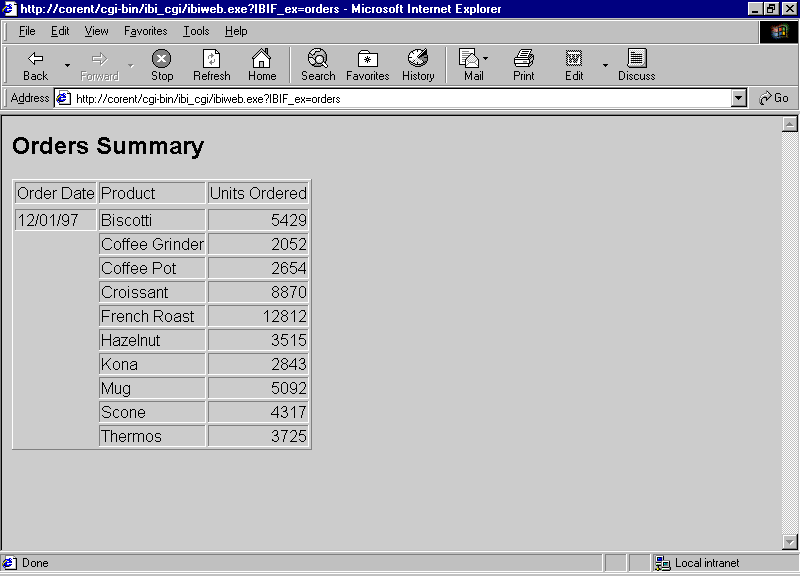
  4. Run the launch page, and click the link. The dynamic report displays on the custom HTML page.


Syntax: How to Display a Report on an Inline HTML Page

-HTMLFORM BEGIN 
html_code
html_code
html_code
.
.
.-HTMLFORM END

where:

html_code

Is a line of standard HTML code. It cannot exceed 80 characters.

Example: Displaying a Dynamic Report on an Inline HTML Page

Note: For information on where to store the files created in this example, see Defining and Allocating WebFOCUS Files.

  1. Create a procedure named ORDERS2. The letters on the left correspond to the notes explaining the code.

    Procedure: ORDERS2

        SET PAGE-NUM = OFF
        TABLE FILE GGORDER
        SUM QUANTITY AS 'Units Ordered'
        BY HIGHEST 1 ORDER_DATE AS 'Order Date'
        BY PRODUCT_DESCRIPTION 
    a. ON TABLE HOLD FORMAT HTMTABLE AS ORDERS2
        END 
    b. -HTMLFORM BEGIN
       <HTML><HEAD><STYLE>TD {FONT-FAMILY: ARIAL; COLOR:
        BLUE;}</STYLE></HEAD>
        <BODY BGCOLOR="FAEBD7"><DIV align="left"> 
    c. !IBI.FIL.ORDERS2;
        </DIV></BODY></HTML> 
    b. -HTMLFORM END
    1. This command saves the report output to a virtual file in HTML format. The file is named ORDERS2.
    2. These commands delimit the inline HTML page that defines style and format. The lines in-between the commands are standard HTML code. Each line is less than 80 characters.
    3. WebFOCUS reads this HTML comment and replaces it with the report output held in ORDERS2.
  2. Create a launch page from which a user can run the report. The following simple launch page is named RUNRPT.HTM and it uses the Servlet.

    Launch Page: RUNRPT.HTM

    <HTML>
    <BODY>
    <A HREF="/ibi_apps/WFServlet?IBIF_ex=orders2">Click here for the 
    Orders Summary report.</A>
    </BODY>
    </HTML>
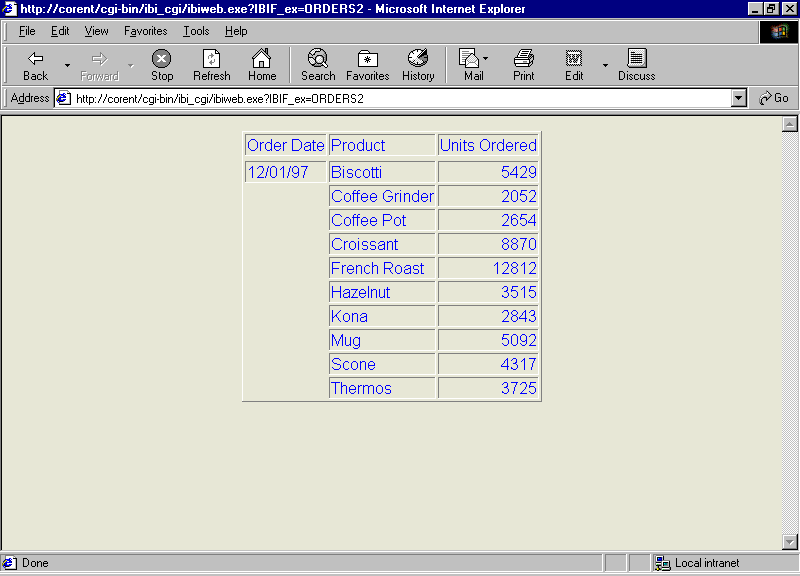
  3. Run the launch page, and click the link. The dynamic report displays on the custom inline HTML page.


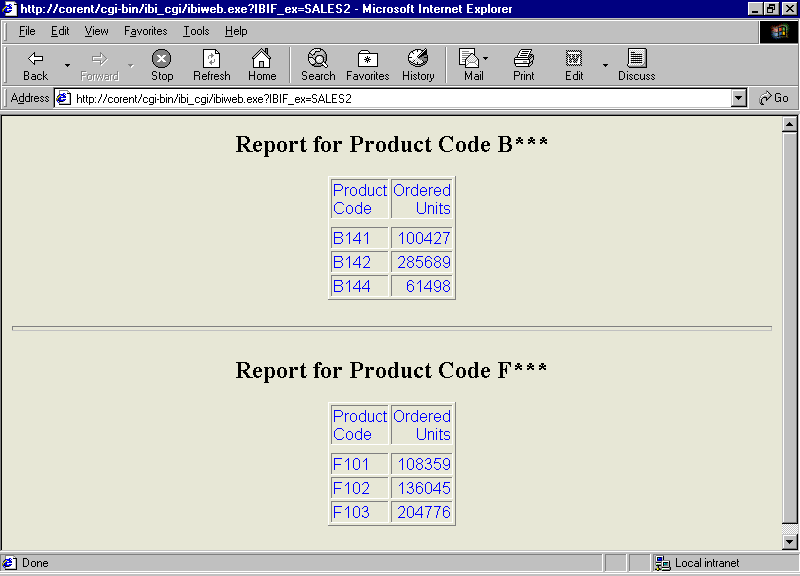
Example: Displaying Two Dynamic Reports on an Existing HTML Page

Note: For information on where to store the files created in this example, see Defining and Allocating WebFOCUS Files.

  1. Create an HTML page named FIRST.HTM. The Reporting Server must be able to locate the page using APP PATH or EDAPATH.

    The letters on the left correspond to the notes explaining the code.

    HTML Page: FIRST.HTM

        <HTML>
        <BODY BGCOLOR="#CCCCCC"> 
    a. <H2>Report for Product Code B***</H2> 
    b. <!--WEBFOCUS TABLE UPPER-->
        <HR SIZE=5> 
    a. <H2>Report for Product Code F***</H2> 
    b. <!--WEBFOCUS TABLE LOWER-->
        </BODY>
        </HTML>
    1. This text identifies the two reports on the HTML page.
    2. WebFOCUS reads these HTML comments. UPPER and LOWER are the names assigned to the virtual files in step 2. On the HTML page, WebFOCUS replaces the comments with the designated report output.

      Note: The HTML comment line must be closed with the ---> characters or a single > character and should not have any other HTML tags within it.

  2. Create a procedure named TWOSALES. The letters on the left correspond to the notes explaining the code.

    Procedure: TWOSALES.FEX

       SET PAGE-NUM = OFF
       TABLE FILE GGORDER
       SUM QUANTITY BY PCD
       IF PCD EQ 'B$$$'  
    a. ON TABLE HOLD FORMAT HTMTABLE AS UPPER
       END
       TABLE FILE GGORDER 
       SUM QUANTITY BY PCD
       IF PCD EQ 'F$$$'  
    a. ON TABLE HOLD FORMAT HTMTABLE AS LOWER
       END 
    b. -RUN 
    c. -HTMLFORM FIRST
    1. These commands generate and save the report output from each request to virtual files in HTML format. The files are named UPPER and LOWER.
    2. This command runs the report requests.
    3. This command sends the report output to the HTML page named FIRST.HTM. You create this page in step 1.
  3. Create a launch page from which a user runs the reports. The following simple launch page is called MULTIRPT.HTM and it uses the Servlet.

    Launch Page: MULTIRPT.HTM

    <HTML>
    <BODY>
    <A HREF="/ibi_apps/WFServlet?IBIF_ex=twosales">Click here for sales 
    reports for two product codes.</A>
    </BODY>
    </HTML>
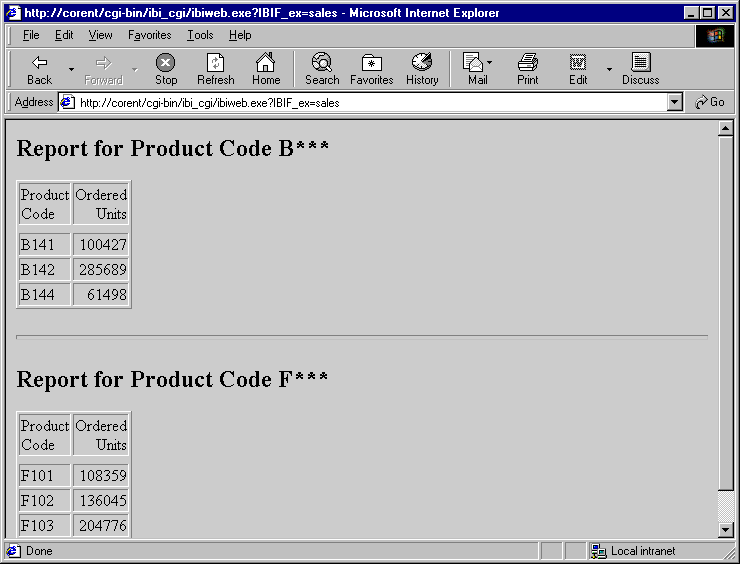
  4. Run the launch page, and click the link. The two dynamic reports display on the custom HTML page.


Example: Displaying Two Dynamic Reports on an Inline HTML Page

Note: For information on where to store the files created in this example, see Defining and Allocating WebFOCUS Files.

  1. Create a procedure named SALES2. The letters on the left correspond to the notes explaining the code.

    Procedure: SALES2.FEX

        SET PAGE-NUM = OFF
        TABLE FILE GGORDER
        SUM QUANTITY BY PCD
        IF PCD EQ 'B$$$'  
    a.  ON TABLE HOLD FORMAT HTMTABLE AS UPPER
        END
        TABLE FILE GGORDER 
        SUM QUANTITY BY PCD
        IF PCD EQ 'F$$$'  
    a.  ON TABLE HOLD FORMAT HTMTABLE AS LOWER
        END 
    b. -RUN 
    c. -HTMLFORM BEGIN
       <HTML><HEAD><STYLE>TD {FONT-FAMILY: ARIAL; COLOR:
        BLUE;}</STYLE></HEAD>
       <BODY BGCOLOR="FAEBD7"><DIV align="left">
       <H2>Report for Product Code B***</H2> 
    d. <!--WEBFOCUS TABLE UPPER-->
       <HR SIZE=5>
       <H2>Report for Product Code F***</H2> 
    d. <!--WEBFOCUS TABLE LOWER-->
       </DIV></BODY></HTML> 
    c. -HTMLFORM END
    1. These commands generate and save the report output from each request to virtual files in HTML format. The files are named UPPER and LOWER.
    2. This command runs the report requests.
    3. These commands delimit the inline HTML page that defines style and format. The lines in-between the commands are standard HTML code. Each line is less than 80 characters.
    4. WebFOCUS reads these HTML comments. UPPER and LOWER are the names assigned to the virtual files. On the HTML page, WebFOCUS replaces the comments with the designated report output.

      Note: The HTML comment line must be closed with the ---> characters or a single > character and should not have any other HTML tags within it.

  2. Create a launch page from which a user can run the reports. The following simple launch page is called MULTIRPT.HTM and it uses the Servlet.

    Launch Page: MULTIRPT.HTM

    <HTML>
    <BODY>
    <A HREF="/ibi_apps/WFServlet?IBIF_ex=sales2">Click here for sales 
    reports for two product codes.</A>
    </BODY>
    </HTML>
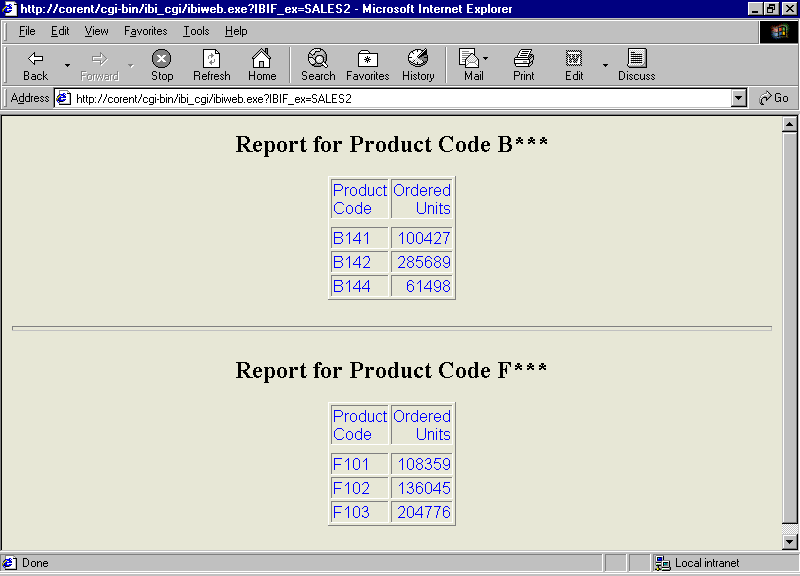
  3. Run the launch page, and click the link. The two dynamic reports display on the custom inline HTML page.


Syntax: How to Display Multiple HTML5 Charts on an HTML Page

In order for HTML5 charts (HOLD FORMAT JSCHART) to be included in -HTMLFORMs in a way that results in a valid HTML document, there must be a way to generate the output of an HTML5 graph so that it does not contain document-level HTML tags (such as, <html>, <head>, <body>). You can generate this type of chart output using the following command.

SET EMBEDDABLE = {OFF|ON}

where:

OFF

Generates complete HTML report output with document-level HTML tags. This is the default value.

ON

Generates report output in HTML format without document-level tags. This setting should be used when creating HTML5 graph output to be used with -HTMLFORM.

Note: SET EMBEDDABLE=ON also affects HTML report output and Java-based graph formats. For those formats, it is the equivalent of using HOLD FORMAT HTMTABLE.

Embeddable HTML5 graph output does not contain the <script> tags necessary to load the JavaScript code for the chart engine (since it should only be loaded once in an HTML document). You must do this in the HTML you provide with the -HTMLFORM. To do this, include the IBI.OBJ.IBIHEADJS token in the -HTMLFORM, which automatically expands into the code necessary to load all the JavaScript libraries required for its interactive report and graph features (including the chart engine).

Example: Including Two HTML5 Charts in an HTML Page

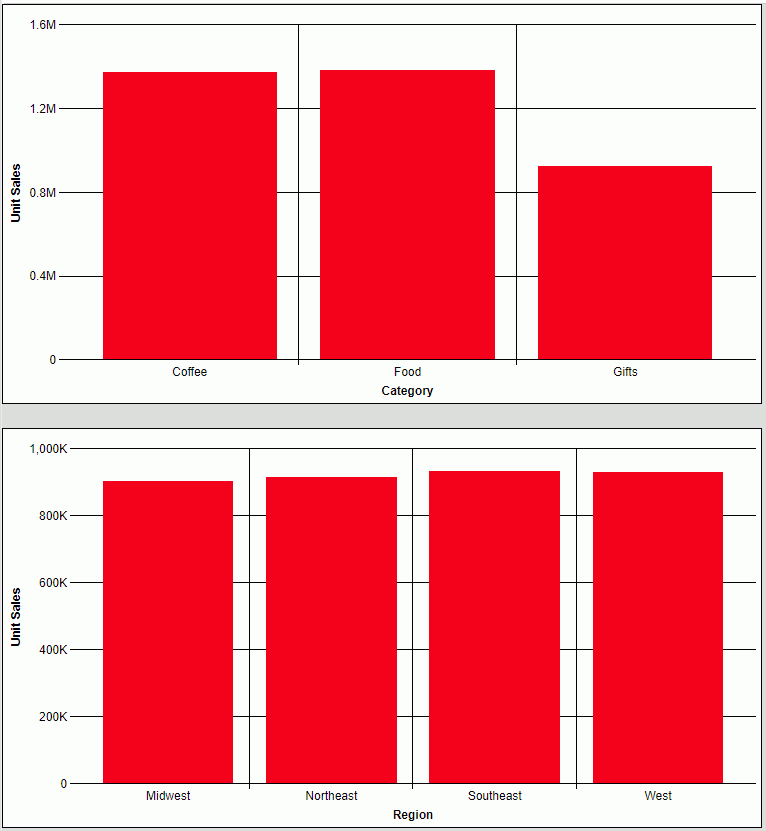
The following HTML page includes two embeddable HTML5 charts (SET EMBEDDABLE = ON). The !IBI.OBJ.IBIHEADJS token is added to the HTML <head> tag to load the JavaScript libraries needed for rendering the charts in the browser.

SET EMBEDDABLE=ON

GRAPH FILE GGSALES
SUM UNITS BY CATEGORY
ON GRAPH SET LOOKGRAPH BAR
ON GRAPH HOLD FORMAT JSCHART AS GRAPH1
ON GRAPH SET STYLE *
type=data, column=n1, bucket=x-axis, $
type=data, column=n2, bucket=y-axis, $
END

GRAPH FILE GGSALES
SUM UNITS BY REGION
ON GRAPH SET LOOKGRAPH BAR
ON GRAPH HOLD FORMAT JSCHART AS GRAPH2
ON GRAPH SET STYLE *
type=data, column=n1, bucket=x-axis, $
type=data, column=n2, bucket=y-axis, $
END

-HTMLFORM BEGIN
<html>
<head>
<title>Two HTML5 graphs in an HTMLFORM</title>
!IBI.OBJ.IBIHEADJS;
</head>
<body>
!IBI.FIL.GRAPH1;
<br>
!IBI.FIL.GRAPH2;
</body>
</html>
-HTMLFORM END

The output is shown in the following image.

Procedure: How to Display a Static Report on an Existing HTML Page

To create a procedure:

  1. Allocate the HTML file that will combine the report output and the custom HTML page.

    For example, on Windows, the command is

    FILEDEF htmlpage DISK app/htmlpage.HTM

    where:

    htmlpage

    Is the name of the combined report output and custom HTML page file. The file name can be from 1 to 8 characters.

    app\

    Is the application directory in which to save the file.

    For other platform-specific commands, see Defining and Allocating WebFOCUS Files.

  2. Include the following command
    ON TABLE HOLD FORMAT HTMTABLE AS report

    where:

    report

    Is the name of a virtual file that contains the report output. The name can be from 1 to 8 characters. Do not include an extension. This file is not saved to disk.

  3. At the end of the procedure, include the Dialogue Manager command
    -HTMLFORM filename SAVE AS htmlpage

    where:

    filename

    Is the name of the custom HTML page that will incorporate the report output. You create this page in step 2. The Reporting Server must be able to locate the page using APP PATH or EDAPATH.

    htmlpage

    Is the name of the HTML file that will combine the report output and the custom HTML page. The web server must be able to locate this file.

  4. Create the custom HTML page. Add the following comment to indicate where the output will display
    !IBI.FIL.report;

    or

    <!--WEBFOCUS TABLE report-->

    where:

    report

    Is the name of the virtual file that holds the report output. That file was created in step 1.

    Note: The HTML comment line must be closed with the ---> characters or a single > character and should not have any other HTML tags within it.

    The Reporting Server must be able to locate the page using APP PATH or EDAPATH.

    On the HTML page, WebFOCUS replaces the comment with the report output.

  5. Run the procedure from step 1 to create the static report on the custom HTML page.
  6. Create a launch page with a hyperlink that links to the report.

Example: Displaying Static Reports on an Existing HTML Page

This example runs on WebFOCUS for Windows. If you are using another platform, substitute the appropriate platform-specific command for the FILEDEF command. For more information, see Defining and Allocating WebFOCUS Files.

Note: For information on where to store the files created in this example, see Defining and Allocating WebFOCUS Files.

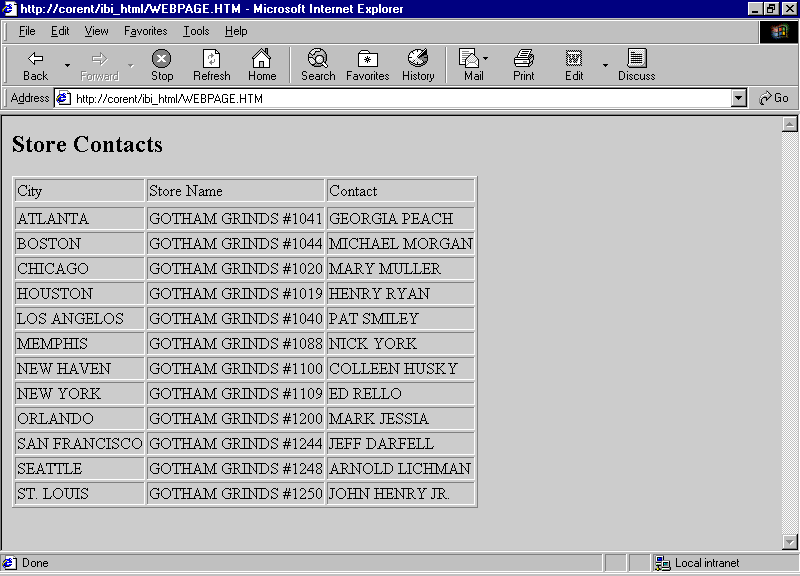
Displaying One Static Report on an Existing HTML Webpage

  1. Create a procedure named CONTACTS. The letters on the left correspond to the notes explaining the code.

    Procedure: CONTACTS.FEX

    a. FILEDEF WEBPAGE DISK APPDIR/WEBPAGE.HTM
       SET PAGE-NUM = OFF
       TABLE FILE GGSTORES
       PRINT STORE_NAME ADDRESS1
       BY CITY 
    b. ON TABLE HOLD FORMAT HTMTABLE AS AREPORT
       END 
    c. -HTMLFORM DATAOUT SAVE AS WEBPAGE
    1. This command allocates the file WEBPAGE.HTM and saves it to a directory accessible to the web server. It will combine the report output and the custom HTML page.
    2. This command saves the report output to a virtual file in HTML format. The file is named AREPORT. It is not saved on disk.
    3. This command merges the report output with the custom HTML page named DATAOUT, which you create in step 2. It also specifies a second HTML file, WEBPAGE, in which the combined HTML from the report output and the custom page are saved.
  2. Create a custom HTML page named DATAOUT.HTM. The Reporting Server must be able to locate the page using APP PATH or EDAPATH.

    HTML Page: DATAOUT.HTM

        <HTML>
        <BODY BGCOLOR="#CCCCCC"> 
    a.  <H2>Store Contacts</H2> 
    b.  <!--WEBFOCUS TABLE AREPORT-->
        </BODY>
        </HTML>
    1. This text identifies the report.
    2. WebFOCUS reads the HTML comment and replaces it with the report output held in AREPORT.

      Note: The HTML comment line must be closed with the ---> characters or a single > character and should not have any other HTML tags within it.

  3. Run the procedure CONTACTS to create the static report on the custom HTML page. One way to do this is to call the WebFOCUS Client:
    <HTML>
    <BODY>
    <A HREF="/ibi_apps/WFServlet?IBIF_ex=contacts">Click here
    to run CONTACTS and create a static report.</A>
    </BODY>
    </HTML>

    The message Done in your browser indicates that file was created.

  4. Create a launch page from which a user can run the report. This simple launch page is named ONESTAT.HTM:

    Launch Page: ONESTAT.HTM

    <HTML>
    <BODY>
    <A HREF="WEBPAGE.HTM">Click here to view store contacts.</A>
    </BODY>
    </HTML>
  5. Run the launch page, and click the link. The static report displays on the custom HTML page.


Displaying Two Static Reports on an Existing HTML Webpage

  1. Create a procedure named DEMOG. The letters on the left correspond to the notes explaining the code.

    Procedure: DEMOG.FEX

     
    a. FILEDEF RPTPAGE DISK APPDIR/RPTPAGE.HTM
       SET PAGE-NUM = OFF
       TABLE FILE GGDEMOG
       SUM HH AS 'Number of,Households' AVGHHSZ98 AS 'Avg.,Size'
       MEDHHI98 AS 'Avg.,Income'
       BY ST
       WHERE ST EQ 'CA' 
    b. ON TABLE HOLD FORMAT HTMTABLE AS UPPER
       END
       TABLE FILE GGDEMOG
       SUM HH AS 'Number of,Households' AVGHHSZ98 AS 'Avg.,Size'
       MEDHHI98 AS 'Avg.,Income'
       BY ST
       WHERE ST EQ 'NY' 
    c. ON TABLE HOLD FORMAT HTMTABLE AS LOWER
       END
       -RUN 
    d. -HTMLFORM RPTOUT SAVE AS RPTPAGE
    1. This command allocates the file RPTPAGE.HTM and saves it to a directory accessible to the web server. It will combine the report output and the custom HTML page.
    2. This command saves the output from the first request to a virtual file named UPPER.
    3. This command saves the output from the second request to a virtual file named LOWER.
    4. This command merges the report output with the custom HTML page named RPTOUT, which you create in step 2. It also specifies a second HTML file, RPTPAGE, in which the combined HTML from the report output and the custom page are saved.
  2. Create a custom HTML page named RPTOUT.HTM. The Reporting Server must be able to locate the page using APP PATH or EDAPATH.

    HTML Page: RPTOUT.HTM

        <HTML>
        <BODY BGCOLOR="#CCCCCC"> 
    a.  <H3>Demographic Report for California</H3> 
    b.  <!--WEBFOCUS TABLE UPPER-->
        <HR SIZE=5> 
    a.  <H3>Demographic Report for New York</H3> 
    b.  <!--WEBFOCUS TABLE LOWER-->
        </BODY>
        </HTML>
    1. This text identifies the two reports.
    2. WebFOCUS reads these HTML comments and replaces UPPER and LOWER with the report output.

      Note: The HTML comment line must be closed with the ---> characters or a single > character and should not have any other HTML tags within it.

  3. Run the procedure DEMOG to create the static reports on the custom HTML page. One way to do this is to call the WebFOCUS Client:
    <HTML>
    <BODY>
    <A HREF="/ibi_apps/WFServlet?IBIF_ex=demog">Click here
    to run DEMOG and create two static reports.</A>
    </BODY>
    </HTML>
  4. Create a launch page from which a user can run the reports. This simple launch page is called TWOSTATS.HTM:

    Launch Page: TWOSTATS.HTM

    <HTML>
    <BODY>
    <A HREF="RPTPAGE.HTM">Click here to view the demographic reports.</A>
    </BODY>
    </HTML>
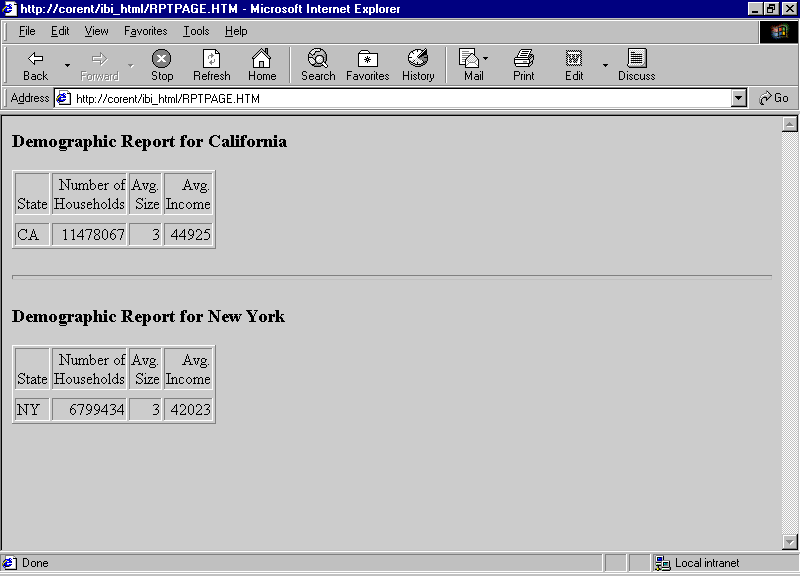
  5. Run the launch page, and click the link. The static reports display on the custom HTML page:


Displaying an Accordion By Row Report Using HOLD FORMAT HTMTABLE With -HTMLFORM

How to:

The HOLD FORMAT HTMTABLE command in conjunction with -HTMLFORM functionality supports the display of Accordion By Row (SET EXPANDBYROW, SET EXPANDBYROWTREE) reports to create an HTML page. Accordion by Column reports (SET EXPANDABLE) are not supported with -HTMLFORM.

Syntax: How to Display an Accordion By Row Report Using the HOLD FORMAT HTMLTABLE Command With -HTMLFORM

You can display one or more Accordion By Row reports on a custom HTML page by creating the report with the SET EXPANDBYROW command, specifying HOLD FORMAT HTMTABLE, and then using the Dialogue Manager command -HTMLFORM.

Include the following commands in the procedure:

ON TABLE SET {EXPANDBYROW|EXPANDBYROWTREE} ON
ON TABLE HOLD FORMAT HTMTABLE AS report

where:

report

Is the 1-character to 8-character name of a virtual file that contains the report output.

Running this report creates an output file that contains only the report data. In order to display the output as an HTML Accordion By Row report, the following JavaScript code must be included in the HTML by using the following syntax and placement:

IBI.OBJ.EXPBYROWJS

Is the JavaScript for HTML Accordion report functionality. Must be coded in the -HTMLFORM after the <HTML tag> and before the <BODY> tag.

<div id="IBI_popupHere"></div>

Is required prior to display of the first Accordion report (using !IBI.FIL.filename) for display of pop-up column title description.

!IBI.OBJ.IBIGBLONLOAD

Is the JavaScript that requests the load of the global environment setup for WebFOCUS HTML reports. Must be coded within the <BODY> tag before the comment line (!IBI.FIL.report) that indicates where to display the first HTML report as:

 <BODY ONLOAD='!IBI.OBJ.IBIGBLONLOAD';>
!IBI.OBJ.IBIGBLJS

Is the JavaScript for global environment setup for WebFOCUS HTML reports. Must be coded after the comment line (!IBI.FIL.report) that indicates where to display the last HTML report, and before the closing </HTML> tag.

Example: Displaying Two HTML Accordion Reports on an HTML Webpage

The following request contains two Accordion By Row reports, RPT1 and RPT2, saved as format HTMTABLE. The -HTMLFORM block contains all of the JavaScript code to display them on an HTML page.

TABLE FILE GGSALES
HEADING
"Regional Budget and Sales Report"
" "
SUM BUDUNITS UNITS BUDDOLLARS DOLLARS
BY REGION
BY ST
BY CATEGORY
BY PRODUCT
ON TABLE HOLD AS RPT1 FORMAT HTMTABLE 
ON TABLE SET EXPANDBYROW ON 
ON TABLE SET HTMLCSS ON
ON TABLE SET DROPBLNKLINE ALL
ON TABLE SET STYLE *
TYPE=REPORT,COLOR=NAVY,FONT='ARIAL',SIZE=9,GRID=OFF,$
TYPE=HEADING,LINE=1,STYLE=BOLD,SIZE=12,JUSTIFY=CENTER,$
TYPE=TITLE,BACKCOLOR=RGB(45 111 205),COLOR=WHITE,STYLE=-UNDERLINE+BOLD, $
TYPE=DATA,BACKCOLOR=(WHITE RGB(235 235 255)),$
TYPE=SUBTOTAL,BACKCOLOR=RGB(163 200 236),STYLE=BOLD,$
END
TABLE FILE GGSALES
HEADING
"Product Category Sales Report"
" "
SUM GGSALES.SALES01.DOLLARS
GGSALES.SALES01.BUDDOLLARS
BY GGSALES.SALES01.CATEGORY
BY GGSALES.SALES01.REGION
BY GGSALES.SALES01.ST
ON TABLE HOLD AS RPT2 FORMAT HTMTABLE 
ON TABLE SET EXPANDBYROW ON 
ON TABLE SET HTMLCSS ON
ON TABLE SET PAGE-NUM NOLEAD
ON TABLE SET SQUEEZE ON
ON TABLE SET EMPTYREPORT ON
ON TABLE SET DROPBLNKLINE ALL
ON TABLE SET STYLE *
TYPE=REPORT,COLOR=NAVY,SQUEEZE=ON,FONT='ARIAL',SIZE=9,GRID=OFF,$
TYPE=HEADING,LINe=1,STYLE=BOLD,SIZE=12,JUSTIFY=CENTER,$
TYPE=TITLE,BACKCOLOR=RGB(45 111 205),COLOR=WHITE,STYLE=-UNDERLINE+BOLD, $
TYPE=DATA,BACKCOLOR=(WHITE RGB(235 235 255)),$
TYPE=SUBTOTAL,BACKCOLOR=RGB(163 200 236),STYLE=BOLD,$
END
-HTMLFORM BEGIN
<HTML>!IBI.OBJ.EXPBYROWJS; 
<BODY ONLOAD='!IBI.OBJ.IBIGBLONLOAD;'> 
<font face="arial" color="blue"><b>This HTML page is created with -HTMLFORM and displays <br> two Accordion By Row (SET EXPANDBYROW) Reports</b>
<br></br>
</font> 
<div id="IBI_popupHere"></div> 
!IBI.FIL.RPT1;  
<br></br>  
!IBI.FIL.RPT2;
!IBI.OBJ.IBIGBLJS; 
</BODY>
</HTML>
-HTMLFORM END

The output is:

Displaying an HTML HFREEZE Report Using HOLD FORMAT HTMTABLE and -HTMLFORM

How to:

You can display one or more HTML HFREEZE reports on a custom HTML page by creating the report with the HFREEZE=ON styling attribute, adding the HOLD FORMAT HTMTABLE command, and then using the Dialogue Manager command -HTMLFORM.

Syntax: How to Display an HTML HFREEZE Report Using HOLD FORMAT HTMTABLE and -HTMLFORM

Include the following command in the report request:

ON TABLE HOLD FORMAT HTMLTABLE AS report

Also, include the following in the StyleSheet section of the request:

ON TABLE SET STYLE *
TYPE=REPORT, HFREEZE=ON,$

where:

report

Is the 1 to 8 character name of a virtual file that will contain the report output.

Running this report creates an output file that contains only the report data. In order to display the output as an HTML HFREEZE report, the following JavaScript code must be included in the HTML by using the following syntax and placement:

!IBI.FIL.report

Is required as a placeholder to indicate the positioning or placement of the report on the HTML page.

!IBI.OBJ.IBIHEADJS

Is placed in the <HEAD> tag of the HTML page.

Example: Displaying Two HTML HFREEZE Reports Using HOLD FORMAT HTMTABLE and -HTMLFORM

The following FOCEXEC creates and displays two HFREEZE reports in an HTML page created with -HTMLFORM . The first two TABLE requests create the HFREEZE reports (styling code specifies HFREEZE=ON) that are saved to the Reporting Server with ON TABLE HOLD FORMAT HTMLTABLE:

-*Example: Displaying Two HTML HFREEZE Reports on an HTML Web Page
-*
TABLE FILE GGSALES
HEADING CENTER
"Regional Sales Report"
SUM DOLLARS BUDDOLLARS
BY CATEGORY
BY PRODUCT
BY REGION
BY ST
BY CITY
ON REGION SUBTOTAL
FOOTING CENTER
"*** Scroll To See All Data ***" 
ON TABLE HOLD AS TOPRPT FORMAT HTMTABLE 
ON TABLE SET HTMLCSS ON
ON TABLE SET PAGE-NUM NOLEAD
ON TABLE SET SQUEEZE ON
ON TABLE SET EMPTYREPORT ON
ON TABLE SET BYDISPLAY ON
ON TABLE SET STYLE *
TYPE=REPORT,COLOR=NAVY,SQUEEZE=ON,FONT='ARIAL',SIZE=9,GRID=OFF,$ 
TYPE=REPORT,HFREEZE=ON,SCROLLHEIGHT=2.25, $ 
TYPE=HEADING,STYLE=BOLD,SIZE=12,JUSTIFY=CENTER,$
TYPE=FOOTING,STYLE=BOLD,SIZE=10,JUSTIFY=CENTER,$
TYPE=TITLE,BACKCOLOR=RGB(45 111 205),COLOR=WHITE,STYLE=-UNDERLINE+BOLD, $
TYPE=DATA,BACKCOLOR=(WHITE RGB(235 235 255)),$
TYPE=SUBTOTAL,BACKCOLOR=RGB(163 200 236),STYLE=BOLD,$
TYPE=SUBTOTAL,BORDER-TOP=LIGHT,BORDER-TOP-COLOR=RGB(111 155 246),$
END
TABLE FILE GGSALES
HEADING CENTER
"Regional Sales Report"
SUM GGSALES.SALES01.DOLLARS
GGSALES.SALES01.BUDDOLLARS
BY GGSALES.SALES01.CATEGORY
BY GGSALES.SALES01.ST
BY GGSALES.SALES01.REGION
ON REGION SUBTOTAL
FOOTING CENTER
"*** Scroll To See All Data ***" 
ON TABLE HOLD AS BOTRPT FORMAT HTMTABLE 
ON TABLE SET HTMLCSS ON
ON TABLE SET PAGE-NUM NOLEAD
ON TABLE SET SQUEEZE ON
ON TABLE SET EMPTYREPORT ON
ON TABLE SET BYDISPLAY ON
ON TABLE SET STYLE *
TYPE=REPORT,COLOR=NAVY,SQUEEZE=ON,FONT='ARIAL',SIZE=9,GRID=OFF,$ 
TYPE=REPORT,HFREEZE=ON,SCROLLHEIGHT=2.25, $ 
TYPE=HEADING,STYLE=BOLD,SIZE=12,JUSTIFY=CENTER,$
TYPE=FOOTING,STYLE=BOLD,SIZE=10,JUSTIFY=CENTER,$
TYPE=TITLE,BACKCOLOR=RGB(45 111 205),COLOR=WHITE,STYLE=-UNDERLINE+BOLD, $
TYPE=DATA,BACKCOLOR=(WHITE RGB(235 235 255)),$
TYPE=SUBTOTAL,BACKCOLOR=RGB(163 200 236),STYLE=BOLD,$
TYPE=SUBTOTAL,BORDER-TOP=LIGHT,BORDER-TOP-COLOR=RGB(111 155 246),$
END
-HTMLFORM BEGIN
<HTML> 
<HEAD>!IBI.OBJ.IBIHEADJS;
</HEAD> 
<BODY>
<font face="arial" color="blue" ><b>This HTML page is created with -HTMLFORM displaying two HFREEZE reports</b> 
<br></br>
HTMLTABLE data from TOPRPT HOLD file </font>
!IBI.FIL.TOPRPT;
<font face="arial" color="blue">HTMLTABLE data from BOTRPT HOLD file</font>
!IBI.FIL.BOTRPT; 
</BODY>
</HTML>
-HTMLFORM END

The generated HTML page with the two reports is:
Displaying an Active Technologies Report Using HOLD format AHTMLTAB and -HTMLFORM

You can display one or more HTML Active Technologies Reports on a custom HTML page using HOLD FORMAT AHTMLTAB and the Dialogue Manager command -HTMLFORM.

Include the following command in the procedure:

ON TABLE HOLD FORMAT AHTMLTAB AS report

where:

report

Is the name of a virtual file that contains the report output. The name can be from 1 to 8 characters.

Running this report creates an output file that contains only data and parameters used in the HTML active report. In order to display the output as a complete HTML active report, active report JavaScript code must be included in the HTML BODY by using the following syntax:

<BODY>
!IBI.OBJ.ACTIVEREPORTJS;

Example: Displaying HTML Active Technologies Reports on an HTML Webpage

The HTML code to include active technologies report JavaScript is shown in boldface type in the following example:

TABLE FILE GGSALES
SUM
  DOLLARS
  UNITS
BY REGION
BY ST
BY CITY
HEADING
"Regional Sales Summary"
ON TABLE HOLD AS REPORT1 FORMAT AHTMLTAB
END
-*
TABLE FILE GGSALES
SUM
  DOLLARS
  UNITS
BY CATEGORY
BY PRODUCT
HEADING
"Production Order Summary"
ON TABLE HOLD AS REPORT2 FORMAT AHTMLTAB
END
-*
-HTMLFORM BEGIN
<!DOCTYPE html>
<HTML>
<HEAD>
<TITLE>Displaying HTML Active Technologies Reports on an HTML Web Page</TITLE>
</HEAD>
<BODY> 
!IBI.OBJ.ACTIVEREPORTJS;
<TABLE BORDER='1'>
 <TR>
  <TD valign=top>
!IBI.FIL.REPORT1;
  </TD>
  <TD valign=top>
!IBI.FIL.REPORT2;
  </TD>
 </TR>
</TABLE>
</BODY>
</HTML>
-HTMLFORM END

Displaying Multi-Drill Menu Items Using -HTMLFORM

You can display multiple menu items on a custom HTML page by creating the report with the DRILLMENUITEM styling attribute.

To define individual menus and items attached to a report node or data element, include the following in the procedure:

TYPE=type [,subtype] [,DRILLMENUITEM='description', action|'keyword']
  [,NAME=name] [,PARENT=parentname], 

where:

type

Identifies the report component that you select in the web browser to execute the link. The TYPE attribute and its value must appear at the beginning of the declaration.

subtype

Are any additional attributes, such as COLUMN, LINE, or ITEM, that are needed to identify the report component that you are formatting.

Each DRILLMENUITEM item must have a description or a keyword pair. Descriptions without actions will automatically be inactive by default.

The exception to this rule will be parent items containing children entries linked with the NAME/PARENT pairing. In this instance, the action will be to present the children in the cascading menu.

description

Is the text that appears on the pop-up menu of drill-down options on the report output. The default value is DrillDown n, where n is a consecutive integer, such as DrillDown 1, DrillDown 2, and so on.

Note:

  • If DRILLMENUITEM is set to the special value 'SEPARATOR':
    • A horizontal separator line will be drawn using the styling and color attributes defined for the menu borders at the location within the menu.
    • A separator cannot be associated with an action.
  • The DRILLMENUITEM value cannot be empty or blank.
action

Is the type of link. For example, a link to a detail report or URL.

The following attributes are optional. They are only required for cascading menus where a hierarchy must be defined.

name

An optional unique identifier for the current item to use as a link between parent and children items. Only required if this node serves as a parent to children menu items where a link must be identified.

parentname

An optional unique identifier/name of the parent menu item for the current child item. Only required if this node serves as a parent to another item in the hierarchy.

Example: Displaying Multi-Drill Menu Items Using -HTMLFORM

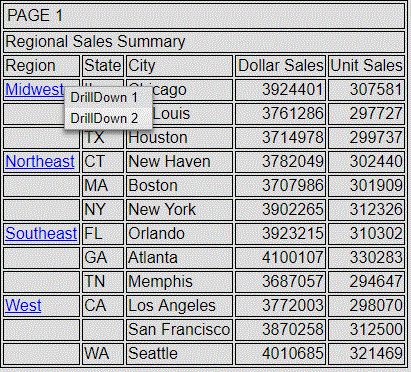
The following example illustrates how to use the DRILLMENUITEM StyleSheet attribute to drill down to two URL links.

SET POPUPDESC=ON
TABLE FILE GGSALES
SUM DOLLARS UNITS
BY REGION BY ST BY CITY
HEADING
"Regional Sales Summary"
ON TABLE SET STYLE *
TYPE=DATA, COLUMN=N1,
DRILLMENUITEM='DrillDown 1', URL=http://www.ibi.com,
DRILLMENUITEM='DrillDown 2', URL=http://support.ibi.com,$
ENDSTYLE
ON TABLE HOLD FORMAT HTMTABLE
END
-HTMLFORM BEGIN
<html>
<BODY>
<head> <title>Displaying Drilldown Menu Items Using -HTMLFORM</title>
!IBI.OBJ.IBIHEADJS;</head>
!IBI.FIL.HOLD;
</BODY>
</html>
-HTMLFORM END

The output is:

Using HOLD FORMAT XML and -HTMLFORM

Running a report which creates a HOLD FORMAT XML that is called by -HTMLFORM requires additional code to avoid generating an empty HOLD file and an error condition. Add two lines of FILEDEF code, shown in boldface type in the following example:

TABLE FILE GGORDER
SUM QUANTITY
ON TABLE HOLD FORMAT XML
END
-RUN 
FILEDEF HOLD CLEAR
FILEDEF HOLD DISK HOLD.XML   
-HTMLFORM BEGIN
!IBI.FILE.HOLD;
-HTMLFORM END