Using Data Source Stacks in Procedures

How to:

Reference:

A data source stack is a non-persistent (or in-memory) array where you can store and manipulate data from one or more data sources. In the Maintain Data language, you use data source stacks to hold values you read from the data source and manipulate data before writing it back to the data source. You can think of a data source stack as a staging area in memory in which you can manipulate data before committing it to the data source or displaying it to the user.

To use a data source stack, first create one using the Stack Editor, or by editing the procedure as text and typing the appropriate syntax. The columns of a stack are usually based on actual data source fields, but you can also add your own columns.

Fill the data source stack with data from one or more data sources. You can then use a form to display the stack data to the user. The user has the option of changing this data. WebFOCUS App Studio Maintain Data stores the changes in the data source stack until the application issues an UPDATE command to update the data source.

There are two ways to create a data source stack:

For more information, see the WebFOCUS App Studio Maintain Data Language Reference content.

Note: When you use a data source field as a column in a data source stack, WebFOCUS App Studio Maintain Data defines columns based on the rest of the fields in that data source or, if your data source is hierarchical, the rest of the fields in the segment and the key fields in any parent segment. These columns are called implied columns. Maintain Data includes all of these fields in your data source stack so that when you update your data source from the data source stack, it knows the path to these fields.

Procedure: How to Create a Data Source Stack Explicitly Using the Stack Editor

  1. Ensure that all the data sources you want to reference in this stack are being used by the procedure.
  2. Select the procedure that you want the data source stack to be part of.
  3. Right-click Stacks under the procedure and click New data source stack.
  4. In the Stack Editor dialog box, type a name for your data source stack.
  5. Define the columns that make up the data source stack. There are two ways to do this (you can use one or both):
    • Base the columns on actual fields in your data source. Select a field under the list of data sources in the Available fields list and click the right arrow button.
      Note:
      • If no data sources appear in the Available fields list, you must specify which ones to use in your procedure.
      • When you copy one of the fields in a segment into the definition of a stack, WebFOCUS App Studio Maintain Data automatically copies all of the rest of the fields in that segment and the key fields from the ancestor segments. These columns are called implied columns.
    • Create custom (user-defined) columns. You can use custom columns as temporary work areas or to create calculated fields, such as Name = First || Last. Under the Variables folder, click New Variable. In the Computed Stack Columns dialog box under the Declaration tab, type a name and type for the new column and then click OK. Repeat these steps, until all of your columns have been defined.
  6. Click the Description tab and type a description (Optional).
  7. Click OK.

    WebFOCUS App Studio Maintain Data creates an entry for your new data source stack in the Project Explorer under the procedure. When you open it, you see the columns that define the data source stack.

    Tip. You can create a data source stack based on the fields in a data source segment by dragging the data source segment to the procedure in which you want to create the data source stack. WebFOCUS App Studio Maintain Data prompts you for the name of the data source stack in the Create New Stack dialog box. Creating a data source stack this way also uses the data source in the procedure, if you have not specified it already.

Reference: Stack Editor: Definition Tab
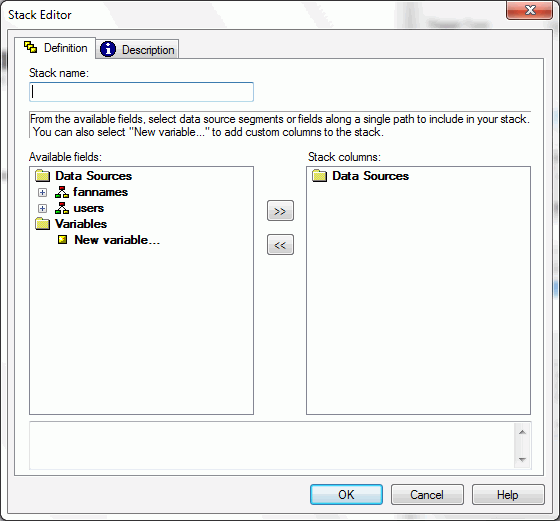
When you create or edit a data source stack, WebFOCUS App Studio Maintain Data opens the Stack Editor dialog box, as shown in the following image.
Maintain Stack Editor Dialog Box
This dialog box includes the following options:
Stack name

Is the name of the stack.

Available Fields

Lists the data sources that you have specified for use in this procedure. To define columns for the data source stack, either use existing fields from the data sources or create new ones by clicking New variable.

Arrow buttons

The forward arrow buttons copy a selected parameter or field into the list of data source stack columns.

The back arrow buttons remove a selected column from the list of data source stack columns.

Stack columns

Contains the columns that you have defined for your data source stack.

When you use a data source field to define a stack, WebFOCUS App Studio Maintain Data defines columns for all of the rest of the fields in the data source. If your data source is hierarchical, WebFOCUS App Studio Maintain Data defines columns for the rest of the fields in the segment, and the key fields from parent segments. These are the implied columns.

Generated code

Contains the Maintain Data language code generated by the Stack Editor dialog box for your data source stack. This can take the form of Infer datasource.segment.field into stack and/or Compute stack.column/format.
Reference: Using the Type Wizard

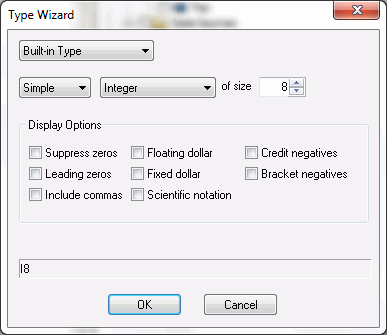
When you create a variable or define an argument or return variable, you must assign a data type to it. A data type is either a format or a class and can be assigned using the Type Wizard. There are two kinds of data types: Built-in Type (or format) and User-defined Class.

Maintain Type Wizard

If you choose Built-in Type, you have three basic formats:

  • Alphanumeric. For values composed of alphabetic, numeric, or special characters.
  • Date. For dates or components.
  • Numeric. For values composed of the digits zero (0) through nine (9) and, optionally, a minus sign (-). You have the following choices:
    • Double Precision. For whole numbers or fractions, using eight (8) bytes of storage and a maximum number of 15 positions. This type of field automatically inserts a comma (,) after every third significant digit.
    • Floating Point. For whole numbers or fractions using four (4) bytes of storage and maximum number of nine (9) positions.
    • Integer. For whole numbers using four (4) bytes of storage and maximum number of nine (9) positions. Numbers after the decimal are truncated.

If you choose Class, you must already have defined a class. For more information, see the WebFOCUS App Studio Maintain Data Language Reference content.

Note: The Type Wizard does not create specifications for the following data types: date-time, packed-decimal, and text. You must manually enter the specification in the data type field. For more information on specifying packed-decimal or text, see the Describing Data With WebFOCUS Language content.