Working With the Environments Tree Panel

In this section:

Reference:

The Environments Tree panel is the primary navigational aide in WebFOCUS App Studio. Using it, you can always stay oriented to the Workspace or web application that you are working in. You can use the panel to move or copy objects between folders, copy folders, share content with other WebFOCUS App Studio users, or hide content.

From the Environments Tree panel, you can:

The Environments Tree panel is shown in the following image.

The Environments Tree panel opens with App Studio.

Reference: Environments Tree Toolbar

The Environments Tree toolbar contains the buttons and menus that you need to navigate, filter, and sort the information that appears in the Configured Environments tree.

View Options

Presents options for viewing items (for example, alphabetical sorting or grouping), as described in the following table.

Option

Name

Function

View items sorted in Alphabetical order

Sorts the files alphabetically from A to Z.

View items sorted in reverse Alphabetical order

Sorts the files alphabetically from Z to A.

View items sorted in Chronological order

Sorts the files by the last saved time, in descending order.

View items sorted in reverse Chronological order

Sorts the files by the saved time, in ascending order.

View Items grouped by File Type

Sorts the files by file type.

Respect Sort Order Property

Respects the Sort Order property value specified in the File/Folder Properties panel. This is the default.

View items by Title

Displays the files by title and sorts the files by title. If an item does not have a title, its name is shown.

View items by Name

Displays the files by name and sorts the files by name. If an item does not have a title, its name is shown.

Refresh View

Refreshes all of the files and folders that you see in the Configured Environments tree. Refresh View also shows the dependencies of the file or folder that you have selected.

Show All Content files

Filters the tree to show all content file types, except for Master Files. To view Master Files, click Show only Master files.

Show only Procedure files

Filters the tree to show only this file type.

Show only Master files

Filters the tree to show only this file type.

Show only HTML files

Filters the tree to show only this file type.

Show only Maintain files

Filters the tree to show only this file type.

Show only Image files

Filters the tree to show only this file type.

Show only ReportCaster files

Filters the tree to show only this file type.

Show only Library files

Filters the tree to show only this file type.

Other files

Filters the tree to show other file types.

Viewing Nodes in the Configured Environments Tree

Reference:

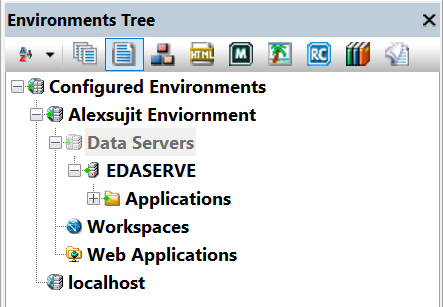
The Configured Environments tree displays the WebFOCUS Environments, Data Servers, Workspaces, and Web Applications nodes. These are the development areas where you can create content. If you have the Managed Reporting version of WebFOCUS App Studio and WebFOCUS installed on your machine, or configured a remote WebFOCUS 8 environment, a workspace node also appears.

If a node under the Configured Environments Tree has been populated and contains content, a green dot is shown on the node icon. If a node has been populated and does not contain any content, a red dot is shown on the node icon. If a node has not been populated, WebFOCUS App Studio does not know if there is any content in that node and no dot is shown on the node icon. If you create a new content in a node with a red dot on it, that node now has content in it and will change to a green dot. If you delete all content in a node with a green dot, that node now has no content in it and will change to a red dot.

Note: By default, the Configured Environments tree sorts files and folders by title. If you change the sorting options to View Items by Name, the names of your files and folders will display. Whether you display content by title or by name, the Workspaces, Data Servers, and Web Applications nodes do not display differently.

You can expand the nodes on the Configured Environments tree to view your configured environments, folders, and application files. Use the filtering commands on the toolbar to sort files alphabetically, display by name or title, or include the associated paths.

From the Configured Environments tree, you can manage content for each of your WebFOCUS environments. This includes creating new folders or files, opening existing files, and copying files. Right-click a node, folder, or file to view the shortcut menu of options. You can also open files by double-clicking them.

You can also use the Refresh Descendants option to refresh a specific application or folder. Right-click the application or folder that you want to refresh, and then click Refresh Descendants.

Note:

You can copy files from your desktop to the Configured Environments Tree.

From the Configured Environments node, you can access the following shortcut menu option:
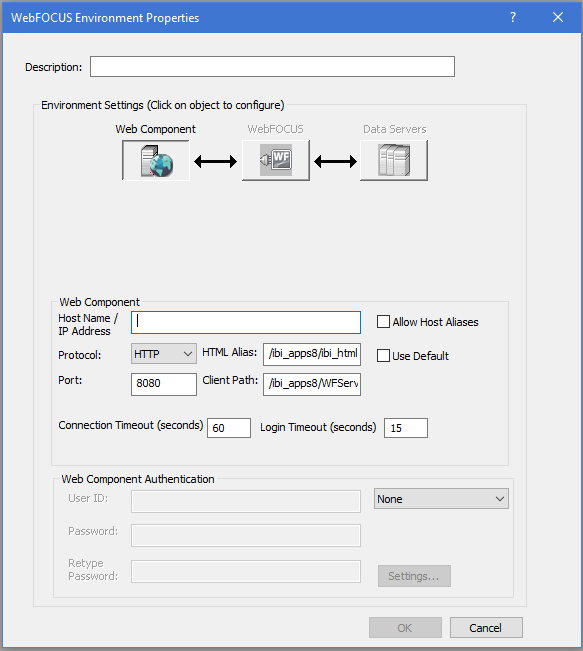
From your WebFOCUS environment, in the Environments Tree panel, you can access the following shortcut menu options:

Note: You can copy files that are not in WebFOCUS App Studio and paste them in the Configured Environments tree to use those files when creating your application.

Reference: Data Servers

The Data Servers node lists each Reporting Server that the WebFOCUS Client can access. This node expands to display the files that you can use to develop WebFOCUS applications successfully.

The process of populating the application paths of the files in the Data Servers node is done on a background thread. While this background thread is running, you can navigate on the tree, open a folder, and create files. However, you will be unable to save a new file, or do anything that requires a path list, such as create a new style sheet, until the background thread completes. This section of the Configured Environments tree, which is visible, will populate.

From a data server, you can access the following shortcut menu options:

  • Manage Adapters. Opens the Select Server Node dialog box from which you can configure a new adapter or edit the settings of an existing adapter.
  • Refresh Descendants. Refreshes the contents of the application or folder in the Configured Environments tree to omit deleted files, and show new files and file information, such as date, time, and size.

From the Workspaces folder, you can access the following shortcut menu options:

  • New Application. Creates a new application folder.
  • Configure Application Path. Opens the Application Path dialog box from which you can create applications, add applications to the search path, map and reorder applications, delete applications or mappings from the path.
  • Refresh Descendants. Refreshes the contents of the application or folder in the Configured Environments tree to omit deleted files, and show new files and updated file information, such as date, time, and size.

From an application folder or a file, you can access the following shortcut menu options:

  • New. Creates a new folder or file. The following shortcut menu options are available when pointing to New:
    • Procedure. Creates a new procedure folder in your current application folder.
    • Reporting. Expands a submenu containing the following options.
      • Report. Creates a new report.
      • SQL Report. Creates a new SQL report.
    • HTML/Document. Creates a new HTML page or document.
    • InfoAssist. Expands a submenu containing the following options.
      • Chart. Creates a new chart using the Chart canvas.
      • SQL Chart. Creates a new SQL chart.
    • Text Editor. Expands a submenu containing the following options.
      • WebFOCUS StyleSheet. Creates a template WebFOCUS StyleSheet.
      • Text Document. Creates a text document. You can use the Add Comment or Remove Comment commands to comment on the file.
    • Folder. Creates a new folder in your current Workspaces folder.
  • Duplicate. Creates a copy of the selected file or folder in the Data Servers node.

    If you duplicate a folder, all contents, except for portals, are also duplicated.

  • Copy. Copies the selected file or folder to the clipboard where you can paste it to a different node.

    If you copy a folder, all contents, except for portals, are also copied.

  • Paste. Pastes the cut or copied file or folder.
  • Rename. Changes the name of the selected folder or file.
  • Delete. Deletes the selected folder or file. You will be prompted to confirm your deletion. Click No if you do not want to delete an item, or click Cancel to abort the delete operation. If you choose to abort the delete operation while deleting a list of items, Cancel will prevent all subsequent items from being deleted.
  • Properties. Displays the folder properties in the Data Servers node.
  • Refresh Descendants. Refreshes the contents of the application or folder in the Configured Environments tree to omit deleted files, and show new files and updated file information, such as date, time, and size.

Reference: Workspaces

The Workspaces node is storage space for data or information, and allows you to use App Studio to administer and develop against a Managed Reporting environment. The Workspaces node lets you manage resources and applications on remote servers, as well as on your local machine if you have performed a full installation of App Studio. You can create and edit application files on all remote servers from one easily accessible interface. You can also create and administer reports for Managed Reporting from a Windows application rather than a web browser.

From a Workspaces node, you can access the following shortcut menu options:

  • Impact Analysis. Enables you to generate a list that identifies the procedures that access a specific Master File or field within a Master File.
  • New Folder. Creates a new folder in the specified Workspaces node.

    Note: Using this option is not the same as creating a new Workspace.

    To create a new workspace, use the BI Portal New - Enterprise Domain option. This option triggers the workspace template, which creates workspace-specific user groups and sub-folders such as My Content. For more information, see the WebFOCUS Business Intelligence Portal manual.

    Using the New Folder option in WebFOCUS App Studio does not trigger the workspace template.

  • Physical View or Shared View. Enables you to toggle between the two. Shared View displays all folders (including empty folders) in the hierarchy that includes shared content. Physical View suppresses empty folders in the hierarchy that includes shared content. Physical View displays all folders that contain shared content.
  • Mode Manager. Allows you to edit private files, if you have the proper authorization setting.
  • Refresh Descendants. Refreshes the contents of the application or folder in the Configured Environments tree to omit deleted files, and show new files and updated file information, such as date, time, and size.

From a folder or file, in the Workspaces node, you can access the following shortcut menu options:

  • Impact Analysis. Enables you to generate a list that identifies the procedures that access a specific Master File or field within a Master File.
  • New. Creates a new folder or file. The following shortcut menu options are available when pointing to New:
    • Procedure. Creates a new procedure folder or file in your current application folder.
    • Reporting. Expands a submenu containing the following options.
      • Report. Creates a new report.
      • SQL Report. Creates a new SQL report.
    • HTML/Document. Creates a new HTML page or document.
    • InfoAssist. Expands a submenu containing the following options.
      • Chart. Creates a new chart using the Chart canvas.
      • SQL Chart. Creates a new SQL chart.
      • Visualization. Creates a new visualization.
      • Alert. Creates a new alert.
    • Text Editor. Expands a submenu containing the following options.
      • JavaScript File. Creates a new JavaScript file from which you can create original JavaScript.
      • Cascading Style Sheet. Creates a new cascading style sheet.
      • WebFOCUS StyleSheet. Creates a new WebFOCUS StyleSheet.
      • Text Document. Creates a new text document.
    • Folder. Creates a new folder.
  • Publish/Unpublish. Allows or suppresses public access to every file within the selected folder. Multiple folders can be selected at one time by pressing the Ctrl key while selecting the desired folders.
  • Hide/Show. Hides or shows every file in the selected folder, to users who are permitted to access the folder. Multiple folders can be selected at one time by pressing the Ctrl key while selecting the desired folders. You can specify which users can see this content by changing the Do not show on user’s list property in the File/Folder Properties panel.
  • Duplicate. Creates a copy of the selected file or folder in the Workspaces node.
  • Copy/Paste. Copies or pastes a folder or file.

    If you copy a folder, all contents, except for portals, are also copied.

  • Rename. Changes the name of the selected folder or file.

    To ensure that all instances of the original name and references are updated, it is recommended that you use the Save As option to rename an HTML page.

  • Delete. Deletes the selected folder or file. You will be prompted to confirm your deletion. Click No if you do not want to delete an item, or click Cancel to abort the delete operation. If you choose to abort the delete operation while deleting a list of items, Cancel will prevent all subsequent items from being deleted.
  • Source Control. Enables Source Control for the folder or file.
  • Properties. Displays the folder properties in the Workspaces node.
  • Refresh Descendants. Refreshes the contents of the application or folder in the Configured Environments tree to omit deleted files, and show new files and updated file information, such as date, time, and size.

Note: For more information on publishing and unpublishing folders and items within the workspaces, see the TIBCO WebFOCUS® Security and Administration manual.

Reference: Web Applications

The Web Applications node allows you to open files with the Text Editor, or the mode you used to create them.

Note: Based on the file type, different options may display.

From the Web Applications node, you can access the following shortcut menu options:

  • New Application. Creates a new application folder.
  • Refresh Descendants. Refreshes the contents of the application or folder in the Configured Environments tree to omit deleted files, and show new files and updated file information, such as date, time, and size.

From an application folder, you can access the following shortcut menu options:

  • Rename. Changes the name of the selected folder or file.
  • Delete. Deletes the selected application folder. You will be prompted to confirm your deletion. Click No if you do not want to delete an item, or click Cancel to abort the delete operation. If you choose to abort the delete operation while deleting a list of items, Cancel will prevent all subsequent items from being deleted.
  • Copy/Paste. Copies the selected folder and its contents to the clipboard, allowing you to paste it.
  • New. Creates a new file. The following shortcut menu options are available when pointing to New:
    • HTML File. Creates a page in html format. You can import existing HTML content, as well.
    • JavaScript File. Creates a new JavaScript file from which you can create original JavaScript.
    • Cascading Style Sheet. Creates a base template from which you can create a unique cascading style sheet (CSS).
    • Folder. Creates a new folder.
  • Properties. Displays the folder properties in the File/Folder Properties panel.
  • Refresh Descendants. Refreshes the contents of the application or folder in the Configured Environments tree to omit deleted files, and show new files and updated file information, such as date, time, and size.

From a file, you can access the following shortcut menu options:

  • Open. Opens the file.
  • Open in Text Editor. Opens the file in a text editor.
  • Edit in Windows Associated Tool. Edits the file in your Windows associated tool.
  • Print. Prints the file.
  • New. Creates a new file. The following shortcut menu options are available when pointing to New:
    • HTML File. Creates a page in .html format. You can import existing HTML content, as well.
    • JavaScript File. Creates a new JavaScript file from which you can create original JavaScript.
    • Cascading Style Sheet. Creates a base template from which you can create a unique cascading style sheet (CSS).
  • Duplicate. Creates a copy of the selected file in the Web Applications node.
  • Copy/Paste. Copies the selected file to the clipboard where you can paste it to a different node.
  • Rename. Changes the name of the selected file.
  • Delete. Deletes the selected application folder. You will be prompted to confirm your deletion. Click No if you do not want to delete an item, or click Cancel to abort the delete operation. If you choose to abort the delete operation while deleting a list of items, Cancel will prevent all subsequent items from being deleted.
  • Properties. Displays the folder properties in the File/Folder Properties panel.

Reference: Node Population

Population is a check to see what content, if any, is contained within a node in the Configured Environments tree. Node population occurs when you select a node in the Configured Environments tree. The node icon will be different depending on whether population has occurred. If a node contains files after population a green dot appears on the node icon. If a node does not contain files after population, a red dot appears on the node icon.

If a node has been populated and contains content, deleting that content will change the green dot to a red dot. Conversely, if a node has been populated and contains no content, creating content in that node will change the red dot to a green dot.

Reference: Master File Shortcut Commands

The following shortcut menu options are available for a Master File:

  • Create Report. Opens the Report Wizard, where you can create a new report.
  • Create InfoAssist Chart. Opens the InfoAssist Chart Canvas, where you can create a new chart.
  • New. Creates a new folder or file. The following shortcut menu options are available when pointing to New:
    • Procedure. Creates a new procedure folder in your current application folder.
    • Reporting. Expands a submenu containing the following options.
      • Report. Creates a new report.
      • SQL Report. Creates a new SQL report.
    • HTML/Document. Creates a new HTML page or document.
    • InfoAssist. Expands a submenu containing the following options.
      • Chart. Creates a new chart using the Chart canvas.
      • SQL Chart. Creates a new SQL chart.
    • Text Editor. Expands a submenu containing the following options.
      • WebFOCUS StyleSheet. Creates a template WebFOCUS StyleSheet.
      • Text Document. Creates a text document. You can use the add or remove comment to comment the file.
    • Application Directory. Creates a new application folder in your current application folder.
  • Duplicate. Creates a copy of the selected file.
  • Copy/Paste. Copies the selected file to the clipboard where you can paste it to a different node.
  • Rename. Changes the name of the selected file.
  • Delete. Deletes the selected file. You will be prompted to confirm your deletion. Click No if you do not want to delete an item, or click Cancel to abort the delete operation. If you choose to abort the delete operation while deleting a list of items, Cancel will prevent all subsequent items from being deleted.
  • Properties. Displays the folder properties in the File/Folder Properties panel.

Note: When a Master File is opened in the Text Editor canvas, all other open options from the shortcut menu are unavailable.

Opening Files in the Configured Environments Tree

In addition to opening files through the Hamburger menu, or from the Quick Access Toolbar, you can also open files from the development areas in the Configured Environments tree.

Note: Files can only be opened in one area of App Studio at a time to ensure that your changes are not overwritten by another opened version of the file. However, you are able to open a file in App Studio and in a Windows Associated Tool at the same time. To ensure that your changes are saved properly, you should only modify one opened version of the file at a time.

Viewing Shared Files in the Configured Environments Tree

How to:

There are two ways of sharing contents in WebFOCUS App Studio.

Procedure: How to Share a Content File Between Two Developers

Using the BI Portal, an Advanced user can designate a content file to share with an WebFOCUS App Studio Developer user. This overview procedure gives the general steps needed to share a file.

  1. In the BI Portal, an Advanced user creates a file in the My Contents folder of a workspace created in the BI Portal.
  2. The Advanced user right-clicks the file and selects Share With from the shortcut menu. The Advanced user designates an individual WebFOCUS App Studio Developer to share with.

    For more information, see the WebFOCUS Business Intelligence Portal manual.

  3. In WebFOCUS App Studio, the designated Developer user views or opens the file from the Configured Environments tree.

Setting Up Access to TIBCO WebFOCUS Environments

In this section:

How to:

As you set up access to WebFOCUS environments, your settings are retained in a file named wfscom.xml. WebFOCUS environment settings are typically stored in the following locations.

Windows 7:

drive:\Users\user_id\AppData\Roaming\Information Builders\wfscom.xml

where:

user_id

Is your Windows user ID.

Note:

Procedure: How to Add a TIBCO WebFOCUS Environment

A WebFOCUS environment consists of a web server, a WebFOCUS Client, and a Reporting Server. Adding WebFOCUS environments lets you create and manage multiple environments, such as development, test, and production instances.

To add a WebFOCUS environment, do the following:

  • Specify a web server that includes a host name and port number.

  • Configure the HTML alias/context root to access the WebFOCUS Client. If you develop applications in the Data Servers area and need to deploy the application to an environment that has a different alias, see Working With the HTML Alias Property .

  • Provide the appropriate user credentials if web server authentication is required.

The following procedure provides the information you need to add a WebFOCUS Environment.

  1. On the Home tab, in the group, click Environments.

    The Environments List dialog box opens. This dialog box lists all WebFOCUS environments defined for App Studio.

  2. Click Add.

    The WebFOCUS Environment Properties dialog box opens, as shown in the following image.


    WebFOCUS Environment Properties dialog box

    At the top of the dialog box is the Description field, followed by the Environment Settings area. The Environment Settings area contains a series of buttons that represent components in a WebFOCUS environment, and the required parameter fields to configure that environment. When you configure an environment, the areas below the buttons can change according to the parameters that are required.

  3. In the Description field, type a description for the WebFOCUS environment. This description appears in the Configured Environments tree.

    Note: The description cannot contain special characters, such as ., /, \, ?, *, and others. A message with characters not allowed appears if one of the restricted characters is detected during validation.

  4. In the Web Component area, specify the web server information.

    For some environments, once you specify the web server, all other settings default. If the WebFOCUS environment you are accessing does not use default settings, or the components require authentication, click the appropriate button in the Environment Settings area to provide the parameters. The areas that follow explain the parameters available for each component.

    Note: WebFOCUS environment properties must be supplied in a specific order. For example, if web server security is enabled, you cannot set the WebFOCUS Client script name until you have provided valid web server credentials. Similarly, you cannot retrieve a list of Reporting Servers until you have provided a valid WebFOCUS Client Path.

    As you select a component button in the WebFOCUS Environment Properties dialog box, App Studio ensures that it has the necessary information before it displays the properties of that component in the lower part of the dialog box. If the required information is not available, you cannot proceed to the next component.

  5. Click OK.

    The WebFOCUS Logon - WebFOCUS dialog box opens and prompts you for a WebFOCUS ID and password.

    The WebFOCUS Logon - WebFOCUS dialog box populates the ID wfdesktop, by default. This user ID is configured with WebFOCUS and allows self-service development: development from the Data Servers and Web Applications areas.

    Access to the workspace is restricted, and you cannot create new content with this user ID. You can only see and run published content.

    There is a check box option on the logon dialog box for remembering the ID or password. By default, it is not selected. If you select this box, your credentials are stored and encrypted in the wfscom.xml file, the local configuration file that stores information processed by the App Studio communication layer.

    To clear stored credentials, open the WebFOCUS Environment Properties dialog box and select the environment that users need to make changes. Click WebFOCUS Client. Under WebFOCUS Credentials, delete the User ID and Password information, and then clear the Supply Credentials check box.

    Note: A logon dialog box can also open for connection to the web server, application server, or Reporting Server, depending on the security implemented in the WebFOCUS environment that is being accessed.

  6. Type the appropriate user name and password, and then click Logon.

    The WebFOCUS Environment Properties dialog box closes.

  7. In the Environments List dialog box, click OK.

Working With the HTML Alias Property

If you develop applications in the Data Servers area and need to deploy the application to an environment that has a different alias, it is necessary to use a Generic alias. For existing pages, open the HTML pages and change the alias. The pages will not work if you do not change the alias to Generic.

Note: This option is only applicable to the Data Servers area.

To set an alias for a new page or change the alias for an existing page, you can:

  • Set the HTML alias property in the Properties panel for the DOCUMENT object.
  • Set the HTML Alias property value globally in the HTML Page section of the WebFOCUS App Studio Options dialog box.

For the DOCUMENT object, the HTML alias property on the Properties panel contains the following values:

  • Custom. In the HTML page, the alias (szHtmlAlias) will have the value of the HTML Alias from the settings in the WebFOCUS Environment Properties dialog box. Custom is the default value, since applications developed in the Data Servers area are meant for self-service applications.
  • Generic. In the HTML page, the alias (szHtmlAlias) will have a generic value. This allows for files to be moved from one environment to the other.

The HTML alias property on the Properties panel is shown in the following image.

The HTML Alias property on the HTML Page section of the WebFOCUS App Studio Options dialog box has the same values and functionality as the Properties panel. When the value is changed for this property, new pages will inherit the setting from the WebFOCUS App Studio dialog box. This option is global and will be available for each HTML page.

Note: For existing non-self-service applications that need to be moved from development to production, you can set the value of HTML Alias as Generic in the WebFOCUS App Studio Options dialog box. All existing pages will have to be opened and then saved with this setting before they are moved to Production.

The HTML Alias property on the HTML Page section of the WebFOCUS App Studio Options dialog box is shown in the following image.

Note: To test the property, open the HTML page in the editor and verify the value of the HTML Alias, szHtmlAlias. For Custom, the value should be the same as in the HTML Alias property in the Environments dialog box, for example, szHtmlAlias=/ibi_apps/. For Generic, the value should be szHtmlAlias=/ibi_html/.

Setting Up Local Machine Properties

Local Machine properties are optional. Click the Local Machine button to access the WebFOCUS Environment Caching area. Select the options in this area to cache remote directory and file information, and enable file-content caching.

The file content caching location path is for a Windows 7 machine.

In caching, copies of files or information stored on a remote machine are temporarily stored on your local WebFOCUS App Studio machine. WebFOCUS App Studio then works with the locally stored files.

Caching speeds WebFOCUS App Studio performance because remote machines are not accessed and queried every time you request information. This is especially useful when accessing mainframes or when a network connection is slow.

However, caching should not be used when multiple developers are working with the same files because they could overwrite changes made by other developers. By default, caching is not enabled.

Two properties are available:

  • Cache remote directory and file information. This option caches information about files stored in the WebFOCUS environment. This does not actually cache files, only information about them. If you select this property, WebFOCUS App Studio does not requery the Reporting Server every time it needs a list of files stored in the WebFOCUS environment.

  • Enable file content caching. This option caches files typically stored on the server. WebFOCUS App Studio only retrieves files once. When you want to read or edit your files, WebFOCUS App Studio uses a cached copy. When you edit a cached file, the edited cached file is returned to the server and replaces the actual file on the server.

WebFOCUS App Studio retrieves information and files the first time you request them and then caches them locally. WebFOCUS App Studio then uses the cached copies until WebFOCUS App Studio is restarted, or you click the Clear buttons for each level.

  • Note: If you create a new synonym, you have to perform a refresh to view the new files in the WebFOCUS App Studio Environments Tree panel when caching is enabled.
  • You cannot use the caching options for the local development environment if the Source Control feature is enabled.

Specifying Web Component Properties

The Web Components button is typically selected by default. Web Component properties specify how App Studio accesses the web server. The web server must be identified before any other components.

The following properties are available:

  • Host Name/IP Address. Specifies the host name or IP address where your web server is running. This field is required and has no default value.
  • Allow Host Aliases. If checked, enables you to configure multiple WebFOCUS instances that have been installed on the same host machine.
  • Protocol. The protocol to use for accessing the web server (HTTP or HTTPS).
  • Port. The TCP/IP port for accessing the web server. Port 8080 is the default.
  • HTML Alias. Identifies the alias used to access content from the WebFOCUS environment directory, ibi_html. In App Studio, there is no need to configure an ibi_html alias. The ibi_html content is accessed through the ibi_apps alias. The configuration of this alias is:
    /ibi_apps/ibi_html

    where:

    ibi_apps

    Is customizable.

    ibi_html

    Is constant.

  • Client Path. Specifies how calls are made from App Studio to the web server. By default, when you add a new WebFOCUS environment, it is set to use the WebFOCUS Servlet with the default ibi_apps context path:
    /ibi_apps/WFServlet

    where:

    ibi_apps

    Is customizable.

    WFServlet

    Is constant.

    If the WebFOCUS environment uses a non-default context path, clear the Use Default check box and provide the correct Client Path. For example:

    /ibi_apps8/WFServlet

    If the Client Path is incorrect for the environment, you receive an error when you click the WebFOCUS button at the top of the page, or when you click OK to exit and save your changes.

    If you do not know your path, ask your WebFOCUS Administrator or check the WebFOCUS Administration Console of the environment to which you want to connect. The Client Path settings for the environment are located under Utilities and Client Selection.

  • Use Default. Specifies that the default ibi_html alias is used. Keep this option selected unless you change the HTML Alias value.

    • Note: If the Client Path field is empty, and the Use Default check box is selected, there is a problem connecting to the WebFOCUS Client. Ensure your web server is started and that you typed the correct properties on the Web Components page. If you cannot connect, contact your WebFOCUS Administrator.
    • If while providing a custom HTML Alias and Client Path, your connection fails because of incorrect information and the Client Path is deleted, you can clear Use Default to restore the values you entered. Click the Use Default check box to edit the HTML Alias and Client Path, and type the correct information. If a custom ibi_apps alias or context path is used, it needs to be entered in both the HTML Alias and Client Path fields. For example:

      HTML Alias:

      /ibi_apps8/ibi_html

      Client Path:

      /ibi_apps8/WFServlet
  • Connection Timeout. Default time to connect to a WebFOCUS environment is 60 seconds. However, in some slow systems this needs to be increased to avoid connection failures when the timeout period is reached. If timeout issues are experienced, please increase this to 240 or higher. Increasing the timeout can address issues with slow environments or environments that have many resources (applications/files) during development.
  • Login Timeout. Specifies how long App Studio should wait for the login credentials to be validated. The default time is 15 seconds. You can set this to a higher value, if necessary. You can configure this setting for each environment.
  • Web Component Authentication. Specifies whether authentication is required on the web server. To set security, select Basic in the drop-down list, and type a web server user ID and password. If this is set to None, the web server allows anonymous access.

    To configure the web server for an environment that uses browser-based authentication protocols, such as x.509, select Browser-based Login in the drop-down list.

    For more information, see the WebFOCUS Security and Administration manual.

TIBCO WebFOCUS Properties

When you click the WebFOCUS button, App Studio makes a connection to your web server to retrieve information about the WebFOCUS environment. Therefore, you have to first specify Web Component properties, and your web server must be running.

You are prompted to sign in to WebFOCUS to verify your configuration. You will also be prompted to sign in to WebFOCUS if you click OK to exit the dialog box.

The following properties are available:

  • Client Path. Is specified in the WebFOCUS Component properties area, and only appears in this pane for reference. This field is read-only and can only be changed in the WebFOCUS Component properties area.
  • Select Language. Specifies the language of the WebFOCUS Client.
  • Supply Credentials. Specifies whether to supply and store credentials when you connect to WebFOCUS and access the environment.

When the correct WebFOCUS Client Path is provided, you can specify properties for the remaining component.

Data Server Properties

You can set authentication and view available Reporting Servers by clicking the Data Servers button. When you select Data Servers, App Studio connects to the WebFOCUS Client and retrieves a list of servers from its communication configuration file (odin.cfg).

The following property is available:

  • Supply Credentials. If selected, you can type a WebFOCUS Reporting Server ID and password for the server highlighted in the list. Clicking Set stores the credentials with the environment properties, and the ID entered is shown next to the server in the list. The credentials are checked the next time you use a feature on that server, not when you click Set.

Procedure: How to Edit an Existing WebFOCUS Environment

  1. On the Home tab, in the group, click Environments.

    The Environments List dialog box opens.

  2. Select the environment that you want to edit.
  3. Click Properties.

    The WebFOCUS Environment Properties dialog box opens.

  4. Edit the WebFOCUS environment accordingly, and then click OK to accept your changes.
  5. In the Environments List dialog box, click OK.