Joining Data

In this section:

Reference:

You can join two or more related data sources to create a larger integrated data structure from which you can report in a single request. The joined structure is virtual. It is a way of accessing multiple data sources as if they were a single data source. Up to 511 joins can be in effect at one time, for a total of 512 segments, depending on the number of active segments and the number and length of the fields (there is a 256K limit on the length of all fields). Joined files remain physically separate, but are treated as one data source structure throughout the session or until you clear the join.

You can also create a new file structure for reporting by joining existing synonyms of relational tables using the Cluster Joins editor.

What Is a Join?

A join is a temporary connection between two or more data sources, based on a shared field or on a condition you specify in the JOIN command. For example, since the wf_retail_sales data source includes an ID_STORE field and the wf_retail_store data source also includes an ID_STORE field, you can join the two data sources.

The field type must be the same for the common fields, but the field name and field format do not need to be the same.

After you join two files, each time a record is retrieved from the first file (host data source), it also retrieves the matching records from the second file (cross-referenced data source).

Creating Joins Using Join Functionality

In this section:

The following section describes the types of joins you can create using the Join functionality.

Creating an Equijoin

You can use an equijoin structure if you need to join two or more data sources that have two fields, one in each data source, with formats (character, numeric, or date) and values in common.

Joining a store ID field in a sales data source (host data source) to the store ID field in a store data source (cross-referenced data source) is an example of an equijoin.

Creating a Join Based on Conditional Criteria

Conditional joins use WHERE-based syntax to specify joins based on conditional criteria, not just on equality between fields. Additionally, the host and cross-referenced join fields do not have to contain matching formats.

Suppose you have a data source that lists stores by their ID number (the host data source) and another data source that lists sales for each store ID by date (the cross-referenced data source). Using a conditional join, you can join the store ID in the host data source to the store ID in the cross-referenced data source to determine which stores had sales in a given date range (the WHERE condition).

Creating a Join Based on Virtual Fields

Joins that are based on virtual fields use DEFINE-based syntax to create a virtual field in the host data source that you can then join to a real cross-referenced field. The DEFINE expression that creates the virtual host field may contain only fields in the host data source and constants. It may not contain fields in the cross-referenced data source.

You can join a virtual field to more than one real field in more than one cross-referenced data source using separate Join commands, each referring to the same host data source.

Creating a Left Outer Join

When a report omits host rows that lack corresponding cross-referenced rows, the join is called an inner join. When a report displays all matching rows, in addition to all rows from the host data source that lack corresponding cross-referenced rows, the join is called a left outer join.

For details on left outer join syntax, see the Creating Reports With WebFOCUS Language manual.

Creating a Full Outer Join

The WebFOCUS Join command and conditional join command have a Full Outer Join option.

A full outer join returns all rows from the host data source and all rows from the cross-referenced data source. Where values do not exist for the rows in either data source, null values are returned. WebFOCUS substitutes default values on the report output (blanks for alphanumeric columns, the NODATA symbol for numeric columns).

The full outer join is only supported for use with those relational data sources that support this type of join, in which case the WebFOCUS Join syntax is optimized (translated to the full outer join SQL syntax supported by the RDBMS). Use of this syntax for any data source that does not support a full outer join, or the failure of the request to be optimized to the engine, produces an error message.

For details on full outer join syntax, see the Creating Reports With WebFOCUS Language manual.

Specifying a Single (Unique) and Multiple (Non-Unique) Instance Join

When you create a join using the Join functionality, you can specify whether the join is a single instance or a multiple instance.

  • A single instance, or one-to-one join structure matches one value in the host data source to one value in the cross-referenced data source.

    Joining a store ID field in a sales data source (host data source) to the store ID field in a store data source (cross-referenced data source) is an example of a one-to-one join structure.

  • A multiple instance or one-to-many join structure matches one value in the host data source to multiple values in the cross-referenced data source.

    Suppose you have a data source that lists stores by their ID number (the host data source) and another data source that lists products sold for each store ID (the cross-referenced data source). Joining one instance of each store ID in the host data source to the multiple store IDs in the cross-referenced data source is an example of a one-to-many join structure and would result in a listing of all products sold for each store ID.

Manipulating Data Sources in a Join Using the Join Tab

In this section:

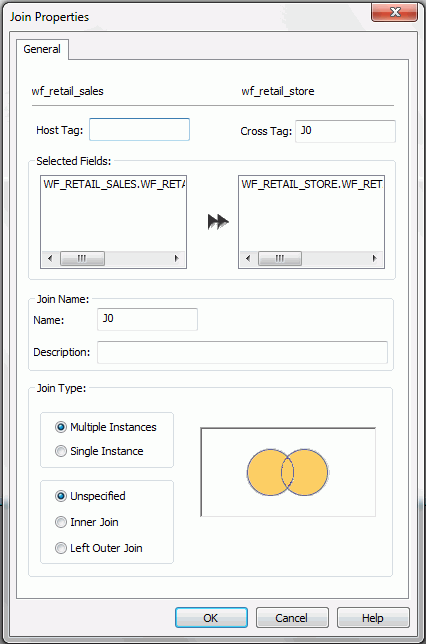
You can use the Join tab to manipulate data sources when using a join. The Join tab is available only when you are creating a join.

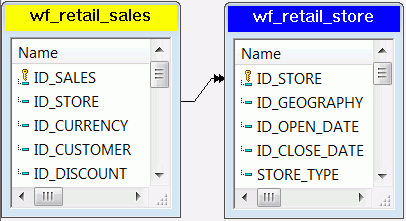
After you join two files, each time a record is retrieved from the first file (host data source), the matching records from the second file (cross-referenced data source) are also retrieved.

Joining Data Sources Using the Join Group

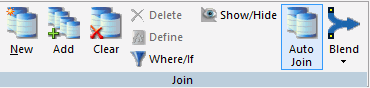
Using the Join group, you can create a new join, add a new data source to the join, clear a join, insert a Define field into a join, create a conditional join, show or hide the procedure (fex) window, perform an automatic join within tables, or blend data sources. The Join group is shown in the following image.

Join group on the Join tab

Displaying Data Sources in the Join Using the Windows Group

You can choose how to display the data sources currently in the join as cascading overlapping tiles (default), horizontal tiles that do not overlap, or vertical tiles that do not overlap. The Windows group is shown in the following image.

Creating a Join Using the Join Canvas

How to:

You can use the Join canvas to join two or more data sources. The Join component provides a graphical method for creating and manipulating all types of joins. To create a join, you must specify a host data source, and then a cross-referenced data source.

You are responsible for placing the Join object in the correct position within your procedure (that is, before a Define or a Report), and running it. The join remains active for the entire session, unless you explicitly clear it.

After a join exists, you can retrieve it, report from it, view its syntax, and clear it.

Procedure: How to Create an Equijoin

  1. Open an existing procedure, or create a new procedure.
  2. In the Procedure View panel, right-click the procedure folder or the component that you want to create the Join after, point to New and click Join.
  3. Select a Master File (host data source), for example, wf_retail_sales, and click OK.

    The Join canvas opens and displays the fields in the Master File.

  4. On the Join tab, in the Join group, click Add.

    You can also right-click the Join canvas and select Add File.

  5. Select a Master File (cross-referenced data source), for example, wf_retail_store, and click OK.

    The new Master File is added to the canvas. Common fields in both files are joined by a Join connector line, as shown in the following image.

  6. Click Save.
  7. Click Run.

    A dialog box opens, displaying the component code, and either an error message or text stating that no error exists.

  8. Click OK and close the Join canvas.

    You can add another component to the procedure by right-clicking the Join component, pointing to New, and clicking the component. When you are prompted to select a Master File, select the same host file you used to create the Join component. This allows you to use the joined data sources.

The following it the WebFOCUS Join syntax that is created:

JOIN WF_RETAIL_SALES.WF_RETAIL_SALES.ID_STORE IN wf_retail_sales
TO WF_RETAIL_STORE.WF_RETAIL_STORE.ID_STORE IN wf_retail_store AS J0
END

Creating Multi-Field Joins

In some cases, you might want to join more than one host field to one or more cross-referenced fields.

There are two types of multi-field joins:

Creating a Virtual Field as the Join Field

How to:

You can create a virtual host field that you can join to a real cross-referenced field.

Procedure: How to Use a Virtual Field as the Join Field

  1. Open an existing procedure or create a new procedure.
  2. In the Procedure View panel, right-click the procedure folder or the component that you want to create the Join after, point to New, and click Join.
  3. Select a Master File (host data source) and click OK.

    The Join canvas opens and displays the fields in the Master File.

  4. On the Join tab, in the Join group, click Define.

    The Join Define in File dialog box opens.

  5. You must associate the virtual field with a segment of the data source.
    1. Type the name of the virtual field you are going to define in the Define Field box.
    2. In the With Field drop-down list box, choose the name of any real field from the segment in which you want to put the virtual field and click OK.

      The virtual field appears in the Fields window of the host data source.

  6. On the Join tab, in the Join group, click Add.

    You can also right-click the Join canvas and select Add File.

  7. Select a Master File (cross-referenced data source) and click OK.

    The new Master File is added to the canvas. Delete any existing Join connector lines.

  8. To complete the Join, drag the mouse pointer from the virtual field to a matching field in the cross-referenced data source.

    You cannot join multiple fields with this option. The virtual field must be the only Join field.

Creating Conditional Joins

How to:

Using conditional joins, you can establish joins based on conditions other than equality between fields. In addition, the host and cross-referenced join fields do not have to contain matching formats and the cross-referenced field does not have to be indexed.

Because each data source differs in its ability to handle complex conditional criteria, the optimization of the WHERE syntax differs depending on the specific data sources involved in the join and the complexity of the conditional criteria.

To display a list of joined data sources, select the following query subject in the Query tool:

? JOIN

This query displays every join currently in effect and indicates any that are based on conditional criteria.

Procedure: How to Create a Conditional Join

  1. Open an existing procedure, or create a new procedure.
  2. In the Procedure View panel, right-click the procedure folder or the component that you want to create the join after, point to New, and click Join.
  3. Select a Master File (host data source) and click OK.

    The Join canvas opens and displays the fields in the Master File.

  4. On the Join tab, in the Join group, click Add.

    You can also right-click the Join canvas and select Add File.

    If you are developing in the Data Servers area or in the domain, a WebFOCUS Table List dialog box opens.

  5. Select a Master File (cross-referenced data source) and click OK.

    The new Master File is added to the canvas. Common fields in both files are joined by a Join connector line.

  6. Select the Join (the connector line), and on the Join tab, click Where/If.

    The Where Expression Builder dialog box opens.

  7. After you have specified your WHERE criteria, click OK to return to the Join tool.

    If you need to change the join type or join name, double-click the conditional join to launch the Join Properties window.

Customizing a Join

In this section:

How to:

You can customize an existing join by changing the files or fields involved. If no default join was created, you can use the same technique to specify a connection explicitly.

You can also change the join name, make the join a single instance, use a virtual field as the join field, and add tag names to the join files.

Procedure: How to Remove a Data Source From the Join

  1. Click the data source you want to remove.
  2. Press the Delete key. A confirmation dialog box appears.

    If you delete the host data source, all cross-referenced data sources are automatically deleted.

Procedure: How to Delete a Join

  1. Right-click the Join connector line.
  2. From the shortcut menu, click Delete.

    You can also select the Join connector line, and on the Join tab, in the Join group, click Clear, or press the Delete key.

    The data sources remain on the canvas with no connector line between them.

Procedure: How to Specify Join Fields

To create your own join (after deleting the existing join, if necessary):

  1. Select a field in the host data source panel.
  2. Click and hold the selected field.
  3. Drag the selected field from the host data source panel onto the matching field located in the cross-referenced data source panel. The pointer changes and displays the appropriate icon when a join is possible.
  4. Release the mouse button.

    A Join connector line appears.

Procedure: How to Create Additional Joins

You can leave the Join window open and create another Join by:

  • Clicking New on the ribbon.
  • Clicking New Join from the shortcut menu on the Join canvas.

You can define up to 511 concurrent Joins that will have a maximum of 512 segments in the new Join structure.

Procedure: How to Make a Join a Single Instance

By default, each join is a multiple instance.

To make the join a single instance:

  1. Right-click the Join connector line.
  2. From the shortcut menu, click Single Instance.

Changing the Join Name

How to:

A default name is automatically assigned to each join.

You can use the Join name to later clear the join and to prevent another join from overwriting it. If you remove the Join name completely, any subsequent unnamed join will overwrite this join.

Procedure: How to Change or Remove the Default Join Name

  1. Right-click the Join connector line and from the shortcut menu, click Join Name.

    The Join Name dialog box displays the default Join name.

  2. Edit or delete the name in the Join Name box and click OK.

    You can also provide a description. This is not used in the Join command, but for reference purposes. A comment (-*) is added to the procedure. For example, -*JOINDESC J0.

    Note: The following reserved words cannot be used as a Join name: ALL, AND, AS, IN, JOIN, TAG, TO, WITH.

Adding a Tag Name

How to:

Tag names provide a way of distinguishing between identical field names in the host and cross-referenced data sources. They function as aliases for the file names in the join. Tag names are useful when you join a file to itself because in such a join all field names, segment names, and file names are the same in the host and cross-referenced data sources. Tag names are also useful if a file is used as a target more than once in the join structure.

A procedure can use the tag name of a data source as a qualifier for field names and aliases.

If you create a report using a recursive join without tag names, the field names in the cross-referenced data source are prefixed with the first four characters of the Join name.

Procedure: How to Add a Tag Name

  1. Double-click the connector line between the tables. The Join Properties dialog box opens.

    The Join Properties dialog box also opens if you right-click a selected link, and click Properties on the shortcut menu. A thick line appears when a join is selected.

  2. Enter names in the Host Tag and Cross Tag name fields and click OK.
    Note:
    • The following reserved words cannot be used as a tag name: ALL, AND, AS, IN, JOIN, TAG, TO, WITH.
    • Tag names can be up to eight characters in length.

Reference: Join Properties Dialog Box

To view or modify the properties of a Join, right-click the Join link and select Properties, or double-click the Join link. The Join Properties window appears, as shown in the following image.

The Join Properties window has the following fields and options:

Host Tag

Enter a tag name for the data source.

Cross Tag

Enter a tag name for the cross-referenced file.

Selected Fields

Displays the field that has been joined from the host file to the cross-referenced file. A single arrow indicates a unique Join, and a double-arrow indicates a non-unique Join.

Join Name

Displays the name of the Join. To change the default Join name, type a new name in this field and click OK.

Note: The Join name must be unique and cannot exceed eight characters.

Description

Enter a description. This is not used in the Join command. It is used for reference purposes. A comment (-*) is added to the procedure.

Join Type

Indicates the type of Join. Choose from the following:

Multiple Instance (Non-Unique). A one-to-many Join structure that matches one value in the host data source to multiple values in the cross-referenced field. Joining employee ID in an employee data source to employee ID in a data source that lists all the training classes offered by that company would result in a listing of all courses taken by each employee, or a joining of the one instance of each ID in the host file to the multiple instances of that ID in the cross-referenced file. This is the default selection.

Single Instance (Unique). A one-to-one Join structure that matches one value in the host data source to one value in the cross-referenced data source. Joining an employee ID in an employee data source to an employee ID in a salary data source is an example of a unique Join.

Unspecified. This option is selected in the Join properties when a Join that was created in an earlier release is opened in the Join tool. In earlier versions, the defaults for Join type and other operators were assumed and not specified in the generated code. Since the Join tool cannot determine the type of Join that was created and if there were other commands set to control the Join, select the appropriate options (Inner Join, Left Outer Join, Multiple Instances, Single Instances) from the Join tool to upgrade the generated code.

Inner Join. A Join that results when a report omits host rows that lack corresponding cross-referenced rows.

Left Outer Join. Extends the results of an Inner Join and retrieves records from both host and cross-referenced tables, including all records from the left table (host) and any records from the right table (cross-referenced) where the condition values match. If there are no matching values in the cross-referenced table, the Join still retrieves records from the host table.

Detecting and Handling of Fan Traps and Chasm Traps

WebFOCUS supports complex joins between a large number of data sources. Sometimes requests against a complex join (or star schema) can cause individual columns to be aggregated multiple time, generating inflated results. These constructions are referred to as fan traps or chasm traps.

The relational adapters have a new context analysis process that detects the multiplicative effect and generates SQL script commands that retrieve the correct values for each segment context. These scripts are then passed to the RDBMS as subqueries in an optimized SQL statement.