Using Radio Buttons

In this section:

How to:

When you dragged the fields from the data source into the form, you deselected the TITLE and USER fields so they do not appear in the form.

By not copying TITLE into the form, you prevent users from typing an arbitrary title in the field. We will give them the option to select Mr., Mrs., or Ms., using a radio button control. This prevents them from typing arbitrary titles.

The task of using radio buttons can be separated into three steps:

  1. Adding the group of radio buttons to your form.
  2. Adding a tool tip text to the group of radio buttons. This step is optional, but it demonstrates how you can display useful information to your users.
  3. Binding the results of the selection to a stack.

Procedure: How to Add a Group of Radio Buttons to the Form

  1. On the Controls tab, click the Radio Button control.
  2. Draw a small rectangle on the form next to the SSN, First, and Last fields.
  3. Select the control on the canvas and bring up the Settings panel.
  4. Add the three values: Mr., Mrs., and Ms.

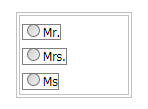
    Your radio buttons should resemble the following image (you may need to adjust the size of your control to see all three of them).


Procedure: How to Add Tool Tip Text

  1. Make sure you have selected your group of radio buttons.
  2. In the Properties panel, select the Title property.
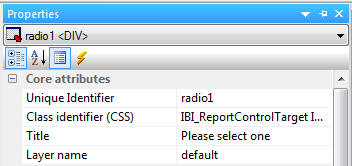
  3. In the empty field to the right, type Please select one, as shown in the following image.


You can move your cursor over the radio buttons at run time to see the tooltip.

Procedure: How to Bind the Results of the Selection to a Stack

  1. Select your group of radio buttons.
  2. Drag the TITLE field from the stack in the Requests & Data Sources panel to the Selection to input area in the Settings panel.

    If you wish, save your work and run your application again to see how it looks. Make sure to close the application before continuing the tutorial.

Stacks and Implied Columns

When you created AddFanStack using the Select Segment Fields dialog box (see How to Add Data Source Fields to a Form), you deselected the TITLE and USER fields. Since you deselected these fields, why are they showing up as columns in the data source stack?

These fields are showing up as columns in the data source stack because of the way App Studio Maintain Data defines data source stacks with the INFER command. When you use a field in the data source to define a column in a data source stack, App Studio Maintain Data defines columns based on the rest of the fields in that data source. If your data source is hierarchical, the rest of the fields in the segment and the key fields in any parent segment.

App Studio Maintain Data includes all of these fields in your data source stack so that when you update your data source from the data source stack, it knows the path to these fields.

These columns are called implied columns.

There is one field from the fannames data source that you have not placed on the form: the USER field. The user will not be entering this field. Instead, it will be generated by the application.