Writing Data to the Data Source

In this section:

How to:

Your next step is to enable users to write the data that they type in this form to the data source. They do this by clicking a button that says Add at the bottom of the form. You add the button to your form and write the Maintain Data Language source code that inserts the data into the data source.

Procedure: How to Add a Button to Your Form

  1. In the HTML canvas, on the Components tab, click Button.
  2. Move the cursor to the bottom of your form and draw a rectangle where you want to place the button.
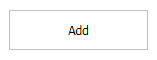
  3. In the Properties panel, change the text in the value property for the button to Add. The text in the button is automatically selected when you create the button, so all you have to do is type your new text, as shown in the following image.
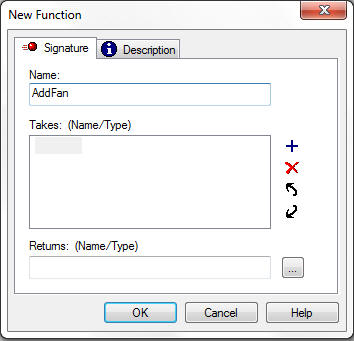
  4. In the Properties panel, notice that the first property is the unique identifier and its value is button1. This is the internal program name of the button (how App Studio Maintain Data refers to it).

    By default, App Studio Maintain Data names forms and controls with their type and a unique number. If you are planning to refer to a form or control in other places in the procedure, giving it a more descriptive name is recommended.

  5. Change the name of the button to AddButton. Change the unique identifier and Name properties.

Writing Functions

How to:

Now that you have created a button that the user will click, you must create the code to run when the user clicks the button.

You put this code in a function. A function is a series of commands in a procedure grouped together as a unit of control. A function accomplishes a task, such as calculating values, extracting data from a data source to place in a data source stack, or writing information to a data source.

Procedure: How to Write a Function

  1. In the Requests & Data Sources panel, select the Start procedure.
  2. Right-click Start.
  3. In the shortcut menu, click New function.
  4. In the New Function dialog box, give your function the name AddFan, as shown in the following image.


  5. Click OK.

App Studio Maintain Data opens the source code for your function in the Maintain Data Editor.

About the Maintain Data Editor

Underlying many of the graphical elements of App Studio Maintain Data is Maintain Data language source code. The Maintain Data Text Editor enables you to create, view, and edit the source code for procedures, procedure components, and other types of files required by your Maintain Data applications. The Maintain Data Text Editor tab opens when you create a new function or edit an existing one. It contains two groups, Find and Position. The Maintain Data Text Editor tab is shown in the following image.

All App Studio Maintain Data procedures start with the keyword MAINTAIN (which must be in uppercase) and end with the keyword END (also in uppercase), as shown in the following image. When you create a procedure, App Studio Maintain Data includes these two keywords automatically.

MAINTAIN FILE fannames
$$Declarations
Case Top
Infer fannames.CUSTOMER.SSN into AddFanStack;
Winform Show Form1;
EndCase
Case AddFan
EndCase
END

Note: The text in your window may wrap differently.

FILE fannames tells App Studio Maintain Data the data sources this procedure is going to access. In the list of components, there is a Data Sources folder with a fannames data source below it.

Data source names (up to 15) follow the MAINTAIN FILE command and are separated by the word AND.

Following this line is a comment line beginning with $$. You can tell that this is a comment since green (the default) is the color for comments. This comment line is automatically generated when you create a procedure.

This particular comment, $$Declarations, is generated automatically by App Studio Maintain Data when you created the procedure. If you create any new variables using the Request & Data Sources panel, App Studio Maintain Data places the source code after this comment.

Case Top begins the definition of the Top function. This definition takes up several lines and ends with the keyword EndCase. The first statement, which begins with Infer, defines the AddFanStack data source stack.

The next line of the Top function, Winform Show Form1; is the code that displays Form1 at run time. This code was generated automatically when you created the procedure.

Finally, the Case AddFan and EndCase define an additional function in this procedure.

Finding or Replacing Text Using the Find Group

The Find group contains options that enable you to find or replace text.

The commands in the Find group are:

Find

Finds the specified text. You can also press Ctrl+F to activate the Find dialog box.

Next

Finds the next instance of the specified text.

Previous

Finds the previous instance of the specified text.

Replace

Replaces the specified text with different text.

Select All

Selects all of the text in the procedure.

Reference: Find Dialog Box

You can use the options on the Find dialog box to indicate how to search for information.

The options on the Find dialog box are:

Find What

Provides a text box where you can specify the text that you want to find.

Match case

Select this option to match the uppercase or lowercase value, as specified in the Find what field.

Match whole words only

Select this option to match the whole word only.

Find Next

Allows you to find the next instance of your search term.

Reference: Replace Dialog Box

You use the options on the Replace dialog box to indicate how to use the find feature to find and replace information.

The options on the Replace dialog box are:

Find What

Provides a text box where you can specify the text that you want to find.

Replace With

Provides a text box where you can specify the text that is going to replace the text for which you are searching.

Match case

Select this option to match the uppercase or lowercase value, as specified in the Find what field.

Match whole words only

Select this option to match the whole word only.

Find Next

Allows you to find the next instance of your search term.

Replace

Replaces the search information that you specified in the Find What field with the text or other information that you indicated in the Replace With field.

Placing the Cursor Using the Position Group

The Position group allows you to place your cursor at the desired line and allows you to turn off line numbers.

The commands in the Position group are:

Goto Line

Displays the current line your cursor is on. You can type a different line number into the text box to place your cursor on that line.

Show Line Numbers

When selected, displays line numbers. This option is selected by default.

Procedure: How to Build Maintain Data Language Code Using the Language Wizard

  1. Ensure that your cursor is in the line between Case AddFan and EndCase.
  2. Right-click in the Maintain Data Editor.
  3. From the shortcut menu, select Language Wizard.

    The Maintain Language Wizard opens. The Maintain Language Wizard helps you build Maintain Data language source code without typing the syntax yourself.

    The first Language Wizard window asks you to specify, in general, what kind of task you want to accomplish.

  4. Select Update records in a data source, as shown in the following image.


  5. Click Next.

    Now that you have specified the general task you want to perform, the Language Wizard narrows the task further. Notice that after each task, there is a word in parentheses. This is the name of the Maintain Data language command that executes that task. Additionally, notice the box at the bottom of the window contains the Maintain Data language code being generated by the Language Wizard. As you move through the Language Wizard, you see more code.

  6. Select Add one or more new data source records (Include), as shown in the following image.


  7. Click Next.

    Now that you have specified which command to use, the Language Wizard asks you to supply the parameters for that command. In this case, you must tell it which data source is being updated and from where.

    You first specify which data source is being updated.

    Note: The Available fields list contains the data sources that you are using in this procedure, not the list of data sources in the folder.

  8. Expand the fannames data source.
  9. Expand the CUSTOMER segment.
  10. Copy the SSN field into the Fields to include box by clicking SSN and then clicking the right arrow, or by double-clicking SSN.

    Notice that, as with stacks, all the other fields in the CUSTOMER segment are also copied, as shown in the following image. This is because the Maintain Data language assumes that if you are adding new data source records to a data source, you want to write information into all the fields in a segment. For more information, see Stacks and Implied Columns.


    Notice that the Maintain Data language box at the bottom now reads as follows:

    Include fannames.CUSTOMER.SSN;
  11. Click Next.

    Your final step is to indicate where this data is being written from, which in this case, is AddFanStack.

  12. Select Stack.
  13. Choose AddFanStack from the list.
  14. Leave the 1 in the Starting from row field and select the All the records in the selected stack option, as shown in the following image.


    Notice that the Maintain Data language box at the bottom now reads as follows:

    For all include fannames.CUSTOMER.SSN from AddFanStack;
  15. Click Finish.

App Studio Maintain Data places the source code that the Language Wizard generated in between the Case AddFan and EndCase lines.

Clearing Data From Stacks

How to:

Now that you have included the data from AddFanStack into the fannames data source, it is a good idea to clear the data from AddFanStack. Use the Language Wizard to write this code.

Procedure: How to Clear the Data From a Stack Using the Language Wizard

  1. Place the insertion point after
    For all include fannames.CUSTOMER.SSN from AddFanStack;

    but before

    EndCase
  2. Right-click in the Maintain Data Editor and, from the shortcut menu, click Language Wizard.
  3. Select Operate on a stack and click Next.
  4. When the Language Wizard asks you which stack operation you would like to perform, select Clear the contents of a stack and click Next.

    The Language Wizard asks you to select one or more stacks to clear.

  5. Select AddFanStack and click Finish. The syntax should read as follows:
    Stack clear AddFanStack;

Assigning the Function to the Add Button

How to:

Now that you have written the code that inserts user data into the data source, you need to designate that when the user clicks the Add button, this function is performed. You do this using the Tasks & Animations panel.

Procedure: How to Assign a Function to an Event

An event is something that a user performs, such as clicking a button or moving to a field. Events are done as tasks with Ajax calls. The target type and request is mntname.case.

  1. In the Tasks & Animations panel, click New to create a new task. The Trigger Type is Click. The Trigger Identifier is AddButton.
  2. In the Requests/Actions section, select Run Request, then select Start, and then select Start.AddFan.

    This will make the Add button call that case (function).

    Note: You need to have Start.Connect in the load task or this will not work.

  3. Run your application to see how it looks.
  4. Add your name to the fannames data source. You are now included in the App Studio FanClub application, as shown in the following image.


  5. Close the application before continuing the tutorial.