Adding a Form to Display Data From a Data Source

In this section:

How to:

The FanClub application can add names to the fannames data source, but users do not get much visual feedback from this task. The FanClub application needs to display the contents of the fannames data source.

This task is divided into the following steps:

  1. Add a new form to the application.
  2. Build the code to extract the data from the fannames data source using the Language Wizard.
  3. Design the form to display the contents of fannames.
  4. Create a link from Form1 to the new form.

Procedure: How to Add a New Form to Your Application

To create a new form, in the Maintain Data Editor, type Winform Show formname when you have the case created.

  1. Create a case OnShowFanButton_Click and type the following:
    Winform Show ShowFan;
    EndCase
  2. From the HTML canvas, right-click the outer frame of the form and select Add Page.
  3. Right-click again and select Show all pages.
  4. Drag ShowFan from the Requests & Data Sources panel to the new page container.
  5. In the Properties panel, change the title of the form from ShowFan to Show Fan Club Members.

Extracting Data From a Data Source Into a Stack

How to:

Your next step is to create a function named GetFans, which extracts all the information in the fannames data source and places it into a stack named GetFanStack. Try this yourself or see the next section for instructions.

Tip: Create the function and then use the Language Wizard to generate the code.

Procedure: How to Extract Data From the Fannames Data Source Into a Stack

  1. In the Requests & Data Sources panel, right-click the Start procedure and then click New function.
  2. In the New Function dialog box, name your function GetFans and click OK.
  3. Make sure your insertion point is placed after the statement
    Case GetFans

    but before

    EndCase
  4. Right-click in the Maintain Data Editor and, from the shortcut menu, click Language Wizard.

    The Language Wizard opens.

  5. Select Retrieve records from a data source and click Next.
  6. Select Starting from the current record position (Next) and click Next.

    The Maintain Data language contains two commands to retrieve data from a data source. This window determines which one you want to use.

  7. Select the data source segments or fields whose records you want to retrieve. In the Available fields box, expand the fannames data source, expand the CUSTOMER segment, move the SSN field to the Fields to retrieve box and click Next.

    This window is where the Language Wizard determines from which data source you are reading the data. For more information, see Stacks and Implied Columns.

  8. Select All the records in the selected segment and make sure Change the current data source position to the top is selected and click Next.
    This ensures that App Studio Maintain Data starts from the beginning of the data source when retrieving records.
  9. Type GetFanStack in the text box to create a new stack, and make sure that Clear the stack first is selected. You can leave the default value 1 in the Place the records into the stack field. Click Next.
  10. Leave the next window blank since you want to retrieve all records from the data source. Click Finish.

    The Language Wizard should generate the following code:

    Reposition fannames.CUSTOMER.SSN;
    Stack clear GetFanStack;
    For all next fannames.CUSTOMER.SSN into GetFanStack;

Adding an HTML Table to Your Form

How to:

You are going to display the fans from the fannames data source using an HTML table. An HTML table displays the contents of a data source stack in a read-only grid.

Another option for displaying the fans from the fannames data source is to create a report procedure in App Studio and execute this code whenever you open this form.

Procedure: How to Add an HTML Table to Your Form

  1. On the Components tab, click the HTML Table button.
  2. Draw a rectangle on the form where you want your HTML table to go on your new ShowFan form.
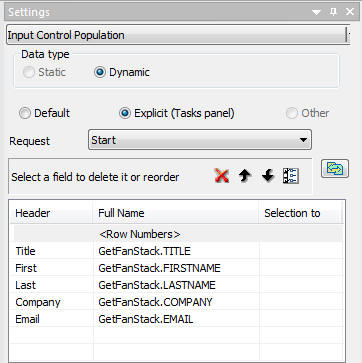
  3. On the Settings panel, be sure that the Explicit (Requests panel) radio button is selected.
  4. From GetFanStack in the Requests & Data Sources panel, drag the LASTNAME, FIRSTNAME, COMPANY, EMAIL, and TITLE fields into the Table Columns list on the Settings panel.

    Use the Move up and Move down buttons to rearrange these fields so that they are in the following order: TITLE, FIRSTNAME, LASTNAME, COMPANY, and EMAIL, as shown in the following image.


    You can change the appearance of any of these columns. For example, suppose you want to change the header titles for the FIRSTNAME and LASTNAME fields so that they read First and Last.

  5. Click Firstname and change Firstname to First.
  6. Repeat the process to change Lastname to Last.

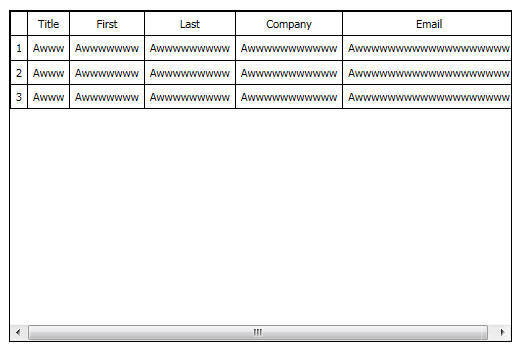
    Your form resembles the following image.


Creating a Link From One Form to Another

How to:

Your final step in creating your new form ShowFan is providing a way to open it from Form1. Do this by adding a button to Form1 that runs the GetFans function and opens the ShowFan form.

Procedure: How to Link From One Form to Another

  1. Make Form1 the active window.
  2. On the Components tab, click Button.
  3. Draw a rectangle to the right of the Add button on Form1.
  4. In the Properties panel, change the name and unique identifier for the button to ShowFanButton and change the value to Show Fans.
  5. Create a new task.
  6. In the Tasks & Animations panel, select Click for the Trigger Type and select ShowFanButton for the Trigger Identifier.
  7. In the Tasks & Animations panel, from the Requests/Actions section, select Run Request, select Start, and then select Start.OnShowFanButton_Click.

    In the Maintain Data Editor, type Perform GetFans( ); in the case. The syntax should read as follows:

    Case OnShowFanButton_Click
    Perform GetFans( );
    Winform Show ShowFan;
    EndCase
  8. Run your application to see how it looks.
  9. Close the application before continuing the tutorial.