Creating a Process Instance List Event Payload
This topic describes using the pageBusPayloadHelperApp application wizard to generate and publish a process instance list event payload.
For information about the data in the event payload that is generated by the pageBusPayloadHelperApp, see Event Payloads for the Work Item and Process Instance Lists.
Procedure
-
From the wizard in the upper-left pane, click on the
Process Instance List tab.
The following dialog is displayed:
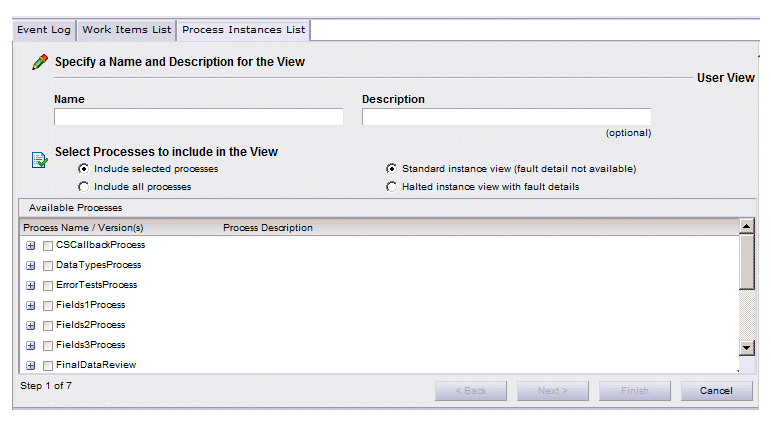
This dialog is used to name the new process view, as well as select one or more process templates that are to be included in the view. Note that process template is the term used when referring to the definition of a process. Instances of processes are started by business services. You will be able to see those instances in the view you are creating.
- Enter a name in the Name field, and optionally a description in the Description field, for the process instance list you are defining(1).
-
Choose the appropriate selection near the top of the dialog to specify whether you want to choose from the list of process templates that currently exist on the server, or all process templates, current and future. These options are described below:
- Include selected process templates - Selecting this causes the list of process templates that currently exist on the server to be displayed. This allows you to page through the list and select the desired process templates whose instances you want to appear in the process view you are creating.
- Include all process templates - Selecting this causes
all process templates to be included in the view, which in turn causes
all instances of those process templates to appear in the process instance list when the view is selected.
If you choose this selection, the process view you are creating will include all instances of all process templates that exist when the view is selected, not when it was created. Note that this is an important distinction from choosing the Include selected process templates selection and adding all of the process templates to the view — when that process view is selected, the process instance list will include the instances from all of the process templates that existed when the view was created, not when it is selected. If new process templates are added to the system, a process view created with the Include all process templates selection will include those process templates as well.
Note that the default “All Instances” process view has Include all process templates selected by default.
If you select Include all process templates, the list of process templates on the Select Process Template in the View dialog goes away, since you don’t need the list to select from; click Next then proceed to step 5.
-
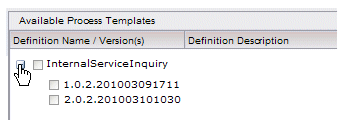
Select the process template(s) whose instances you would like to appear in the process view you are creating, then click
Next.
You can expand each of the templates to list all of the versions that are available for that template by clicking on the
 button:
- Clicking the boxes to the left of the version numbers selects only those specific versions.
- Clicking a top-level box (i.e., next to the template name) causes all versions of the template to automatically be selected. Note that if you select the top-level box, it causes all future versions of the template to also be included in the process view.
-
Choose whether you are creating a standard instance view or a halted instance view by selecting one of the following (note that these selections appear on the dialog only if you have the user access authority to define halted instance views), then click
Next:
- A standard instance view is one in which you will see the normal information about process instances. This type of process view does not, however, include details about halted processes instances.
- A
halted instance view contains attributes that provide information about why a process instance has become halted. This is a special-use process view that is typically only used by supervisory personnel for troubleshooting halted process instances.
For more information about halted process instances, see the TIBCO Workspace User’s Guide.
-
On the
Define Base Filter and Page Size dialog, specify the following dialog, then click
Next:
- Base Filter - This is a filter for the process view that is imposed every time the process instance list is displayed, but it is
not visible to the user. If a
refined filter is specified, either in this wizard or from the
Filter dialog after the process instance list is displayed, the refined filter is added to the base filter.
If you specify a base filter, you must enter valid filter syntax in the Base Filter field — it is not validated. For information about filter syntax, see the "Filtering Lists" topic in the TIBCO Workspace User’s Guide.
Also note that when filtering on text, it is case sensitive.
One thing you can do is advance three dialogs in the wizard, and enter the desired base filter on the Filter dialog. After entering the filter, select Show Expression from the Tools menu, which displays the created filter syntax on the bottom of the Filter dialog. Unfortunately, the expression cannot be copied, but it does allow you to view the valid syntax.
- Page Size - Specify the number of process instances you want on each page; the user can step through multiple pages to view all available process instances. It defaults to 20.
- Base Filter - This is a filter for the process view that is imposed every time the process instance list is displayed, but it is
not visible to the user. If a
refined filter is specified, either in this wizard or from the
Filter dialog after the process instance list is displayed, the refined filter is added to the base filter.
- On the Define Options dialog, specify the Options that are relevant to process instance lists, then click Next:
-
On the
Define User Access Fragment dialog, specify user access permissions, then click
Next.
This dialog is used to specify which functions will be available on the created process instance list.
You can directly enter the appropriate <access/> elements into the User Access Fragment field, or click the Insert Baseline button to insert the default user access permissions into the field:
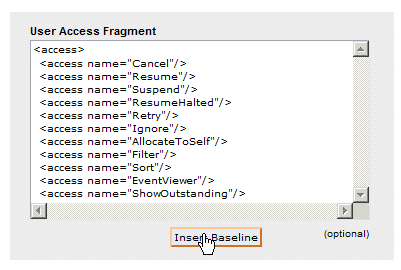
Once the baseline is inserted, you can remove access to a particular function on the created process instance list by deleting the appropriate line in the fragment. (Again, this is not validated — if an invalid XML entry is made, the application may not work properly.)
If you do not enter anything in the User Access Fragment field, the default access will still apply on the created process instance list, it is just not sent in the event payload.
For more information about user access permissions, see "Configuring User Access" in the TIBCO Workspace Configuration and Customization guide.
-
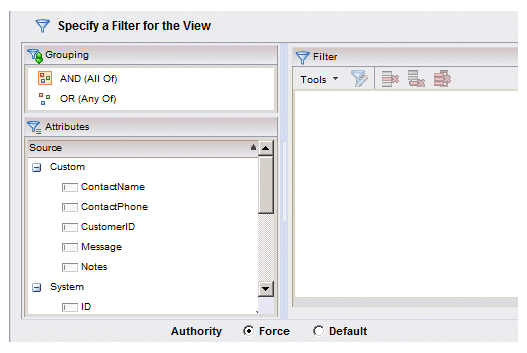
Using the following dialog, specify a filter that is to be applied on the created process instance list, then click
Next:
For complete information about filtering process instance lists, see the "Filtering Lists" topic in the TIBCO Workspace User’s Guide.
The Authority selections allow you to specify whether or not to forcibly impose the filter on the list, as follows:
- Force - The filter is always imposed on the list, regardless if the user had previously set a different filter on the list. In other words, it does not look in user data for a persisted filter on the list.
- Default - Prior to the list being displayed, user data is checked to see if the user had previously specified a filter for the list; if there is a persisted filter, it uses that, otherwise it uses the filter specified here (if no filter is specified here, no filter is imposed).
-
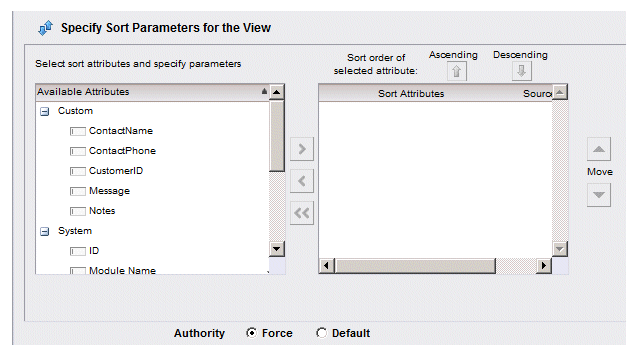
Using the following dialog, specify a sort that is to be applied on the created process instance list, then click
Next:
For complete information about sorting process instance lists, see the Sorting Lists chapter in the TIBCO Workspace User’s Guide.
The Authority selections allow you to specify whether or not to forcibly impose the sort on the list, as follows:
- Force - The sort is always imposed on the list, regardless if the user had previously set a different sort on the list. In other words, it does not look in user data for a persisted sort on the list.
- Default - Prior to the list being displayed, user data is checked to see if the user had previously specified a sort for the list; if there is a persisted sort, it uses that, otherwise it uses the sort specified here (if no sort is specified here, no sort is imposed).
-
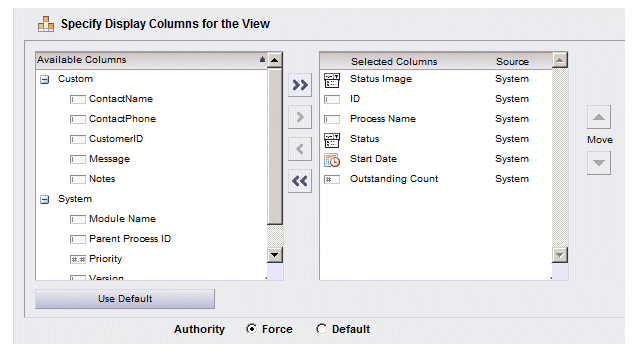
Using the following dialog, specify the columns that are to be displayed on the created process instance list:
For complete information about setting columns on process instance lists, see the "Working With Work Items" topic in the TIBCO Workspace User’s Guide.
The Authority selections allow you to specify whether or not to forcibly impose columns on the list, as follows:
- Force - The specified columns are always imposed on the list, regardless if the user had previously set different columns on the list. In other words, it does not look in user data for persisted columns on the list.
- Default - Prior to the list being displayed, user data is checked to see if the user had previously specified columns for the list; if there are persisted columns, it uses them, otherwise it uses the columns specified here.
-
Click
Finish to complete the definition of the process instance list.
The PageBus event message (in the form of a JSON string) that is the result of the list definition is displayed in the lower-left pane.
-
You can publish the event that is created by either:
- clicking the Publish button in the pageBusPayloadHelperApp, which displays the defined list in the right pane, or
- paste the event into the pageBusPayloadPublishApp so that it can be published from that sample application — see
pageBusPayloadPublishApp.
Note: You can only generate and publish a single event on either the Work Item List or the Process Instance List tab. In other words, if you generate an event payload for a work item list, you must restart the application before generating another work item list payload (after clicking the Publish button, it, as well as the Finish button in the wizard, become disabled, preventing you from generating another event of the same type without restarting the application). You can, however, generate an event payload on one tab, then switch to the other tab and generate an event payload on that tab.
You cannot use any of the four following characters in the view name or description: < (less than), > (greater than), & (ampersand), or “ (double quote). The application will not allow you to enter any of these characters.

