Using the Drag and Drop Method
Procedure
-
From the Organization Browser, either:
- select an LDAP container that contains the resources you want to map, or
-
select a group or position to which the resource you want to map has already been mapped.
This causes the resources in that container or group/position to appear in the resource list in the upper-right pane. Notice the icon displayed to the left of the resource names. The appearance of the icon tells you whether or not the resource has been created or mapped yet:
If the icon is not grayed out, the resource has either been mapped to a group or position, or it’s been created with the Create Resource function. If the icon is grayed out, the resource has not been mapped to a group or position, nor created yet. Note that resources can be “created” without mapping them to a group or position. Creating a resource causes an entry for that resource to be added to the database. For more information, see Creating Resources.
-
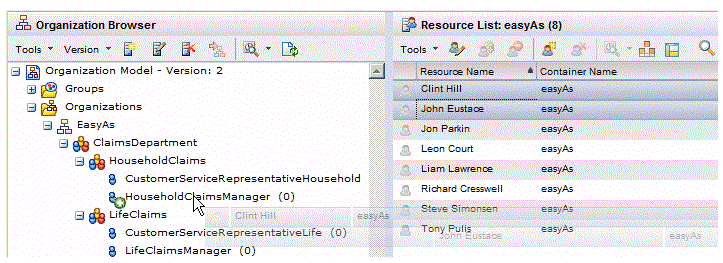
Click on, and drag, one or more resources to the group or position to which you would like to assign the resource(s). (Select multiple resources by holding the Ctrl key down while clicking each resource, or select a group of resources by clicking one resource, then while holding the Shift key, click the last resource in the group. You can also select all resources by selecting Select All from the Tools menu.)
Note - When dragging resources to groups or positions in the organization model tree, you must ensure that the green “plus sign” symbol (see the illustration below) is appearing before you “drop” the resource in the group or position. If an “insertion line” is appearing, it means you do not have the cursor positioned correctly (the cursor actually needs to be slightly below the group or position name). If the insertion line is appearing when you release the resource, it is not added to the group/position.
For example, to assign Clint Hill and John Eustace to the HouseholdClaimsManager position:

If one or more of the resources you have attempted to map to a group or position has not yet been “created” (i.e., previously mapped to a group or position, or explicitly created with the Create Resource function — see Creating Resources), the following dialog is displayed:

This dialog lists the resources that are not yet created among those you had attempted to map. If this dialog is displayed, you can do the following:
- Modify the resource name, if desired. The resource name is what the user must enter to log into the system. In the example shown above, “Clint Hill” must be entered as the 'username to log in (if left unchanged on this dialog). To modify it, select the name in the Resource Name column and change it to the desired resource name.Note: Note that only one case variation of a resource name is allowed, across all LDAP containers. For example, if there is already a resource with the name "Clint Hill", you cannot create a resource with the name of "clint hill".
The resource name can be changed at a later time if desired; see Renaming a Resource.
- Click the Save button - This creates the resource(s) and displays the Resource Editor. All of the resources that you attempted to map to a group or position are listed in the editor.
- Click the Cancel button - This causes the Resource Editor to be displayed without creating the resources that were listed on the Create Resource(s) dialog. Only the resources that were already created among those you attempted to map to a group or position are listed in the editor. (Note, however, that the Resource Editor does not appear if the Cancel button was clicked if none of the resources dragged were not already resources; it only appears if the Cancel button was clicked when at least one of resources that was dragged was already created.)
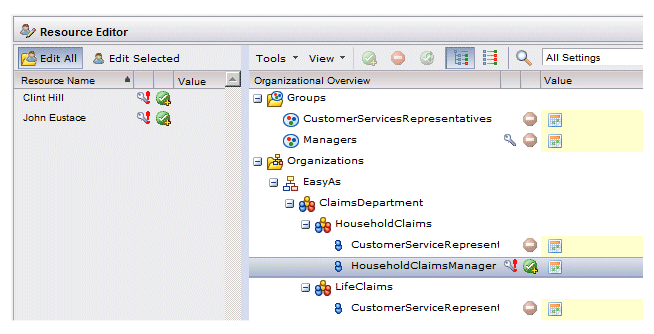
When the Resource Editor is displayed (either with or without the Create Resource(s) dialog being displayed), the group or position to which you are mapping users is selected with the “grant membership” icon (
 ) shown on that group or position. For example:
You can immediately click OK to map the resource(s) to the group or position. Or you can use the Resource Editor to map/remove the selected resources to/from additional groups or positions.
The icons on the Resource Editor provide information about whether or not the listed resources have the required capabilities for the groups or positions to which they are mapped.
For information about all of the functions available from the Resource Editor, see Viewing Editing Resource Information.
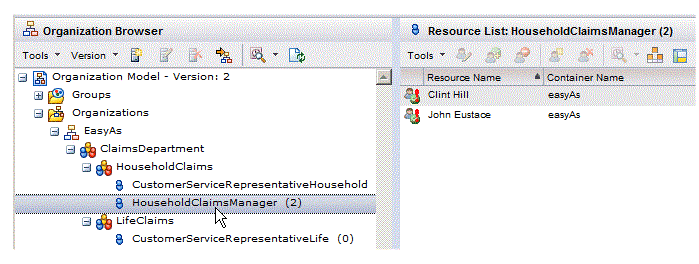
After adding a resource to a group or position, you can verify the assignment by clicking the applicable group or position in the left pane. For example:

The icons shown in the resource list in the example above indicate whether or not the listed resources have the required capabilities for the selected group or position. Note, however, these icons are displayed only if Include Resources With Required Capabilities is selected from the Tools menu — for more information, see Evaluating Required Capabilities from the Resource List.
- Modify the resource name, if desired. The resource name is what the user must enter to log into the system. In the example shown above, “Clint Hill” must be entered as the 'username to log in (if left unchanged on this dialog). To modify it, select the name in the Resource Name column and change it to the desired resource name.
