Using the Column Selector
The Column Selector allows you to customize the columns for a particular list — it does not affect the columns in other lists. For instance, if you customize the columns for your Inbox, the columns in your other work views are not affected.
Columns displayed via the Column Selector are persisted until you change them again. Note that persisted settings are saved on the server, so if you log onto a different machine, those settings will be in effect on that machine also.
Each column in a list represents an attribute, which holds information about some aspect of the item in the list. Note, however, that there are differences in the way the columns are listed in the Column Selector, as described below:
- Work item list - All available columns are listed in alphabetical order — see the illustration in step 1 below.
- Process instance list
- Both
System
and
Custom
columns are listed in the Column Selector(1).
System columns/attributes contain information that the system entered in the attribute, such as the instance start date, current status, etc.
Custom columns/attributes represent customer-specified fields that are added to a process when it is defined. Those fields can then be added to forms. When a user enters information in the fields on a form (e.g., customer name, address, loan amount, etc.), that information is stored in the custom attribute for that field.
Note that for process instance lists, the Column Selector will always show all system columns/attributes, because they are available in every process instance. However, it will only show the custom columns/attributes that are common to all process instances that were included in the process view.
- Event lists - The Column Selector lists the available columns/attributes in a tree structure categorized by the components that write values to the attributes. You can expand or collapse the list below each component name, as needed, by clicking the + or - icon to the left of the component name.
To customize the columns in a list using the Column Selector, follow these steps:
Click the
![]() button or choose Select Columns from the
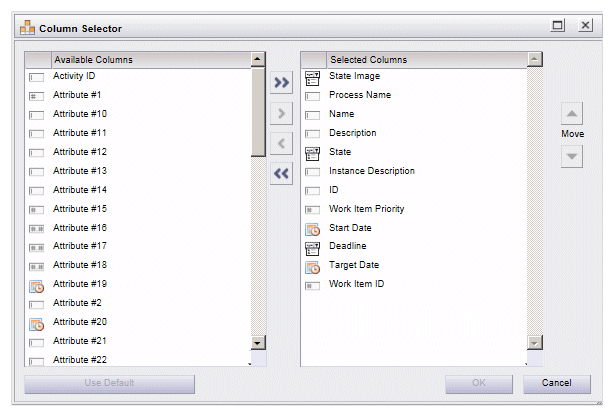
View menu. The following dialog is displayed (this is an example Column Selector from the work item list — the other lists will offer different available columns):
button or choose Select Columns from the
View menu. The following dialog is displayed (this is an example Column Selector from the work item list — the other lists will offer different available columns):
This dialog is used to specify which columns to display. Move the columns that you don’t want displayed to the list on the left. Move the columns you do want displayed to the list on the right.
Procedure
- Select the desired columns, using the following actions:
-
Move columns to the desired list in the Column Selector:
- Columns can be moved back and forth between lists by selecting the desired column(s), then clicking the “” or “<“ buttons.
- An individual column can be moved from one list to the other by double-clicking the column name.
- Columns can also be moved from one list to the other by using a “drag and drop” method — click on the desired column name (or group of selected column names), and while holding the mouse button, drag them to the desired list and release the mouse button.
- All columns can be moved from one list to the other by clicking the “” or “<<“ buttons.
You can also change the columns to the current default for that list type by clicking the Use Default button — for more information, see The Column Default.
- Once the columns you want displayed are shown in the list on the right, you can change the order in which they will appear on the work item list by doing one of the following:
- Click OK when the list on the right contains the columns you would like displayed, in the order you would like them displayed.
The listing of custom columns/attributes is controlled via user access profiles. They are shown in the Column Selector only if you have the proper access.

