A node is a container that host one or more JVMs to execute an ActiveSpaces® Transactions application; it is the primary element that you manage when you manage a ActiveSpaces® Transactions application.
![[Note]](images/note.png) | |
When a node is created it is an empty container. It is bound to a specific application as part of deploying JVMs on the node. |
Each node runs a single application, though an application may run on any number of nodes. An ActiveSpaces® Transactions business solution can be made up of one or many applications, as shown in Figure 2.4, “Solutions are made of applications, which run on nodes on hosts”.

Each node (and there may be more than one on any host machine) contains the whole stack of ActiveSpaces® Transactions - Application-Management-Channels; each node is a fully functional ActiveSpaces® Transactions element. The next section discusses the basic controls you have over a node and the Java Virtual Machines that execute in a node.
The most fundamental control that you have over a node is to manage its life cycle. A node can be installed (i.e. Created), started, stopped, and removed, as shown in Figure 2.5, “Node life cycle”.
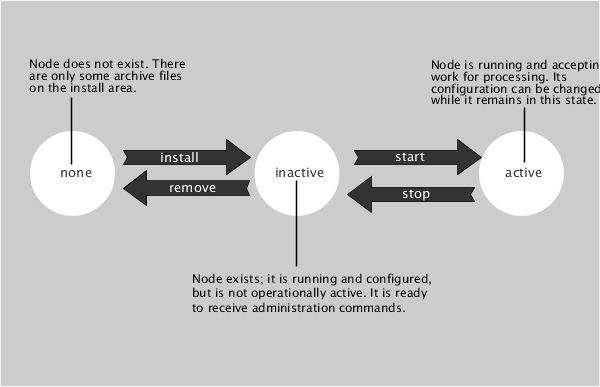
The following paragraphs describe what happens when you install and start a node. (Removing and stopping a node basically just "undo" the result of installing and starting.)
To install a node, you use an administration client to perform an install node command. This starts up a node and prepares it for work, as depicted in Figure 2.6, “Installing a node”. (Installing a node has nothing to do with installing the ActiveSpaces® Transactions product files onto a computer; it is an administration action that brings a node into existence.)

When a node is installed, it gets ready to support deployment of applications onto the node; it also starts a system coordinator. The system coordinator is responsible for monitoring all of the processes running on the node. These services prepare the node to receive and execute administrative commands, even though it is not yet in the "active" state. Notably, the node is ready to execute the "start" command.
An installed node is running an administration server that listens for commands on a port. You can issue commands to the node via this port, using either the command-line interface (CLI), a graphical user interface (GUI) management console, or a standard Java Management Extensions (JMX) console. These tools are discussed in ActiveSpaces® Transactions Administration Guide.
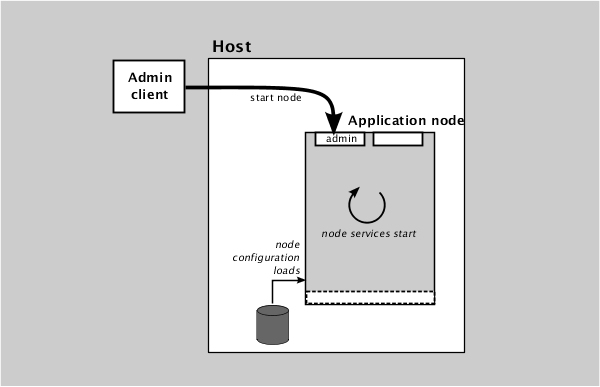
When you start a node, it loads its default node configuration files, starts node application services, and waits for an application to be deployed, as depicted in Figure 2.7, “Starting a node”.
One or more Java Virtual Machines (JVMs) can be hosted on a node, each with a unique name. Each JVM on a node can have:
a different main executing.
different class paths.
different classes loaded.
different components loaded.
The life cycle of the JVMs are independent of the node and of each other. A JVM can be installed, started, stopped, and removed.
The following paragraphs describe what happens when you install, start, stop, and remove a JVM.
A deployment tool is used to install, or deploy, a JVM along with the JAR files that will be executed in the JVM. Once a JVM has been deployed it can be started.
To start a JVM, you use an administration client to
perform a start jvm command. This starts up a JVM
and starts executing Java code. The JVM can either start execution at
a main entry point, or load and execute one or more
deployed ActiveSpaces® Transactions
components (see the ActiveSpaces® Transactions
Java Developer's Guide for
details).