Decision Table Editor Reference
You can create and edit a decision table in WebStudio using the Decision Table editor.
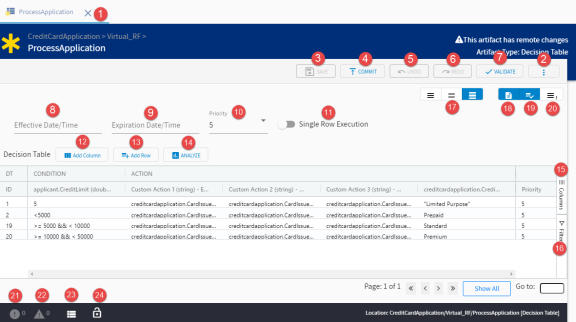
The decision table editor displays the condition and action columns of the decision table and provide various options to edit and manage the decision table. The decision table also displays the auto-generated ID for each row (on the left-most column) and Priority of each row (on the right-most column). The default Priority value for each new row is 5 but if required, you can select a different value from the drop-down. For details about decision tables, see Decision Table Overview.
The following sample screen displays a decision table editor in WebStudio and provides brief description of its elements.
| Element No. | Element | Description |
|---|---|---|
| 1 | Table Title | Displays the decision table name |
| 2 | More Options | Lists more options for decision table. The options are:
Delete
Deletes the artifact. Click
Confirm on the confirmation screen to delete the artifact. After deletion commit the changes to the project using the tree view.
You can also delete a project from the workspace using the tree view. Commit
Commits the changes to the artifact for approval. In the Commit Changes window, enter a comment for the changes in
Message text box. Click the artifact name to review the changes for commit. Click
Confirm to commit the changes to RMS repository.
Synchronize
Synchronizes the update from the server to your local copy of the artifact. For more details about the fields present on the Synchronize Artifact window, see
Synchronize Artifact Details Window Reference.
Revert
Reverts the update (if not committed) done to an artifact. In the Revert window, click the artifact name to review the changes to revert. Click
Confirm to revert the changes.
Lock
Locks the artifact for the user and other user cannot commit any changes to the table until it is unlocked. This option works only if the
ws.scs.locking.enable property is set to true in
RMS.cdd.
Rename
Provide a new name to the artifact. After changing the file name, commit the changes so the artifact is treated as a new artifact.
History
View list of the revisions of the artifact that were committed. For each revision, you can click
View Content to view the revision that was committed or you can click
View Commit to view the revision details.
Audit Trail
Displays the list of actions performed on the artifact by users. You can refine the results using the filters available in the
Audit Trail window. For more information on the fields, see
Viewing Audit Trail of an Artifact or Project.
Export
Exports the artifact to your local computer. Decision table is exported as a Microsoft Excel ( .xls or .xlsx) file.
|
| 3 | Save | Saves the changes to the decision table locally, but does not commit to RMS for approval |
| 4 | Commit | Commits the changes to the decision table for approval |
| 5 | Undo | Reverts last edit done to the decision table |
| 6 | Redo | Performs the action again that was reverted using the Undo command |
| 7 | Validate | Validates a decision table, for any access control violations or syntax errors in the table.
EAR file for the project must be present in the deploy location; otherwise, the validate command fails. All the errors are displayed on the Problems tab at the bottom of the editor. New errors in syntax are added to these existing errors. Double-click errors to see the problematic view. |
| 8 | Effective Date/Time | Specifies the date and time on which the decision table becomes valid in the runtime application |
| 9 | Expiration Date/Time | Specifies the date and time after which the decision table is no longer valid in the runtime application |
| 10 | Priority | Sets a priority for the decision table as desired. When a VRF has multiple implementations (decision tables), the decision table’s Priority setting determines the order in which the decision tables executes |
| 11 | Single Row Execution | Set the toggle to ON, if you want the decision table to stop after one row (rule) passes the condition tests. Only the actions of that row are considered (until the next time the decision table’s rule function is called). |
| 12 | Add Column | Opens the Add Column window. The fields available in the Add Column window are:
Custom Type
Toggle the switch to
ON to add a custom column or toggle the switch to
OFF to add a regular column.
Select Columns
Select the properties to be added as regular column to the decision table. You can select multiple fields and they each of those fields is added as separate column. This field is available only when
Custom Type is
OFF.
Column Name
Enter the custom condition or action. The custom condition or action can use the rule language, standard functions, and data in the scope of the function at run time (for example, scorecards and global variables). It can also contain complex formulas.
Column Type
Select
Condition or
Action to add the selected column as condition or action column.
Property Type
(Read only) Specifies property type of the custom condition or action.
|
| 13 | Add Row | Add an empty row at the end of the decision table. For your convenience, the newly added row is displayed at the bottom of the selected page of the decision table. Click
Save to save the newly added row and its content.
Once the new row is added, you can also right-click a cell in the row to perform operations like copy-pasting, duplicating, removing, or disabling the row. For specifying conditions with parameters of type Date/Time, you can right-click the cell and set the condition using the Date/Time picker. Select the operator from the Select dropdown and set the date and time. |
| 14 | Analyze | Opens table analyzer for analyzing the table. For details about table analyzer, see Analyzing a Decision Table |
| 15 | Columns | Select check boxes for the colunms that you want to filter out. |
| 16 | Filter | Select check boxes for the rows that you want to filter out. |
| 17 | Layout type | Select the type of layout for the artifact. |
| 18 | Show table properties | Shows the table properties like Effective Date/Time, Expiration Date/Time, Priority, and Single Row Execution. For more information about these properties, see Decision Table Editor Reference. |
| 19 | Show decision table | Use this button to show and hide the artifact. |
| 20 | Show exception table | Displays the exception table for the artifact. |
| 21 | Errors | The icon displays the number of errors. Click on the icon to open the Problems tab |
| 22 | Warnings | The icon displays the number of warnings. Click on the icon to open the Problems tab |
| 23 | Properties | Displays the properties for the decision table, cell, and the rule. |
| 24 | Lock Indicator | Indicates whether the artifact (decision table) is locked or unlocked |
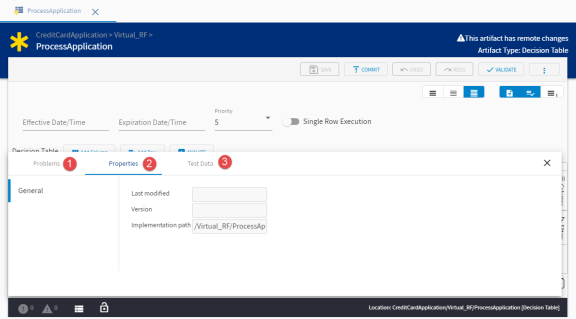
You can access the Problems, Properties, and Test Data tabs by clicking the Error/Warnings or the Properties icon. The following sample screen displays these tabs and provides brief description of its elements.
| Element No. | Element | Description |
|---|---|---|
| 1 | Problems | Displays the errors and warnings after decision table validation. |
| 2 | Properties |
Displays the properties for the decision table, cell, and the rule.
|
| 3 | Test Data | Test data is used for validating decision table. Using test data you can verify if the decision table covers all the data that might be passed through the decision table. The test data is not managed in the decision table. The test data must be in the project in your repository. |