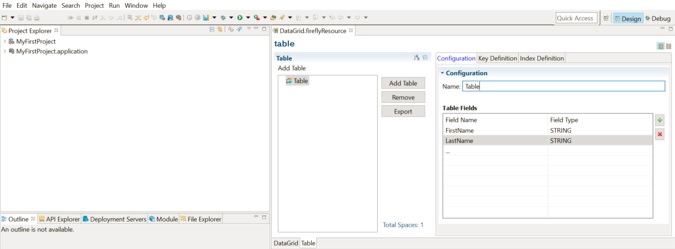
Adding a Table

In the Getting Started tutorial, the third task you must do using the plug-in is to add a table.

A Table shared resource represents a table. The Table shared resource is embedded in the DataGrid shared resource. To use the ActiveSpaces DataGrid activities, you must create a DataGrid connection and then add a table to the DataGrid.

Prerequisites

You must create a DataGrid connection as described in Creating a DataGrid Connection in the project.

Procedure

  1. In the DataGrid Editor, click the Table tab.
    The Table Editor opens.
  2. In the Table panel, click Add Table to add fields to a table in the DataGrid.

    The table parameters that you can specify for configuration is displayed in the right panel. See Table Connection Parameters.
  3. Enter the Table Name.
  4. Click the "+" button beside the Table Fields definition.
  5. In the Configuration panel, specify the table fields.
    1. Enter the Field Name.
    2. Enter the Field Type.
  6. Repeat steps 4 and 5 to add more fields.
  7. Click the Key Definition tab.
  8. In the Key Definition panel, specify the key definition.
    1. Click . In the Select dialog box, select the Key Field Names. Click Apply.
  9. Optional: In the Index Definition panel, specify the index definition.
    1. Click the Index Definition tab.
    2. Enter the Index Name.
    3. Click , and enter the Index Field Names.
    You can manage the tables, by using Add Table to add a table, Remove to remove a table, or Export to export a selected table.

What to do next

After you have added a table, the next task is to configure a process. See the Getting Started tutorial.