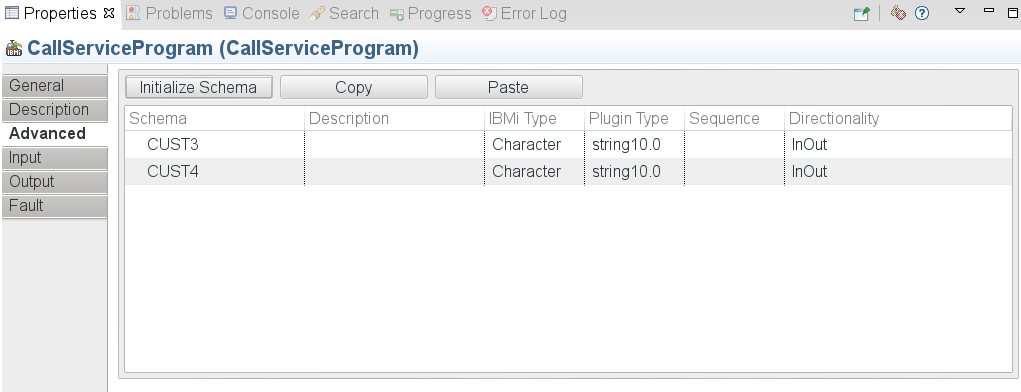
Creating a Message Schema

TIBCO ActiveMatrix BusinessWorks Plug-in for IBM i allows you to customize the message schema in the Advanced tab.

Prerequisites

Before creating a message schema, ensure that the configuration in the General tab is valid.

Procedure

  1. Click the Advanced tab of an activity.
  2. Click Initialize Schema to initialize a message schema, and an entry item is displayed in the Schema column.
    Note: For the CallProgram activity and CallServiceProgram activity, click Initialize Schema to load the message schema from the IBM i system, then you can customize the message schema.
  3. Right-click the entry item and click add Item to add a schema item.
    Note: For the CallProgram activity and CallServiceProgram activity, there is no entry item in the Schema column. Right-click anywhere in the Schema column and click add Item to add a schema item.
  4. Configure the added item:
    1. Double-click the item to change the item name.
      The item name cannot be a number or start with a number. The following characters are escaped when they are used as part of the item name or schemaNode name:
      Character Escaped to
      ` __grave_
      ~ __tilde_
      ! __excl_
      @ __AT_
      # __HASH_
      $ __DOLLAR_
      % __percnt_
      ^ __caret_
      & __amp_
      * __ast_
      ( __lpar_
      ) __rpar_
      - __-
      = __equals_
      + __plus_
      | __verbar_
      \ __bsol_
      ? __quest_
      < __It_
      > __gt_
    2. Enter a description in the corresponding Description column.
    3. By default, the character type is used as the IBMi type for the added schema item. To change the IBMi type, double-click the corresponding IBMi Type column, and click to select a data type from the pop-up window. The following table shows the relationship between the IBMi type and the Plugin Type.
      IBMi Type Length (Default Value) Precision Plugin Type
      Binary1 Uneditable (3) Uneditable byte
      Binary2 Uneditable (5) Editable short
      Note: If the precision of Binary2 type is not 0, The Plugin type is decimal.
      Binary4 Uneditable (10) Editable integer
      Note: If the precision of Binary4 type is not 0, The Plugin type is decimal.
      Binary8 Uneditable (20) Uneditable long
      Character Editable (None) Uneditable string
      Date Uneditable (10) Uneditable date
      Note: If you select this data type, you must use the YYYY-MM-DD format for input.
      Double Uneditable (8) Uneditable double
      Float Uneditable (4) Uneditable float
      Graphic Editable (None) Uneditable string
      indicator Uneditable (1) Uneditable boolean
      PackedDecimal Editable (None) Editable decimal
      Time Uneditable (8) Uneditable time
      Note: If you select this data type, you must use the HH:mm:ss format for input.
      TimeStamp Uneditable (26) Uneditable dataTime
      Note: If you select this data type, you can use either the YYYY-MM-DDTHH:mm:ss format or the YYYY-MM-DDTHH:mm:ss+HH:mm format for input.
      Unicode Editable (None) Uneditable string
      Unsigned Binary 1 Uneditable (3) Uneditable unsignedByte
      Unsigned Binary 2 Uneditable (5) Uneditable unsignedShort
      Unsigned Binary 4 Uneditable (10) Uneditable unsignedInt
      Unsigned Binary 8 Uneditable (20) Uneditable unsignedLong
      Zoned Decimal Editable (None) Editable decimal
    4. Enter an integer in the corresponding Sequence column. The entered value indicates the number of occurrences of the item in the Input tab.
      For example, if you enter 3 as the sequence value for a NAME item, then in the Input tab, you can right-click the NAME item and click Duplicate
      Note: For the QueueReceiver activity and the ReadQueue activity, the entered value indicates the number of occurrences that the item appears in the Output tab.
  5. Right-click the entry item and click add schemaNode to add a schemaNode.
    Note: For the CallProgram activity and CallServiceProgram activity, right-click anywhere in the Schema column and click add schemaNode to add a schemaNode.
  6. Configure the added schemaNode:
    1. Double-click the schemaNode to change the schemaNode name.
      Note: The schemaNode name cannot be a number or start with a number. And some characters are escaped when they used as part of the schemaNode name, see Escaped Characters for more information.
    2. Enter a description in the corresponding Description column.
    3. Enter an integer in the corresponding Sequence column. The entered value indicates the number of occurrences that the schemaNode appears in the Input tab.
      For example, if you enter 3 as the sequence value for a Contact schemaNode, then in the Input tab, you can right-click the Contact schemaNode and click Duplicate to create a same Contact schemaNodes. You can create two Contact schemaNodes at most because the specified sequence is 3.
      Note: For the QueueReceiver activity and the ReadQueue activity, the entered value indicates the number of occurrences that the schemaNode appears in the Output tab.

Example

An alternative to using the schema editor is to use the Data Conversion plug-in. To use it, select Binary Input at the top of this screen. This will disable the wizard control and modify the input/output schemas of the activity to provide access to the raw bytes read or written by the activity.

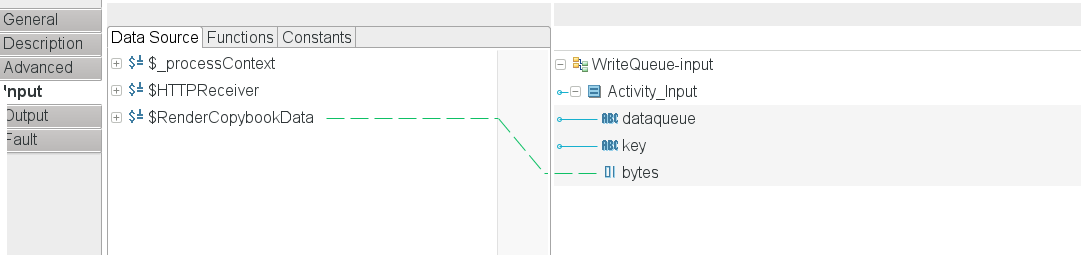
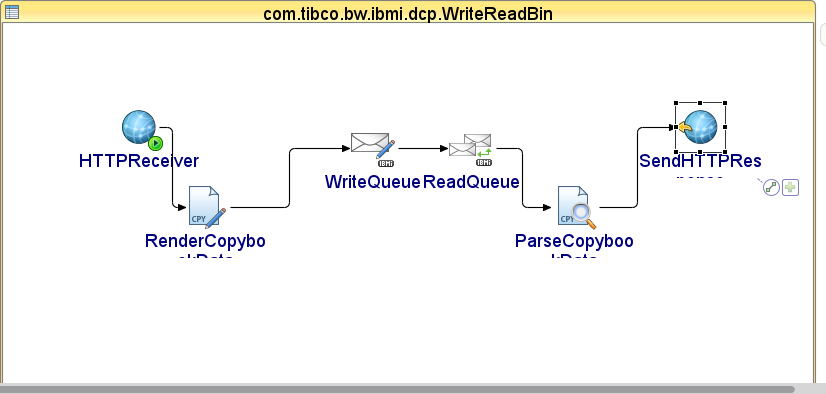
The Data Conversion Plug-in allows creates an XML representation of the contents of the RPG copybook, which maps the message or a program input/output. As it is a shared resource, it alleviates the need to enter it on more than one activity. This is an example of a typical Data Conversion Plug-in flow: