JMS Configuration
On the JMS Configuration tab, you can add, modify, or delete the JMS connection information. You can also delete all the JMS configuration data.
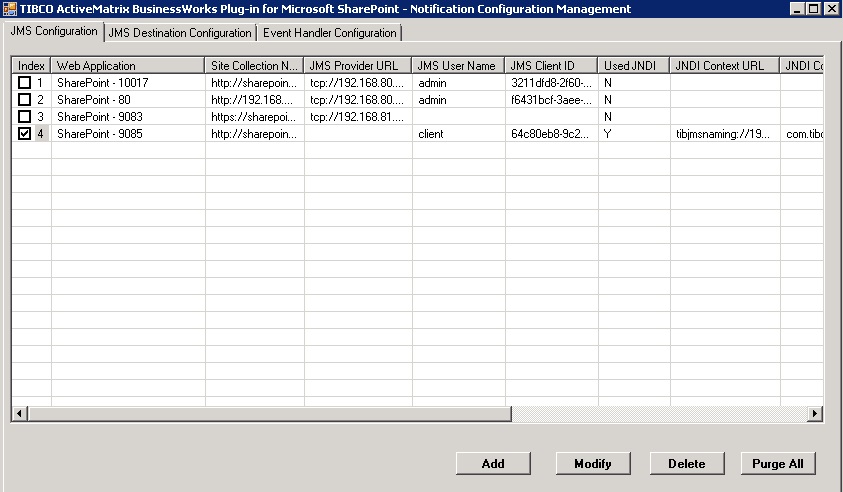
The following table lists the GUI elements on the JMS Configuration tab:
| GUI Element | Description |
|---|---|
| Add | Click this button to add a new JMS connection. After you click this button, the Add JMS Configuration Information window is displayed. See Adding JMS Configuration Information for details about the description for each field. |
| Modify | Click this button to update the existing JMS connection. After you click this button, the Modify JMS Configuration Information window is displayed. See Modifying JMS Configuration Information for details about the description for each field. |
| Delete | Click this button to delete the existing JMS connection after you select the entry in the table. |
| Purge All | Click this button to purge all JMS configuration data by using the SharePoint Notification Configuration Management tool. |
Adding JMS Configuration Information
On the JMS Configuration tab, click Add to add a new JMS connection.
In the Add JMS Configuration Information window, you can configure the JMS connection information. After you complete the JMS connection configuration, the corresponding JMS and SSL configurations are stored in the Microsoft SharePoint server.

The following table lists the GUI elements in the Add JMS Configuration Information window:
| GUI Element | Description |
|---|---|
| SharePoint Web Application | (Required) Specify the web application. |
| SharePoint Site Collection | (Required) Specify the site collection. If you select the Select All item, the configured JMS information are applied to all site collections in the selected web application. |
| JMS Server Connection Configuration | |
| JMS Username | (Required when authorization is enabled on the JMS server) Specify the user name used to access the JMS server. |
| JMS Password | (Required when authorization is enabled on the JMS server) Specify the password used to access the JMS server. |
| Client ID | (Optional) Specify the client ID of the JMS connection. Each connection must use a unique client ID. |
| Auto-generated JMS Client ID | (Required) Specify whether you want to automatically generate a client ID for the connection to a JMS server. The automatically generated string is in GUID format. |
| JMS Provider URL | (Required) Specify the URL to the JMS service provider. The general syntax is protocol://hostname:port. To take TIBCO Enterprise Message Service as an example, the URL is tcp://localhost:7222. |
| Use JNDI for Connection Factory | (Required) Specify whether you want to use Java Naming and Directory Interface (JNDI) to query the factory object from the JMS server. If selected, you have to configure JNDI Context Factory, Topic Connection Factory, JNDI Context URL, Queue Connection Factory, JNDI Username, and JNDI Password fields. |
| JNDI Configuration | |
| JNDI Context Factory | (Required for using JNDI) Specify the initial context factory class for accessing JNDI. The default context factory for TIBCO Enterprise Message Service is com.tibco.tibjms.naming.TibjmsInitialContextFactory. |
| Topic Connection Factory | (Required for using JNDI) Specify the topic connection factory used to create connections for publishing or subscribing messaging. The default value is TopicConnectionFactory. |
| JNDI Context URL | (Required for using JNDI) Specify the URL to the JMS service provider. The general syntax is protocol://hostname: port. To take TIBCO Enterprise Message Service as an example, the URL is tibjmsnaming://localhost:7222. |
| Queue Connection Factory | (Required for using JNDI) Specify the queue connection factory used to create connections for point-to-point messaging. The default value is QueueConnectionFactory. |
| JNDI Username | (Required for using JNDI when authorization is enabled on the JMS server) Specify the user name used to access a JNDI server. |
| JNDI Password | (Required for using JNDI when authorization is enabled on the JMS server) Specify the password used to access a JNDI server. |
| Use SSL for JMS | (Optional) Specify whether you want to use SSL to support client authentication for the JMS server. If selected, you have to configure Trusted Certificates Path, Identity File, Identity Password, and Target Host Name fields. |
| SSL Configuration
See Configuring SSL for TIBCO Enterprise Message Service for details about how to use SSL. |
|
| Trusted Certificates Files | (Required for using SSL) Specify the full paths and names to the certificates.
Click Add Certificates or Remove Certificates to add or remove the certificates used to verify the identities of servers and clients. You can select more than one certificate at a time. |
| Target Host Name | (Required for using SSL) Specify the common name of the JMS server certificate. |
| Identity File | (Required for using two-way SSL authentication) Specify the full path and name to the identity file. Click Browser to locate the identity files. |
| Identity Password | (Required for using two-way SSL authentication) Specify the password used to access the identity file. |
| Save | Click this button to save the JMS configuration. |
| Cancel | Click this button to exit the JMS configuration. |
| Test JMS Connection | Click this button to test whether the specified JMS configuration fields result in a valid connection to the JMS server. |
Modifying JMS Configuration Information
You can update the JMS information, and then click Modify to save the configuration. The fields in the Modify JMS Configuration Information window are similar to the fields in the Add JMS Configuration Information window. See Adding JMS Configuration Information for more details about the description of each field.