Monitoring your data
Overview
Once an administrator has completed configuration, business users can use the add-on to view and analyze data quality statistics. The two main ways that business users interact with the add-on are via the Dashboard and the Execute and Query services. The dashboard visually presents collections of configured indicators. See Dashboard overview for more detailed information about using the dashboard. The Execute and Query service allows you to execute indicators, view execution history, and generate reports. For an overview of this service's functionality, see Using the Execute and Query service.
Dashboard overview
Depending on configuration options set by your administrator, you can open the dashboard from the main EBX® tool bar, or from a dataspace or dataset or table's Actions menu. Open the menu and in the Services group, select Insight > Dashboard. The main parts of the dashboard are highlighted in the following image:
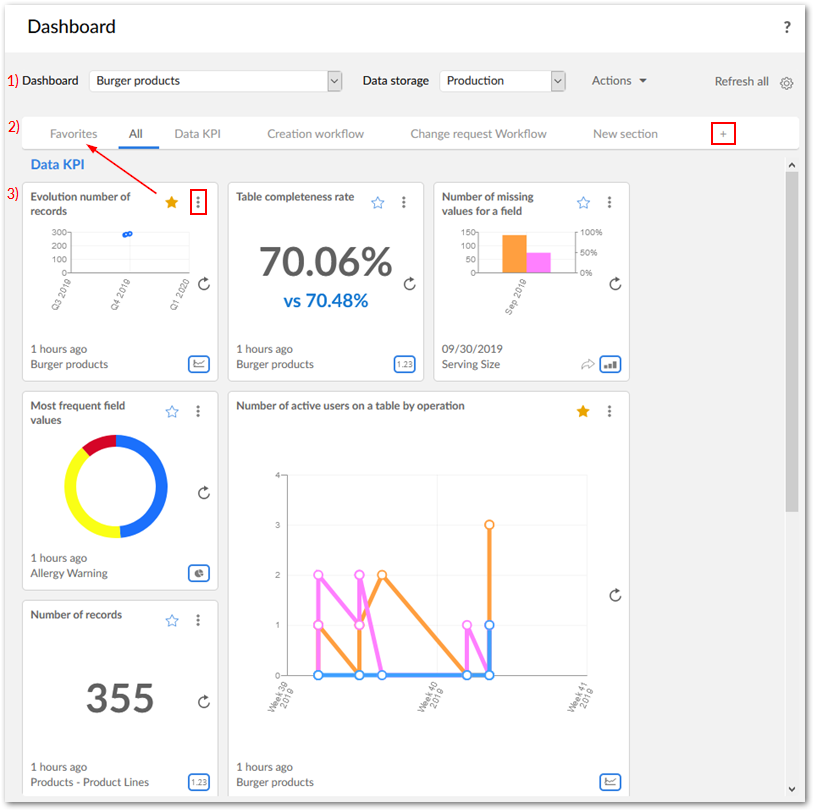
The following list describes the sections highlighted above in more detail:
From left to right the title displays: the current dashboard configuration and Actions menu, from which you can export a PDF of the current dashboard. If enabled, you will also be given the option to select the data storage location for the dashboard.
The Dashboard menu which lists the currently displayed dashboard and allows you to access others.
If enabled, the Data storage menu that allows you select the data storage location for the dashboard.
The Refresh all button refreshes indicator display for the current dashboard. Note that this does not execute indicators. To execute an individual indicator, select the reload icon.
Administrators can use the settings icon to update the dashboard's configuration.
The selectable tabs correspond to sections in the current dashboard. In the image, the All tab is selected and displays all sections in the current dashboard. Two tabs of note are the Favorites tab and the tab with the
 icon. The Favorites tab displays all starred tiles from the current dashboard. The tab displays for users with administrative privileges and enables creation of a new dashboard section. Additionally, administrators can:
hover over a tab and select
 to remove it from the dashboard.
double-click tab labels to re-name.
The image shows examples of large and small indicator tiles. Generally speaking, large tiles work better for graphs, whereas small tiles work well to display smaller charts and data. If you have administrative privileges, you can use the indicator menu to remove it from the section. See the Understanding indicator tiles section below for additional information about the actions and features available on the indicators.
Understanding indicator tiles
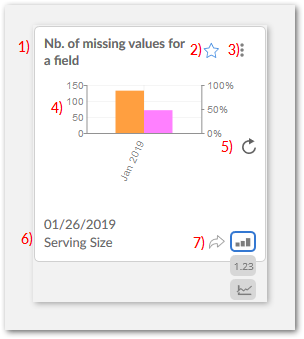
The way information on an indicator tile displays varies depending on the tile type and data being displayed. The image and list below provide an overview of indicator tile features and the User Guide section Expanding dashboard tiles, provides additional details when viewing expanded chart type indicators:
|
|
Using the Execute and Query service
You can run the Execute and query service from dataset and table Actions menus. Once you've run the service, you can:
Execute indicators and view their results.
Query and obtain information about specific indicators.
Generate dynamic reports that the add-on executes on only one indicator, but can include multiple D.E.C.s to which that indicator is attached.
The Execution, query and dynamic indicator report section in the User Guide describes this service's functionality in greater detail.