Task 4: Configuring a merge policy
Overview
When a matching operation positively identifies duplicate records, or a user manually initiates a merge, the merge policy determines:
Which record should survive the merge process. In other words, the record into which values will be merged to create a golden record.
The function used to decide which data values will be included in the golden record. One function can be applied to the entire table, or you can set a separate function for each field.
Whether a new golden record is automatically created. If not, values are merged into an existing record.
How FK relationships are handled as part of a merge. For example aligning foreign keys to the new golden record by updating the foreign keys in related tables to target the new golden record.
Creating Merge policy settings
To create a Merge policy (Begin with Step 2 if you completed the previous quick start task):
From the main menu bar, select the Administration panel and open Data Quality & Analytics > TIBCO EBX® Match and Merge Add-on and open the table settings to which you want to add a Merge policy.
Select the Merge policies tab.
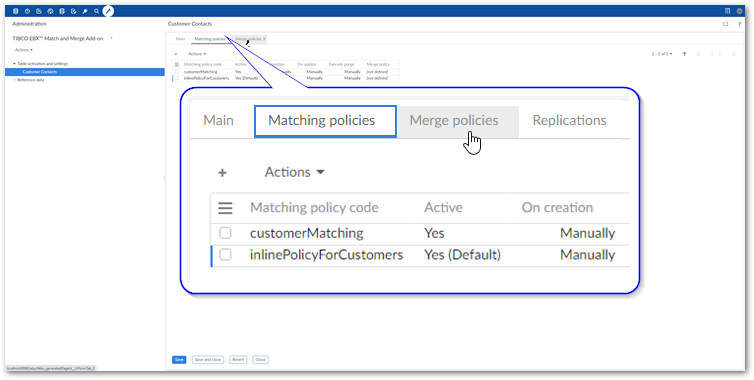
Select '+' icon to create a new merge policy and fill in the required fields on the page that displays. The image below highlights these options:
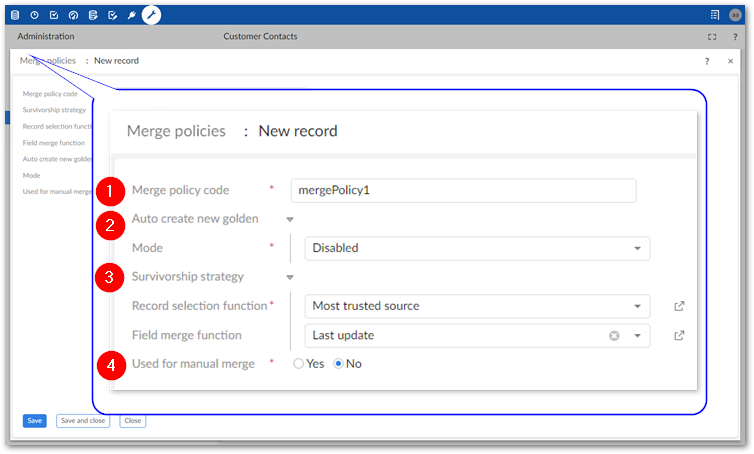
1) Merge policy code
A name used to describe this merge policy.
2) Auto create new golden
Allows you to specify that a new record will be automatically created as part of the merge process. The Mode drop-down menu allows you to activate and specify when a new golden is created.
When this option is enabled, you can use the Customize source value for new golden option (not shown) to specify the source to use. The field populates with trusted sources configured in the following location: TIBCO EBX® Match and Merge Add-on > Reference data > Trusted sources.
Note
If the selected source field is a foreign key to another table, its data type must match that of the primary key in the lookup table.
3) Survivorship strategy
Determines how values are survived into new records.
Record selection function: Specifies the record selection function to use. A record selection function determines which record survives the merge process. For example, with the Most trusted source option, the record stemming from source with the highest level of trust will survive the merge process. Data values will be merged into the surviving record to create a golden record.
Field merge function: You can use this property to specify a single function that determines which data values are merged into the golden record. If you would like to create settings for different fields, use the options in the Survivor field tab to do so.
4) Used for manual merge
Sets whether this merge policy's settings are applied when a user manually initiates a merge operation. If multiple merge policies are defined for the same table, you can only enable this option on one policy. When enabled:
Values for the manual merge are pre-selected based on this merge policy's settings. Users can still update selections from the merge screen.
The Apply permission on merge view field displays. This option allows you to set whether TIBCO EBX® permissions apply in the Merge view. This allows you to address the use case where a data steward needs to access all fields in order to perform a successful merge.
Configuring survivorship fields
Merge policies allow you to define criteria for entire tables, but also allow you to set parameters for individual fields. To set merge behavior for a specific field:
Select a merge policy's Survivor field tab and use the '+' icon to set up a new field.
The following list highlights some of the options:
Field: Choose the field on which these settings apply.
Field merge function: Select the function used to choose which value should survive the merge process. If you choose Constant, you can enter a value that the add-on will populate this field with (in all golden records). Note that this option is only available for fields of String and Text data types and not for multi-valued fields.
Condition for field value survivorship: Optionally, enter a predicate expression to evaluate the value to be survived. Both the Field merge function and this expression must evaluate to true to be survived. The XPath predicate expression used here must comply with EBX® requirements. For more information, see the Supported XPath syntax section EBX® Reference Guide.
Execute only if empty: Set whether the merge only happens when the value in the survived record is empty.
Managing relationships
The add-on allows you to set behavior for cases when a merge operation involves relationships. For example, you might want to update a foreign key that points to the value in a merged record to point to the value in the golden record. To manage how the add-on handles relationships in these types of scenarios:
Attention
The following steps apply to related tables contained in the same dataset. If the related table is in a different dataset or dataspace, the add-on will automatically align the foreign keys.
Select a merge policy's Related tables tab.
The add-on automatically adds options here for related tables that come from the same data model and hold a foreign key to the table where matching executes. Note that if the data model was updated, you can refresh the list of related tables. To do this, open the Actions menu and select Refresh.
Double-click to open the relationship you want to update.
Use the Align foreign keys drop-down menu to set how FKs should be managed.
You can choose from the following options:
None: This relationship is ignored.
Manually: The merge process will allow users to manually select whether the related value is updated.
Automatically: The FK value is updated automatically based on the survived record.
Enabling automatic merge
If you want the add-on to automatically merge records that it considers positive matches, you must associate a merge policy with a matching policy. Follow the instructions below to edit a matching policy and associate a merge policy:
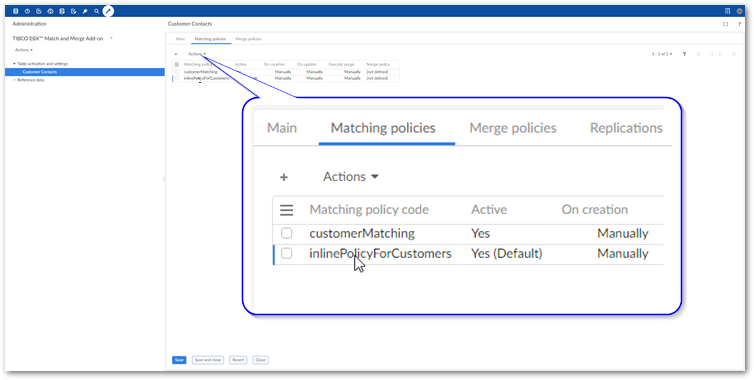
Select a registered table's Matching policies tab and open the desired matching policy.
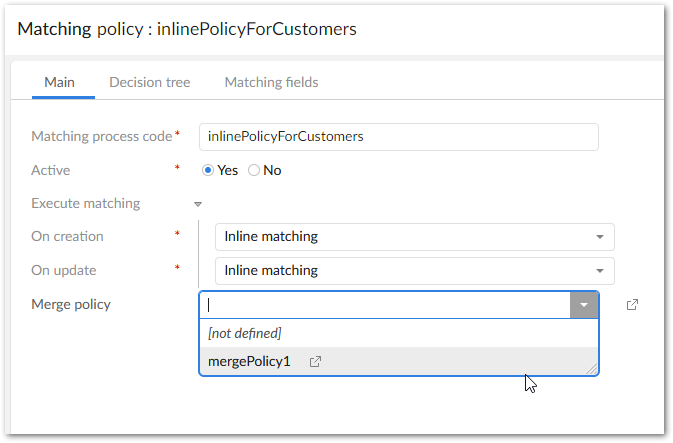
On the Main tab, use the Merge policy menu to select the desired merge policy.
Note
When you select a merge policy here, merging happens automatically and happens according to the settings in the selected policy. When a merge is triggered, it bypasses the option to merge manually.
Save and close.
What's next? To enable automatic matching features for your data model, see the instructions in Task 5: Activating matching.