Changes to supported add-ons
Overview
Some add-ons were migrated to EBX® 6, others were replaced with re-worked versions, and a few were phased out. You can find comprehensive details of these updates and discontinuations in the table below. If you have any data model dependencies on removed or replaced add-ons, these must be addressed prior to initiating the automatic migration process.
Add-on | EBX® status and migration requirements |
|---|---|
TIBCO EBX® Match and Merge Add-on (Previously Match and Cleanse ( | This add-on was discontinued and replaced by a reworked version in EBX® 6: the TIBCO EBX® Match and Merge Add-on ( |
TIBCO EBX® Match and Merge Add-on ( | This add-on is a reworked version of, and replaces, the TIBCO EBX® Match and Merge Add-on (previously Match and Cleanse |
TIBCO EBX® Data Exchange Add-on ( | In EBX® 6 there is a reworked version of this add-on: the TIBCO EBX® Data Exchange Add-on (New) ( |
TIBCO EBX® Data Exchange Add-on (New) ( | This add-on is a reworked version of the TIBCO EBX® Data Exchange Add-on (ADIX). Since this add-on is new, no special consideration is required during the migration process. Note that the legacy version of this add-on is still available in EBX® 6. To help designate between versions of the add-on, the menus in the UI append (New) to the reworked version. |
TIBCO EBX® Insight Add-on ( | This add-on is available in EBX® 6 and its configuration information is automatically migrated. A reworked version of this add-on is available, the TIBCO EBX® Insight Add-on (New) ( |
TIBCO EBX® Insight Add-on (New) ( | This add-on is a reworked version of the TIBCO EBX® Insight Add-on (DQID). Since this add-on is new, no special consideration is required during the migration process. Note that the legacy version of this add-on is still available in EBX® 6. To help designate between versions of the add-on, the menus in the UI append (New) to the reworked version. |
TIBCO EBX® Information Search Add-on ( | Some of this add-on's functionality is now included in the core product and its configuration is now significantly different. The add-on's configuration is not automatically migrated. |
TIBCO EBX® Digital Asset Manager ( | The add-on's configuration is automatically migrated. APIs that were deprecated in earlier versions are no longer available. Therefore, code review might be required to replace the deprecated APIs with their new versions. |
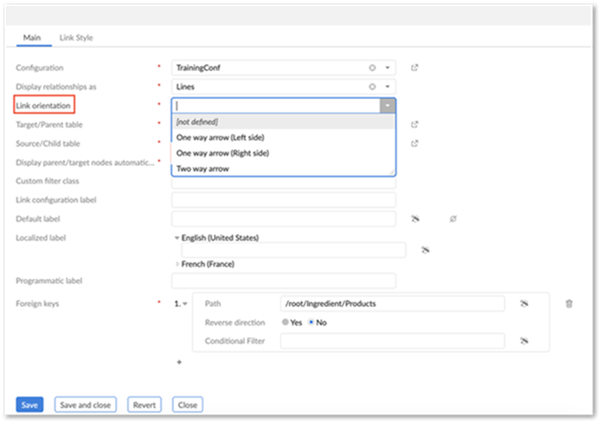
TIBCO EBX® Data Model and Data Visualization ( | The add-on's configuration is not automatically migrated. You must export an archive of the configuration and re-import it after successfully completing the migration process. See Manually migrating add-ons for the steps to perform this task. There is a new feature that defines link orientation. This is a required field and must be defined for all links after migration. You can set it once and then apply the modification to other records. See the instructions here for more details. |
TIBCO EBX® EBX GO Add-on ( | This add-on's configuration is not automatically migrated. You must export an archive of the configuration file and import it after successful migration. See Manually migrating add-ons for the steps to perform this task. |
TIBCO EBX® Rules Portfolio Add-on ( | This add-on was discontinued. If this add-on was previously used, you should remove any related Java extensions. See Java extensions for discontinued add-ons for additional information. |
TIBCO EBX® Graph View Add-on ( | This add-on was discontinued. |
TIBCO EBX® Information Governance Add-on ( | This add-on was discontinued. If this add-on was previously used, you should remove any related Java extensions. See Java extensions for discontinued add-ons for additional information. |
TIBCO EBX® Oracle Hyperion EPM Add-on ( | This add-on was discontinued. |
TIBCO EBX® Activity Monitoring Add-on ( | This add-on was discontinued. |
Manually migrating add-ons
To manually migrate add-on configurations, perform the following actions:
Export an archive of the add-on's configuration:
Navigate to the desired add-on:
Administration > User interface > TIBCO EBX® Data Model and Data Visualization Add-on
Administration > TIBCO EBX® GO Add-on > Configuration
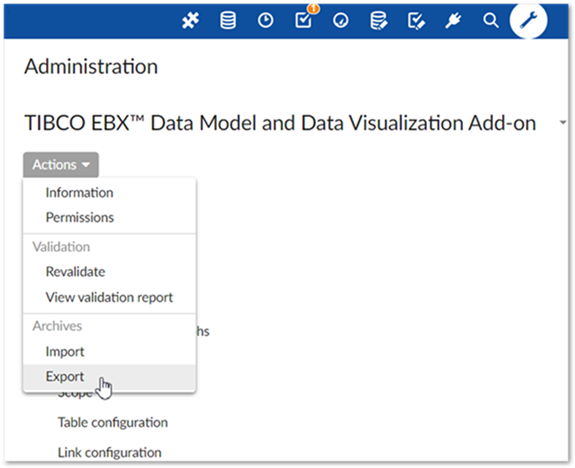
As shown in the following image, from the Actions menu, select Archives > Export.

Supply a name for the archive, leave the default settings, and select Export.
No messages display upon successful export.
Import the configuration archive:
Navigate to the desired add-on.
From the Actions menu, select Archives > Export.
From the Archive to import menu, select the name of the archive you exported in step 1.
Select Import.
Data Model and Visualization Add-on additional steps
A new feature is included with the add-on that allows users to define link orientation. This is a required field for all links and must be initialized. After migrating your repository and importing the add-on's configuration archive, perform the following steps:
Navigate to Administration > User interface > TIBCO EBX® Data Model and Data Visualization Add-on > Link configuration.
Open a record, set the Link orientation property, save and close the record.

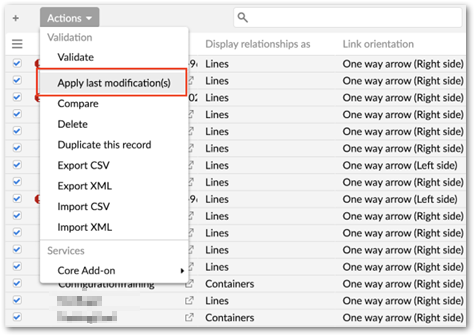
Optionally apply the same modification to all records in the Link configuration table:
Select all records in the table.
Open the Actions menu and select Apply last modification.

Digital Asset Manager Add-on additional steps
Use the following steps to migrate the add-on from a version that is compatible with EBX® 5.9.X to a version compatible with 6:
In the environment containing the old version of the add-on, navigate to Administration > User interface > {addon.label.full}.
From the Actions menu, select Archives > Export.
In the environment containing the new version of the add-on, navigate to Administration > User interface > {addon.label.full}.
From the Actions menu, select Archives > Export.
Note that since there is not a direct mapping of all properties from version 5 to 6, some tables will have errors. Complete the following step to resolve these errors.
From the Actions menu, select Migrate digital asset manager data.
The following lists some of the terminology changes take place between versions 5 and 6 (other changes are very minor):
Drive type --> Connector
File system --> Default connector
External management --> External manager
Display configuration --> Record detail view
Editor configuration --> Drive view configuration