Step 2: Preparing the repository
Introduction
It is strongly recommended to perform all migration tasks in at least a test and pre-production environment prior to migrating a production environment. Once a server with the EBX® 6 artifacts is started, the repository migration begins automatically; the process is not reversible. Migration can only complete successfully if the data models in the repository contain no errors.
Note
You might want to use a copy of, or one that closely resembles, the repository in production. This will allow you to estimate the effort needed to prepare the production repository and allow you to see how long the automatic migration process will take, so you can plan downtime accordingly.
To prepare your repository for migration, complete the steps in the following tasks:
Task 1: Create a backup
The migration process is not reversible. With this in mind it is important to backup your repository in its current state.
Attention
Whether you are migrating a repository from 5.9, or upgrading from a previous version 6, it is critical that you back up your repository.
To back up your repository:
Shut down the application server hosting the EBX® 5 instance.
Back up your EBX® 5 repository. Include any relational database objects whose name starts with the current repository prefix. This prefix is specified in the
ebx.propertiesfile underebx.persistene.table.prefix.Back up and delete any EBX® logs, or move them to another folder.
Back up add-on configurations:
If you have the TIBCO EBX® Data Model and Data Visualization Add-on, or the TIBCO EBX® GO Add-on, you will need to export the configuration archive and import it again after the migration completes. See Manually migrating add-ons for instructions.
Task 2: Prepare the repository
It is important to clean your EBX® 5.9 environment to accelerate the migration process, especially for repositories with large volumes of data. This process requires administrative access to EBX® as the processes must be performed in the EBX® user interface.
Due to data compression changes beginning with version 6.2.3, it is especially important to delete all unnecessary dataspaces. Migration will create dictionaries, rewrite all blocks to the new format, search for blocks that can share content, recompress the blocks using the dictionary.
You should clean the following repository elements:
Dataspace cleanup
Closed dataspaces are deleted during migration. You must re-open any dataspace you want to keep prior to migration. We recommend that any closed dataspaces that will not be kept are deleted and purged prior to migration as this can help optimize the migration processing time.
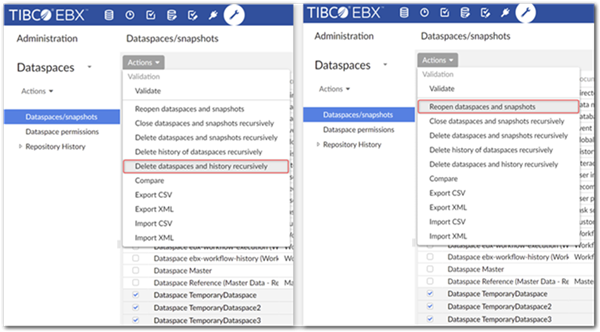
To manage your dataspaces:
Navigate to Administration > Dataspaces > Dataspaces/snapshots.
Reopen or delete dataspaces:
To delete: Select the dataspaces to delete and from the table's Actions menu select Delete dataspaces and history recursively.
To reopen: Select the dataspaces to delete and from the table's Actions menu select Reopen dataspaces and snapshots.
After purging, check the G_BLK table. If any of the following are true, contact support before migration to get assistance with additional cleanup to reduce migration time:
The G_BLK table has more than 10M rows, or
A payload exceeding 100GB, or
The G_TRV table has more than 10K rows.
Workflow cleanup
Workflow cleanup is an optional step. However, all workflow tables are automatically migrated and can increase the migration processing time as these tables can be large. If your business use case does not require workflow history, or if it could be externalized in an audit trail "at rest" database, purging the tables can speed up the migration process.
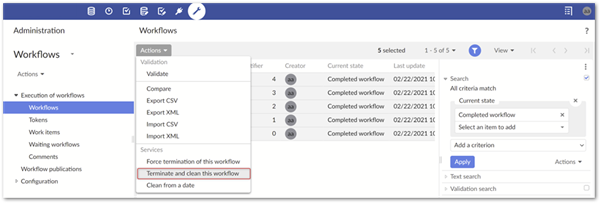
To delete completed workflows:
Navigate to Administration > Workflow > Execution of workflows > Workflows.
Create a filter on the table where Current state is set to Completed workflow.
Select all records and from the table's Actions menu, select Terminate and clean this workflow.
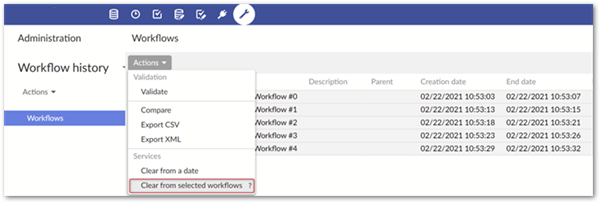
To delete workflow history:
Navigate to Administration > Workflow history > Workflows.
Select all records to delete and from the table's Actions menu select Clear from selected workflows.
Data model cleanup
In order for successful completion of the migration process, all data models used by the repository's datasets must compile without errors. This strict requirement is in place to prevent loss of data and to ensure a consistent repository state at the end of the migration process. Additionally, any artifacts from discontinued add-ons should be removed from data models.
To clean your data models, see the topics addressed in the following sections:
Resolve data model errors
To resolve data model errors:
Locate data model errors by checking the following locations:
Navigate to Administration > Technical configuration > Modules and data models and look for any data model errors.

Open the
kernel.logfile and search forerror [-].
Perform the actions required to fix the data model errors. Alternatively, if the data model is no longer in use, you can delete it. However, this must also be done in any dataspaces that define a dataset based on the data model, including any child dataspaces.
Restart the application server and double check the Modules and data models table, and the logs to be sure no models are still in a state of error.
Includes for discontinued add-ons
The TIBCO EBX® Match and Merge Add-on (DAQA) might be included in a data model. If this is the case, the include instruction must be removed from the data model as well as any elements based on its data type.
To address discontinued add-ons:
Open the
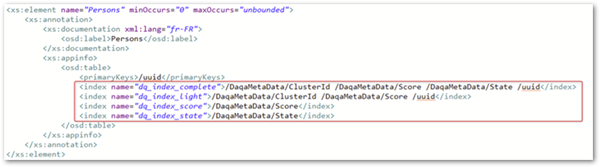
kernel.logfile and search for any data model compilation report that begins with****** Schema. Check whether the report contains the following info line:Include: Module: ebx-addon-daqa.In the following example, the custom module
ebx-sample-testcontained the inclusion in the Persons model:
Open your data model's XSD and remove the following:
/WEB_INF/ebx/schema/ebx-addon-daqa-types.xsd.
Search for and remove any elements with a defined type of
DaqaMetaData.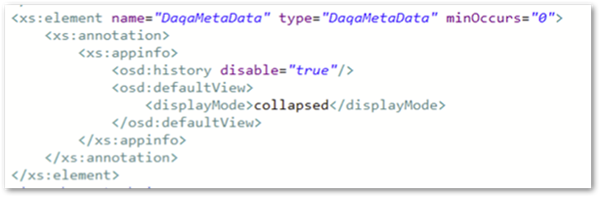
Search for and modify any other elements that were using the elements modified in the step above.
Java extensions for discontinued add-ons
Any Java extension provided by a discontinued add-on must be removed from data models. You must check all XSD files and delete any reference to the non-exhaustive list below:
For the TIBCO EBX Information Governance Add-on (IGOV), check for use of the following:
com.orchestranetworks.addon.igov.IGovLabelingSchemaDocumentationFor the TIBCO EBX Rules Portfolio Add-on (RPFL), check for use of the following data model extension:
com.orchestranetworks.addon.rpfl.DefaultSchemaExtensionFor the TIBCO EBX Information Search Add-on (TESE), check for use of the following table filter:
com.orchestranetworks.addon.tese.SearchTableFilter. This add-on is not discontinued, however if you replace it with the reworked version and do not deploy the legacy version, you must remove the trigger.For the TIBCO EBX Insight Add-on (DQID), check for use of the following trigger:
com.orchestranetworks.addon.dqid.controller.DQIdTrigger. This add-on is not discontinued, however if you replace it with the reworked version and do not deploy the legacy version, you must remove the trigger.
In addition to checking for the items listed above, it is a good idea to check toolbars defined by the data model as they can sometimes include user services from the add-ons.
URL policy
The URL policy from 5.9 is deprecated and if you do not update it, issues can occur when attempting to access the UI. To ensure the URL policy conforms to 6.x requirements, navigate to Administration > User interface > User interface configuration > Advanced perspective > Interface configuration > URL Policy and revert any existing settings. To update the URL computing configuration, you can edit the ebx.properties file. See URLs computing for more information.
Task 3: Back up your clean repository
Back up your current repository:
Shut down the application server hosting the EBX® 5.9 instance.
Back up your 5.9 repository. Include any relational database objects whose name starts with the current repository prefix. This prefix is specified in the
ebx.propertiesfile underebx.persistene.table.prefix.Back up and delete any EBX® logs, or move them to another folder.
Back up add-on configurations:
If you have the TIBCO EBX® Data Model and Data Visualization Add-on, or the TIBCO EBX® GO Add-on, you will need to export the configuration archive and import it again after the migration completes. See Manually migrating add-ons for instructions.