Running the GUI Installer
To install TIBCO iProcess Technology Plug-ins, perform the following steps:
| 1. | Log in with a suitable user name. To install ActiveMatrix BusinessWorks Plug-in for iProcess, you must be logged in as a BusinessWorks user. To install the other components of TIBCO iProcess Technology Plug-ins, you must be logged in as the iProcess Engine administrator (IPEADMIN). |
| — | on UNIX, this is pro by default (also referred to as the “Background” user on UNIX). |
| — | on Windows, this is specified when the iProcess Engine is installed (it is the user installing the iProcess Engine by default). |
For more information, see the Installation guide for TIBCO iProcess Engine.
| 2. | Run the appropriate TIBCO iProcess Technology Plug-ins setup program for your operating system. |
The following table lists the setup programs for the available operating systems:
|
Platform |
Setup Program Name |
|
Windows |
setupwindows64.exe |
|
Linux |
setupLinux.bin |
Type the appropriate command, followed by the Installshield parameter:
-is:javahome javahome
where javahome defines the location of the version of Java that the installer is to use. Example:
setupwindows64.exe -is:javahome d:\program files\java
The Welcome dialog box is displayed.
| 3. | Review the information in the Welcome dialog, then click Next to proceed. |
The Cloud Software Group, Inc. End User License Agreement is displayed.
| 4. | Review the terms of the license agreement: |
| — | If you agree to the terms, select I accept the terms of the license agreement to continue with the installation; then click Next. |
| — | If you do not agree to the terms of the license agreement, select I do not accept the terms of the license agreement and exit from the installation process by clicking the Cancel button. |
The Installation Mode dialog box is displayed.
| 5. | Choose the type of installation you are performing by clicking the appropriate radio button, then click Next. The following installation types are available. |
| — | New installation |
With the 11.8.0 version, this product has migrated from 32-bit to 64-bit. Due to this, upgrading from a version prior to 11.8.0 is not supported. Uninstall your current version of iProcess and install the latest version (11.9.0).
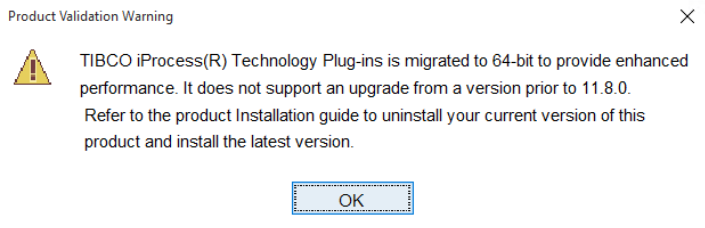
This restriction is applicable only to Windows Platform and Plug-in on the iProcess Engine side. TIBCO recommends to uninstall iProcess Technology Plug-ins before iProcess Engine is upgraded as there is a dependency on Java version. However, if the iProcess Engine has been upgraded, please use local Java 8 ( setting JAVA_HOME and PATH ) to uninstall iProcess Technology Plug-ins.
| — | Re-install or repair, or upgrade an existing installation |
| — | Reconfigure an existing installation |
For information about these types of installations, see Installation Overview.
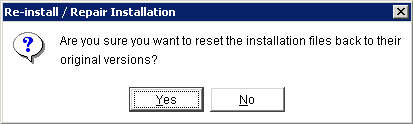
| 6. | If you select the “Re-install, repair,...” type of installation, the following dialog is displayed, warning you that configuration settings are reset to their original values in this type of installation. If you are sure you want to re-install the original files, click Yes to continue, or No to return to the Installation Mode dialog box.
Figure 6: The Re-install or Repair Installation Warning Dialog.
|
| 7. | If you select New Installation in step 5, the Destination dialog box is displayed:
Figure 7: The Destination Dialog
|
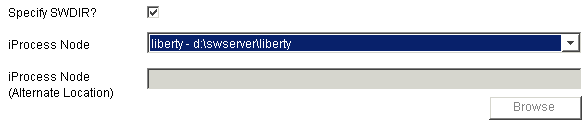
The installer selects the location of the TIBCO iProcess Engines (Nodes) on your system (at least one must be installed prior to installing the plug-ins — see Supported Systems) and enter them in the iProcess Node field.
| 8. | Complete the Destination dialog as follows: |
Leave the Specify SWDIR check box selected if you are installing any plug-in other than the ActiveMatrix BusinessWorks Plug-in for iProcess. All of the TIBCO iProcess Technology Plug-ins (with the exception of the ActiveMatrix BusinessWorks Plug-in for iProcess) are associated with a specific iProcess Engine, and need SWDIR specified.
The Specify SWDIR check box must be cleared to install the ActiveMatrix BusinessWorks Plug-in for iProcess, which is not associated with an iProcess Engine and does not need SWDIR setting. Note that when you clear the check box, the iProcess Node field becomes disabled (because you don’t need to select an iProcess Node (Engine) if you are only installing a ActiveMatrix BusinessWorks Plug-in for iProcess). Clearing the Specify SWDIR check box also prevents you from choosing to install any of TIBCO iProcess Technology Plug-ins other than ActiveMatrix BusinessWorks Plug-in for iProcess.
If you are installing only an ActiveMatrix BusinessWorks Plug-in for iProcess, proceed to step 9.
If you are installing any plug-in other than ActiveMatrix BusinessWorks Plug-in for iProcess, select the iProcess Engine to which you want to associate this installation of TIBCO iProcess Technology Plug-ins from the iProcess Node field.
Or, you can use the iProcess Node (Alternate Location) field to specify the iProcess Node if the desired node is not listed in the iProcess Node field drop-down list. To specify an alternate, you must select “Alternate location” from the iProcess Node field; then enter the desired node in the iProcess Node (Alternate location) field (or use the Browse button to locate it). Enter the path to the desired iProcess Engine (for example: “c:\swserver\eastbranch”).
| 9. | Click Next. The Features dialog box is displayed.
Figure 8: The Features Dialog
|
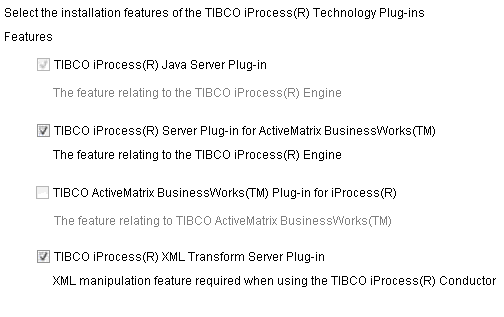
On this dialog box, you can select the plug-ins that you want to install. The plug-in you select determines which dialogs are displayed beyond this point, because each plug-in requires specific types of data.
Also note that there is a dependency on the iProcess Java Server Plug-in for all of the TIBCO iProcess Technology Plug-ins, with the exception of the ActiveMatrix BusinessWorks Plug-in for iProcess. That is, if you install any of the plug-ins (except the ActiveMatrix BusinessWorks Plug-in for iProcess), you must also install the iProcess Java Server Plug-in.
| 10. | Use the subsections in Appendix A, Installation Data Reference, for information about the data that can be specified in each of the dialogs displayed by the TIBCO iProcess Technology Plug-ins installer, depending on the plug-in you are installing. |
The following table lists the dialogs displayed for each plug-in, and the page to reference for information about that dialog:
|
Plug-in |
Dialogs Displayed |
See... |
||||||||||||
|
TIBCO iProcess Java Server Plug-in |
|
|||||||||||||
|
TIBCO iProcess Server Plug-in for ActiveMatrix BusinessWorks |
|
|||||||||||||
|
TIBCO ActiveMatrix BusinessWorks Plug-in for iProcess |
|
n/a |
||||||||||||
|
TIBCO iProcess BusinessEvents Server Plug-in |
|
|||||||||||||
|
TIBCO iProcess XML Transform Server Plug-in |
|
|||||||||||||
| 11. | After completing each necessary dialog, click Next to proceed in the installation process. |
When all of the necessary dialog boxes have been completed for the selected plug-ins, the Pre-Installation Summary screen is displayed. This screen provides a summary of the plug-ins you are installing.
| 12. | If you are satisfied with the summary, click Install. (You can also click Back to return to any dialog box to make changes.) |
The installer copies the necessary files to your system and informs you when it is finished.
| 13. | Click Finish to complete the installation. |