Managing JMS Destinations
JMS destinations (also referred to as endpoints) must be queues, as JMS topics are not supported. Depending on your requirements you can add new JMS queues, or copy, modify, and delete existing JMS queues. This section describes:
| • | Adding a New JMS Queue |
| • | Copying an Existing JMS Queue |
| • | Modifying an Existing JMS Queue |
| • | Deleting an Existing JMS Queue |
Adding a New JMS Queue
To add a JMS queue, do the following:
| 1. | Click Add from either: |
| — | the iProcess Service Agent area of the BusinessWorks Step Definition dialog, or |
| — | the JMS Administration Tool. |
The Add/Modify JMS Destination dialog is displayed.
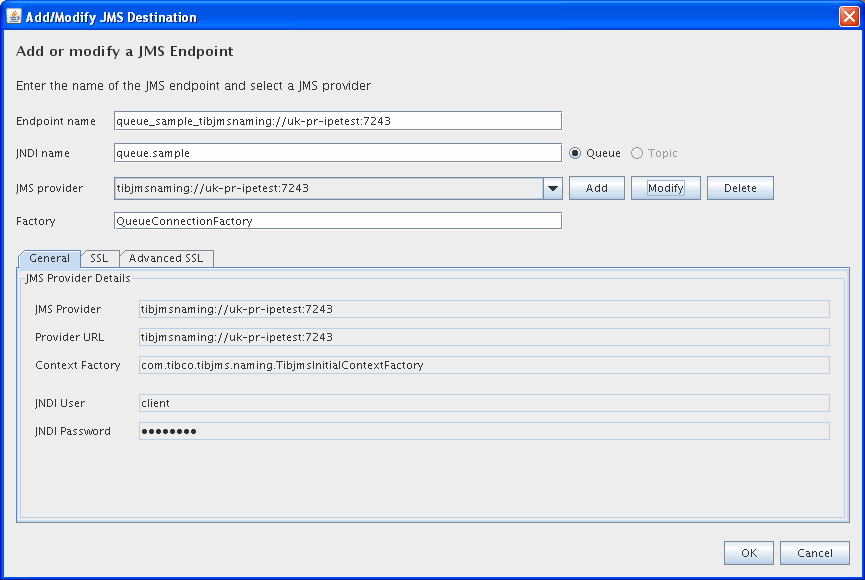
| 2. | Enter the following information in the dialog: |
|
Field |
Description |
|
Endpoint Name |
A unique ID that you want to associate with the JMS provider. |
|
JNDI Name |
Select the JNDI name for this destination. Note: You must also manually create this JNDI object in your JMS server. If you do not, the procedure fails at runtime. |
|
Select the JMS provider associated with this destination. If no JMS provider has yet been defined, you need to define one before you can proceed further with creating a JMS destination. See Managing JMS Providers for details of creating a JMS provider. Note: The Add, Modify and Delete buttons on the upper pane of this dialog affect the JMS Provider associated with the current endpoint, not the endpoint itself. You should bear in mind that a JMS Provider will typically provide more than one JMS endpoint, so modifying or deleting a JMS Provider here may affect several other endpoints as well as the selected one. Deleting a JMS Provider will delete all other endpoints with which that Provider is associated. |
|
|
Factory |
The factory associated with this destination. This defaults to The factory must have been made available via the JNDI lookup interface using the EMS Administration Tool. See TIBCO Enterprise Message Service™ Application Integration Guide for details of this utility. |
If you are using SSL authentication to provide a secure link with TIBCO EMS, the SSL information is displayed in the SSL and Advanced SSL tabs, in a read-only format. To modify any SSL settings, you must change them for the JMS provider. See Managing JMS Providers for details of modifying SSL Authentication settings.
Choosing Certificates
In the Trusted Certificates and Issuer Certificates fields, you must enter a list of certificate files listed in the order in which the client should read them.
To choose a list of certificates:
- Click the Edit button next to the appropriate field.
- The Certificate Configuration dialog is displayed.
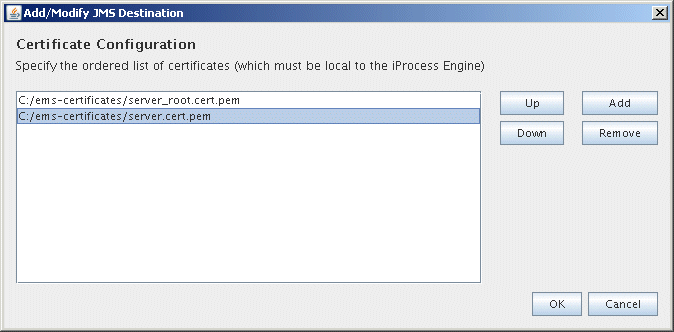
| 3. | To add a certificate file to the list, click Add. A file chooser dialog is displayed. Browse for and select the certificate files that you need. |
| 4. | In the Certificate Configuration dialog, select a certificate and use the Up and Down buttons to move it within the list, until you have the certificates in the order that you want the client to read them. |
| 5. | When you have finished, click OK. |
Copying an Existing JMS Queue
To copy an existing JMS queue, do the following:
- From the JMS Destinations area in either:
- Click Copy. The Add or Modify JMS Endpoint dialog is displayed.
- Amend the information in the Add/Modify JMS Destination dialog, depending on your requirements. See for more information.
| — | the iProcess Service Agent box of the BusinessWorks Step Definition dialog |
| — | the JMS Administration Tool, |
select the JMS queue you want to copy.
Modifying an Existing JMS Queue
To modify an existing JMS queue, do the following:
-
From the JMS Destinations area in either:
- Click Modify. The Add or Modify a JMS Destination dialog is displayed.
- Amend the information in the Add or Modify a JMS Destination dialog, depending on your requirements. See for more information.
| • | the iProcess Service Agent box of the BusinessWorks Step Definition dialog |
| • | the JMS Administration Tool, |
select the JMS queue you want to modify.
Deleting an Existing JMS Queue
To delete a JMS queue, do the following:
- From the JMS Destinations box in either:
- Click Delete. The JMS queue is deleted. Note that the JMS Provider associated with the queue and any other queues associated with the same Provider are also deleted.
| • | the iProcess Service Agent area of the BusinessWorks Step Definition dialog |
| • | the JMS Administration Tool, |
select the JMS queue you want to delete.