Managing JMS Providers
Depending on your requirements you can add new JMS providers, or copy, modify and delete existing JMS providers. This section describes:
| • | Adding a New JMS Provider |
| • | Modifying an Existing JMS Provider |
| • | Deleting an Existing JMS Provider |
Adding a New JMS Provider
To add TIBCO EMS as a new JMS provider, do the following:
| 1. | Click Add from either: |
| — | the iProcess Service Agent area of the BusinessWorks Step Definition dialog. |
| — | the JMS Administration Tool. |
The Add/Modify JMS Destination dialog is displayed.
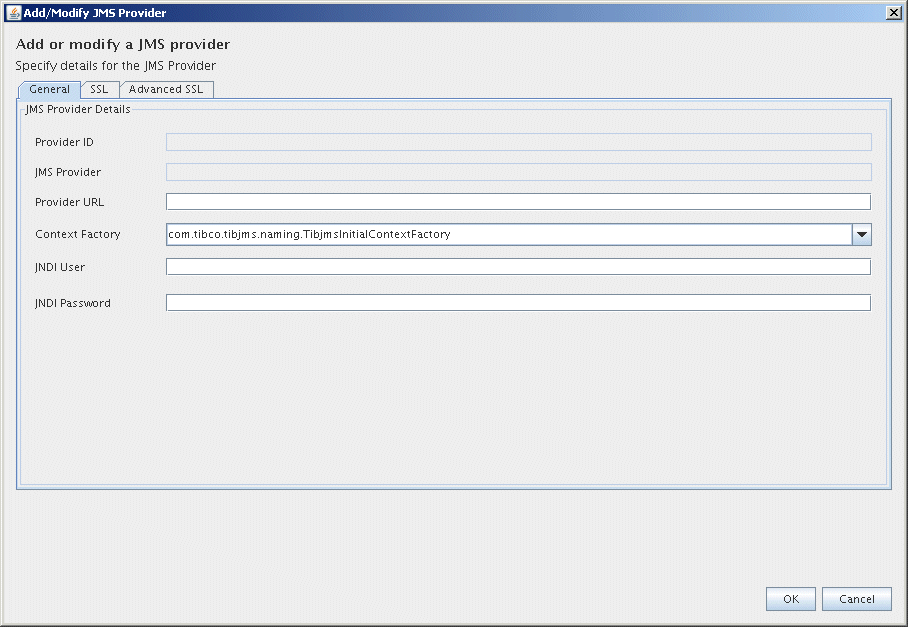
| 2. | From next to the JMS Provider field, click Add. The Add or Modify a JMS Provider dialog is displayed. |
| 3. | Enter the following information in the dialog: |
|
Field |
Description |
|
Provider ID |
A unique ID for the JMS provider. This is supplied automatically. |
|
JMS Provider |
The name of the JMS provider. This name does not need to be unique. BusinessWorks steps do not permit duplicate JMS provider names. However you can create a duplicate JMS provider here so that, for example, you can use two different sets of credentials for the same JMS endpoint. The second and subsequent duplicate provider names are automatically suffixed with a unique identifier. When you create a new provider, the product checks to ensure that the overall record (name and suffix taken together) is unique so that BusinessWorks will accept it. |
|
Provider URL |
The URL to use to connect to the JMS server. |
|
Context Factory |
The initial context factory class for accessing JNDI. |
|
JNDI Username |
(Optional) Username for logging into the JNDI server. |
|
JNDI Password |
(Optional) Password for logging into the JNDI server. This can be up to 1 KByte in length. |
SSL Authentication
If you are using SSL authentication to provide a secure link with TIBCO EMS:
- Select the SSL tab.
- Enter the following information in the dialog:
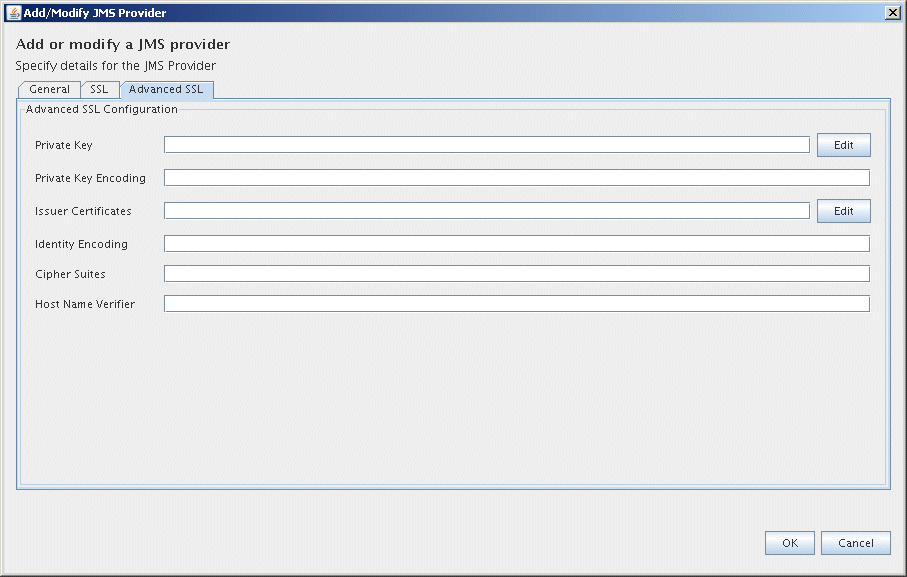
- Select the Advanced SSL tab.
- Enter the following information in the dialog:
|
Field |
Description |
|
Provider Requires SSL |
Check this check box if the server only accepts SSL connections from clients that have digital certificates. If so, connections from clients without certificates are denied. |
|
Vendor |
Select the name of the provider of your SSL implementation. This must be one of the implementations supported by EMS: either |
|
SSL Auth Only |
Check this check box if you require SSL authentication only. Leave it unchecked if you require SSL both for authentication and for message content. |
|
Enable Verify Host |
Check this check box to verify that the server host certificate is authentic. |
|
Enable Verify Host Name |
Check this check box to verify the server host name against either the name specified in its certificate, or the name specified in the Expected Host Name field. |
|
Expected Host Name |
Enter the server host name. This value is used to override the host name given in the certificate, in case it is different to the real host name. |
|
Trusted Certificates |
Click the Edit button to select and sort a list of root certificates to be used for validating client/server certificates. See Modifying an Existing JMS Provider for details of how to do this. Note that the certificate locations specified must be with respect to the iProcess server, and if the certificates are not present in those locations the JMS connection will fail. |
|
Identity |
Click the Edit button to browse for and select the filename of the server certificate. |
|
Password |
Type the password for the server SSL certificate. |
|
Field |
Description |
|
Private Key |
Click the Edit button to browse for and select the file holding the private key to the client’s certificate. If this is included in the certificate referred to in the Identity field, you do not need to specify it here. |
|
Private Key Encoding |
The format of the private key. May be one of |
|
Issuer Certificates |
Click the Edit button to select and sort a list of certificates that comprise the issuer’s certificate chain for the server’s certificate. The server reads the certificates in the chain in the order in which they are presented in this parameter. See Choosing Certificates for details of how to do this. Note that the certificate locations specified must be with respect to the iProcess server, and if the certificates are not present in those locations the JMS connection will fail. |
|
Identity Encoding |
The file format of the certificate referred to in the Identity field. |
|
Cipher Suites |
A list of acceptable cipher suites for the encrypted communication channel. Type a list of names, separated by colons (:). You can use either the OpenSSL name for cipher suites, or the longer descriptive names. For information about available cipher suites and their names, see "Specifying Cipher Suites" in TIBCO Enterprise Message Service™ User’s Guide. |
|
Host Name Verifier |
Enter the name of the custom class used for validating the server host name. |
For more details on these values, see TIBCO Enterprise Message Service™ User’s Guide.
Modifying an Existing JMS Provider
To modify an existing JMS provider, do the following:
- From the JMS Destinations box in either:
- Click Modify. The Add or Modify JMS Destination dialog is displayed.
- From the JMS Provider box, click Modify. The Add or Modify a JMS Provider dialog is displayed.
- Amend the information in the Add or Modify a JMS Provider dialog, depending on your requirements. See for more information.
| — | the iProcess Service Agent area of the BusinessWorks Step Definition dialog |
| — | the JMS Administration Tool, |
select a (or the) JMS queue belonging to the JMS provider that you want to modify.
Deleting an Existing JMS Provider
You cannot delete a loaded JMS provider. If you need to delete a loaded provider, you must unload it first.
If you delete the JMS provider then all the JMS queues that are available for this JMS provider are also automatically deleted.
To delete a JMS provider, do the following:
- From the JMS Destinations box in either:
| — | the iProcess Service Agent area of the BusinessWorks Step Definition dialog |
| — | the JMS Administration Tool, |
select a (or the) JMS queue belonging to the JMS provider that you want to delete.
| 4. | Click Modify. The Add or Modify a JMS Destination dialog is displayed. |
| 5. | From the JMS Provider box, click Delete. |
| 6. | The following confirmation dialog is displayed: |
| 7. | Click OK to delete the JMS provider or Cancel to return to the Add/Modify JMS Destination dialog. |
If the selected JMS Provider is currently loaded, the deletion fails. A dialog is displayed informing you that you cannot delete a loaded JMS provider. If you do need to delete the provider, you must unload it first. This prevents the possibility of loss of data by deleting resources that are actually in use.


