Installing
LogLogic LMI csr certificate and rootCA certificate
You can enable secure mode log forwarding and collecting from the
LogLogic® Universal Collector appliance to the
LogLogic LMI appliance.
Procedure
-
Generate a Certificate Signing Request (CSR) from the
LogLogic LMI appliance.
-
ssh log on to
LogLogic LMI appliance as:
ssh root@10.0.25.97 (for example)
-
Enter password “logapp“ to access the CLI for
LogLogic LMI.
-
Enter the following command:
> system secureuldp create csr
Returns (example):
Generating RSA private key, 1024 bit long modulus
....................................++++++
............................................................++++++
e is 65537 (0x10001)
-----BEGIN CERTIFICATE REQUEST-----
MIIBZzCB0QIBADAoMREwDwYDVQQKEwhMb2dMb2dpYzETMBEGA1UEAxMKMTAuMC4y
NS45NzCBnzANBgkqhkiG9w0BAQEFAAOBjQAwgYkCgYEA2LxeW8dvdMyT9OzIqZ1w
kpBVGHwIV5nJC0aUZZ8bkcNAK7PtCVorLhos83PzHzXt3lqDPg/vIwyr6teb/pJc
l+elByfNnrA1+qdEsEwiPtC4DjdxHcRI4QN+RIfZQ7JmtGYABDZQOZN4NXxOPofc
SQJJtZBFdgPpvmYHuABO678CAwEAAaAAMA0GCSqGSIb3DQEBBQUAA4GBAAwJwbCW
FtPCekHpwVJXmo8P3Sj6yTrz5eCY0XyNPS29eVStwATonopUvtFujiduzbrLpbo8
I+/NpSofGn5uhJl84sXtxHpkoCM8Puf7HHh+GHqWZYiFLiQYBcKV/pKM7IgiF5Nu
iBfCgESkj0lymEHoiD3xTww0bZcQoSsOPX/Y
-----END CERTIFICATE REQUEST-----
>
-
Copy the csr returned (earlier) to your clipboard.
-
Login to the UCM appliance and paste in the
LogLogic LMI csr, following these steps:
-
Go to https://10.0.23.215:10443/ExaProtect/(example).
-
Login id and password:
superadmin/exaprotect (example)
-
On the UCM landing page, mouse over
Collector Management (upper right) and select “ULDP connections” from the drop-down menu.
-
Click the +| Add button to add a connection.
-
On the
ULDP Connection Creation page, enter a name for your connection (such as My_CSR) in the
*
Name field.
-
Under
LMI (LX/ST/MX) in the
*
Address field, enter the URL of the LogLogic appliance to which you wish to connect (example: 10.0.25.97).
-
In the
*
Port field, change the default port from 5514 to 5515.
-
Under
Security, select
Authenticate the connection check box.
-
Under
Security, click the
Generate the LMI Certificate button.
An
LMI Certificate Signing Request window opens.
Paste in the
LogLogic LMI csr you copied to your clipboard in
step 1.
step c above.
-
Click
Generate the Certificate button.
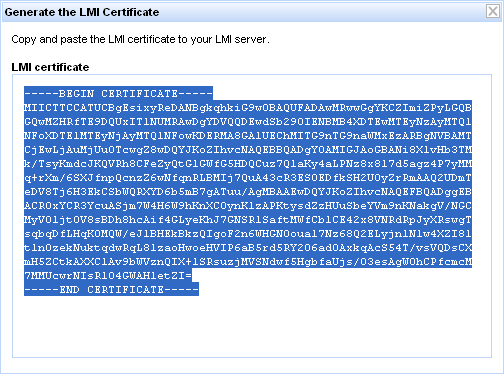
The UCM generates a signed
LogLogic LMI certificate, as shown in the figure below.
LogLogic LMI Certificate Generated by UCM Appliance

-
Press Ctrl-C to copy the signed certificate generated by the UCM appliance.
-
At the command prompt on the
LogLogic LMI appliance, enter the following command:
> system secureuldp install certificate
System returns:
Paste certificate:
-
Paste in the
LogLogic LMI certificate generated by the UCM appliance (in Step 2. k. )
-----BEGIN CERTIFICATE-----
MIICTTCCATUCBgEsixyReDANBgkqhkiG9w0BAQUFADAwMRwwGgYKCZImiZPyLGQB
GQwMZHRfTE9DQUxIT1NUMRAwDgYDVQQDEwdSb290IENBMB4XDTEwMTEyNzAyMTQ1
NFoXDTE1MTEyNjAyMTQ1NFowKDERMA8GA1UEChMITG9nTG9naWMxEzARBgNVBAMT
CjEwLjAuMjUuOTcwgZ8wDQYJKoZIhvcNAQEBBQADgY0AMIGJAoGBANi8XlvHb3TM
k/TsyKmdcJKQVRh8CFeZyQtGlGWfG5HDQCuz7QlaKy4aLPNz8x817d5agz4P7yMM
q+rXm/6SXJfnpQcnzZ6wNfqnRLBMIj7QuA43cR3ESOEDfkSH2UOyZrRmAAQ2UDmT
eDV8Tj6H3EkCSbWQRXYD6b5mB7gATuu/AgMBAAEwDQYJKoZIhvcNAQEFBQADggEB
ACROxYCR3YcuASjm7W4H6W9hKnXCOynKlzAPKtysdZzHUuSbeYVm9nKNakgV/NGC
MyV01jtOV8sBDh8hcAif4GLyeKhJ7GNSRlSaftMWfCblCE42x8VNRdRpJyXRswgT
sqbqDfLHqKOMQW/eJ1BHEkBkzQIgoF2n6WHGNOoua17Nz68Q2ELyjn1Nlw4XZI81
tlnOzekNuktqdwRqL8lzaoHwoeHVIP6aB5rd5RY2O6adOAxkqAcS54T/vsVQDsCX
mH5ZCtkAXXC1Av9bWVznQIX+lSRsuzjMVSNdwf5HgbfaUjs/03esAgWOhCPfcmcM
7MMUcwrNIsRl04GWAHletZI=
-----END CERTIFICATE-----
-
Install the UCM CA Certificate on the
LogLogic LMI appliance by following these steps:
-
Login to the UCM appliance (https://10.0.23.215:10443/ExaProtect/(example).
-
Login id and password:
superadmin/exaprotect (example)
-
On the UCM landing page, mouse over Collector Management (upper right) and select “ULDP connections” from the drop-down menu.
-
Click the +| Add button.
-
Click “View the UCM CA certificate”.
-
The UCM CA certificate is displayed.
-
Press Ctrl-C to copy the UCM CA certificate generated by the UCM appliance to your clipboard.
-
At the command prompt on the
LogLogic LMI appliance, enter the following command:
> system secureuldp install rootCA
System returns:
Paste certificate:
-
Paste in the UCM CA certificate generated by the UCM appliance (in Step 3. e.)
-
Type “exit” in the command line of the
LogLogic LMI appliance.
-
Update the
LogLogic LMI appliance.
-
Login to the
LogLogic LMI appliance (https://10.0.25.97 - example).
-
Go to
page,
General tab.
-
Set the “Enable Secure ULDP” radio button to
Yes.
-
Update the “Secure ULDP Port” to “5515”.
-
Click the
Update button.
Result
Secure mode log forwarding and collecting from the
LogLogic® Universal Collector appliance to the
LogLogic LMI appliance is now enabled.
Copyright © Cloud Software Group, Inc. All rights reserved.

