Setting Up and Managing DNI Daemons
You can manage DNI (Directory Named Initiation) that is located on TIBCO MFT Platform Server from TIBCO MFT Command Center.
Setting Up DNI Daemons on TIBCO MFT Platform Server
Configure the DNIConfig.cfg file which is located in the DNI directory where your Platform Server is installed.
- Set the port number that the DNIDaemon uses to listen for requests from an TIBCO MFT Command Center server.
- Set the AcceptIPAddress parameter for the TIBCO MFT Command Center server.
- Assign a user ID and password to be used for the DNIConfig.cfg file by using the following command: perl DNIDaemon.pl c:DNIConfig.cfg encrypt.
- Execute the DNIDaemon script by using the following command: perl DNIDaemon.pl c:DNIConfig.cfg.
Adding TIBCO MFT Platform Server to TIBCO MFT Command Center
Click to open the Add Server page. Define necessary parameters on this page to add TIBCO MFT Platform Server you configured above to TIBCO MFT Command Center.
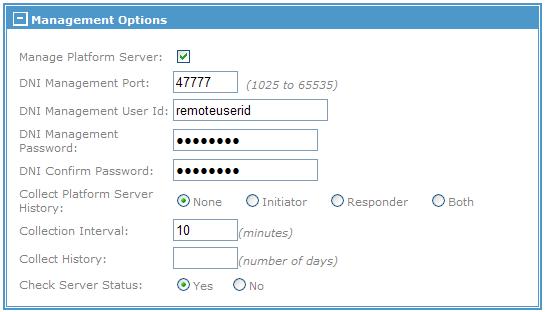
Be sure to expand the Management Options section to set the DNI Management Port, DNI Management User Id, and DNI Management Password fields you configured in Setting up DNI Daemons on TIBCO Platform Server.
The following figure shows a sample configuration of the Management Options section:
Managing DNI Daemons on TIBCO MFT Command Center
Click to open the Manage DNI Daemons page.
The following figure shows the Manage DNI Daemons page with two DNI daemons defined:
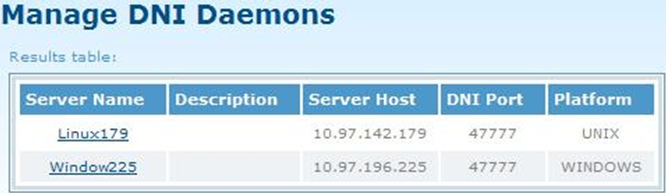
The DNI servers that are added to the TIBCO MFT Command Center system are displayed in the Results table.
You can click the name of the server under the Server Name column to manage the DNI server templates on the Manage DNI Server Template page as shown in the following figure.

Any DNI templates that exist on Platform Server where the DNIDaemon.pl program is being run from are displayed in the Results table.