
Cloud Installation
Introduction
This section provides general information on deploying ModelOps to a Kubernetes cluster.
Requirements
The following tools are required to complete the installation - these must be downloaded and installed prior to installing ModelOps :
- Kubernetes CLI tool
- macOS:
brew install kubectl
- macOS:
- Helm CLI tool
- macOS:
brew install helm
- macOS:
- Tekton CLI tool
- macOS:
brew install tektoncd-cli
- macOS:
Additional requirements depend on the Kubernetes cloud platform being used:
Optional Tools
These tools are optional, but have been found to be useful
- Lens
- macOS:
brew install lens
- macOS:
Docker for desktop also requires:
- Kubernetes must be enabled
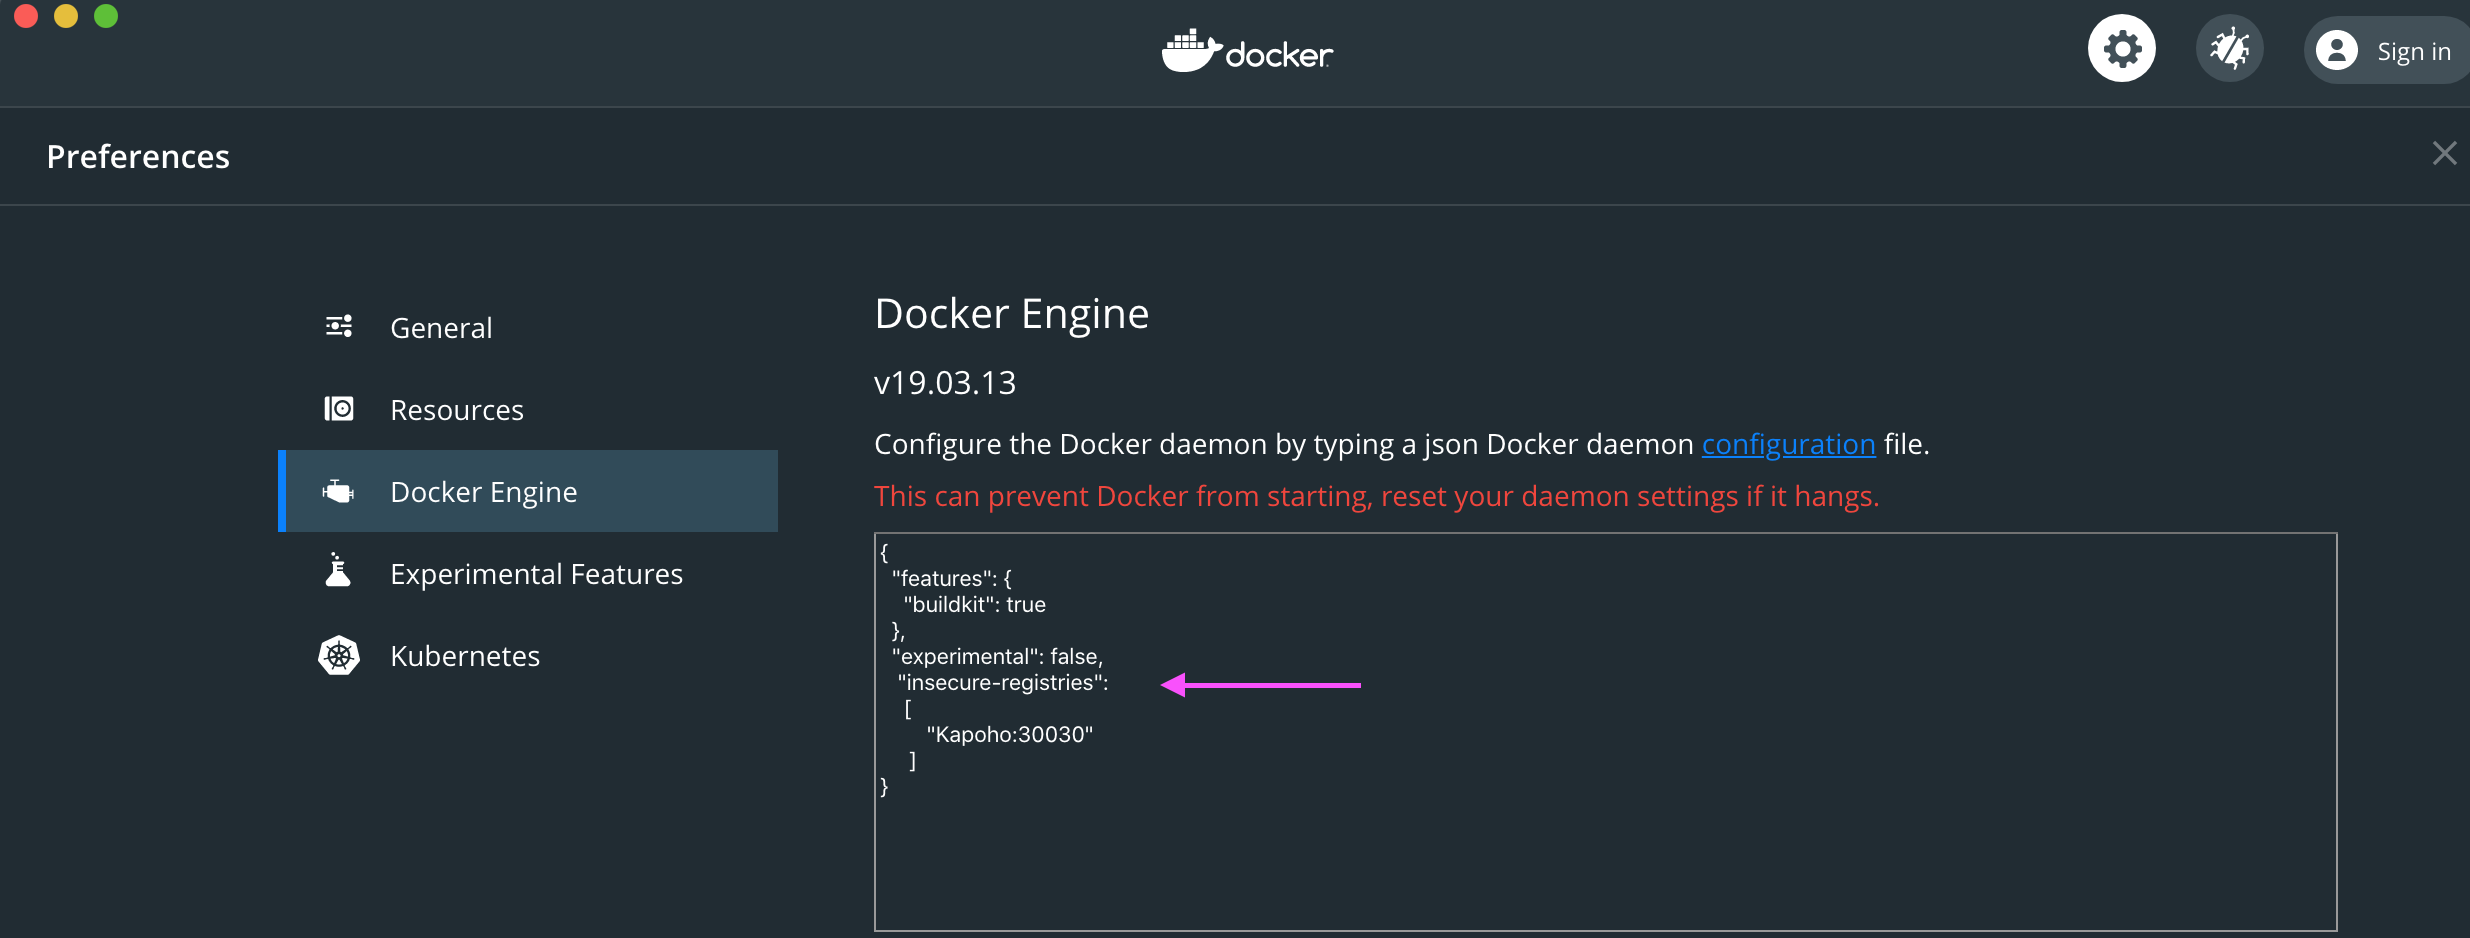
- Docker Engine must enable insecure registries for the local machine
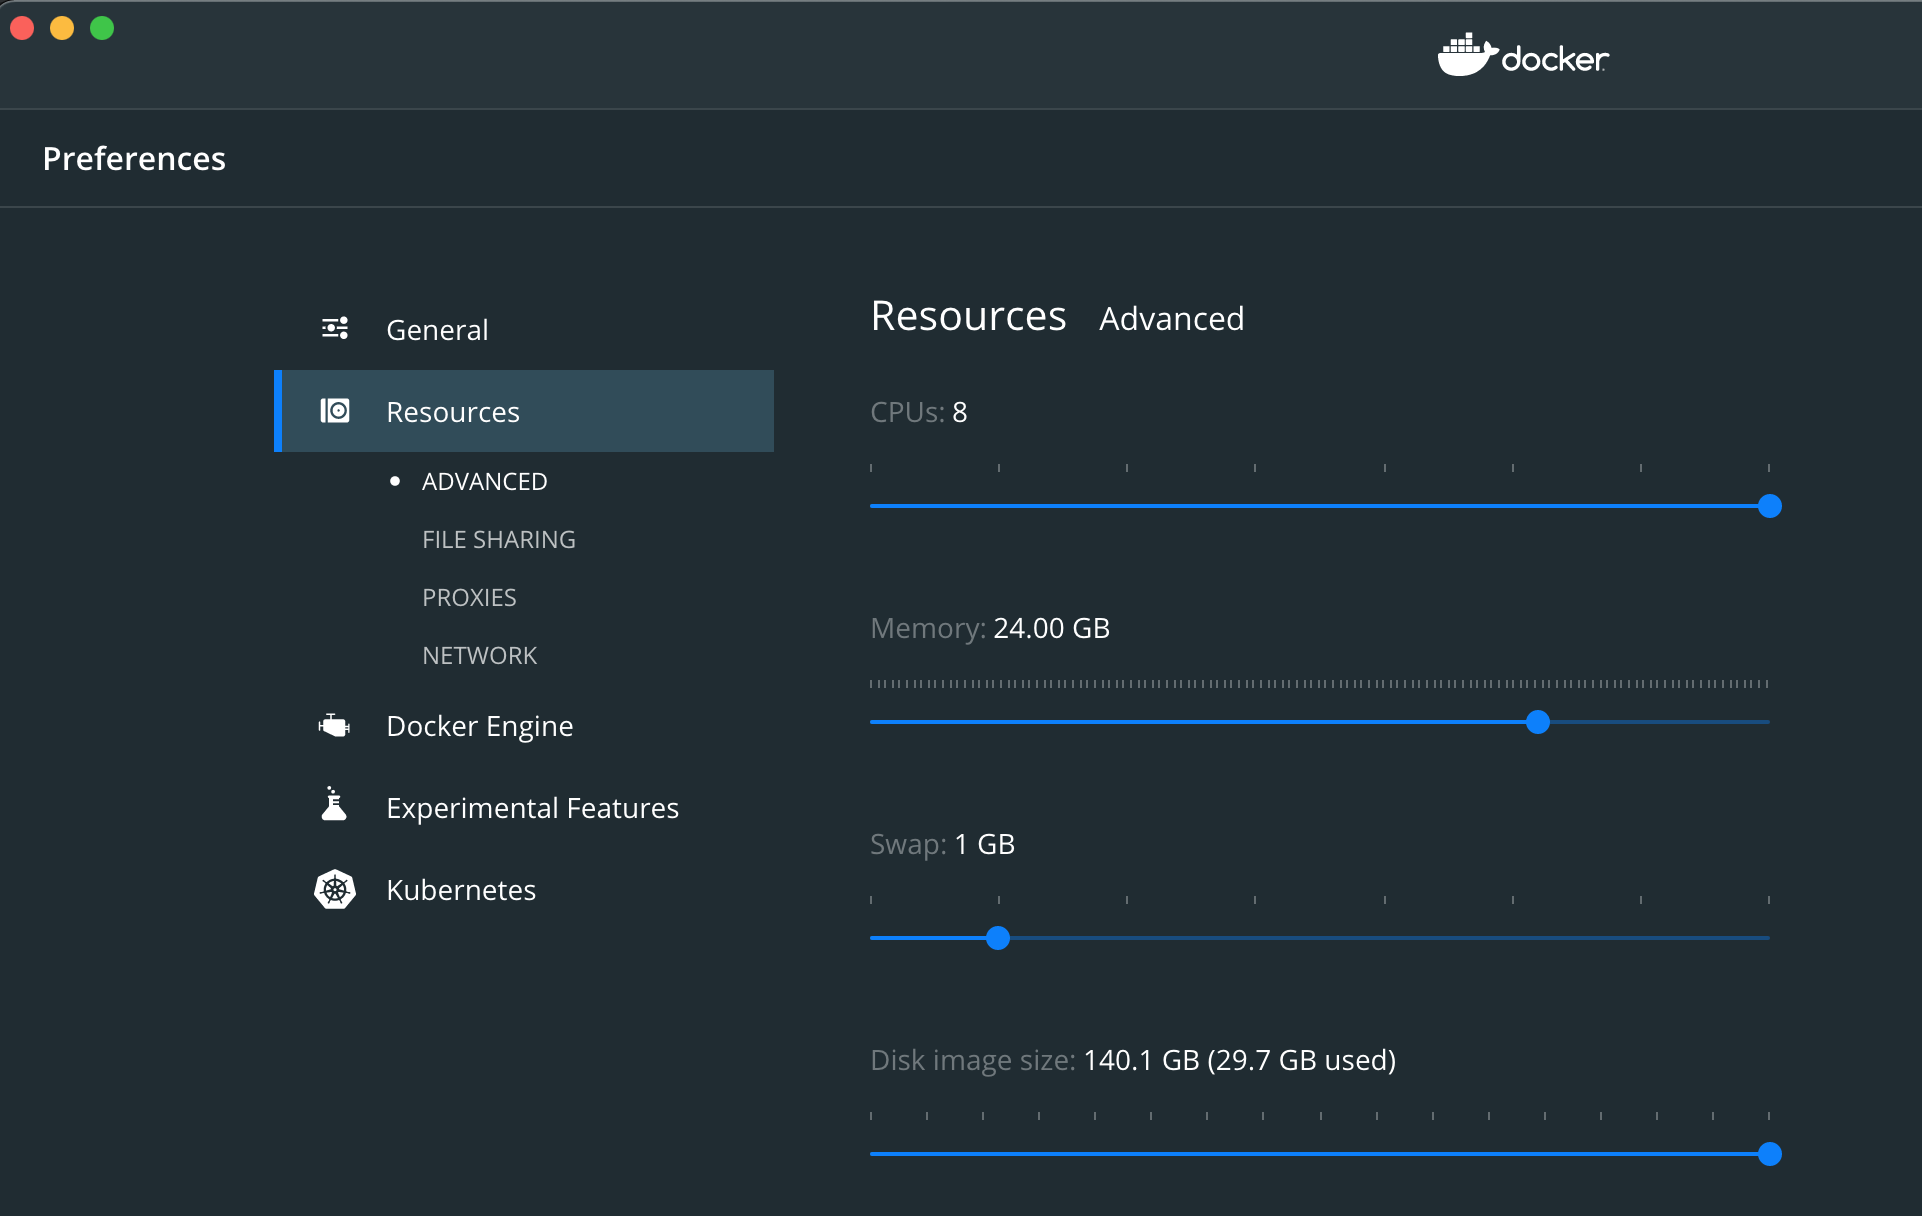
- Allocate required resources, roughly
Kind
Kind has no additional requirements.
Azure AKS
Azure AKS also requires:
- Azure CLI Tools must be installed and configured.
- macOS:
brew install azure-cli
- macOS:
OpenShift
OpenShift also requires:
- OpenShift CLI tools must be installed and configured.
- macOS:
brew install openshift-cli
- macOS:
Sizing
Modelops can be quickly configured for a small, medium or large installation whilst also allowing for further customizations as needed.
Whilst many values are best kept at defaults, the values listed below have biggest effect on sizing and so are exposed as install options.
Small - for single scoring
Minimum hardware is single virtual machine, 6 cores, 30GB memory and 100G disk space. Large configurations will allow for more concurrent scoring and faster executions. Can be run in desktop kubernetes environments such as docker for desktop.
Linux based scoring only ( a hybrid deployment of linux and windows nodes is required for statistica scoring ).
The helm install option, –set global.size=small, defaults to :
Medium - for small teams, the installation default
Minimum hardware is single virtual machine, 8 cpus, 32GB memory and 100G disk space. Recommend cloud infrastructure configured for cluster scaling to absorb variable demand. A useful cluster scaling configuration is a minimum of 1 virtual machine and maximum of 5 virtual machines, although experience shows 2 servers usually sufficient.
Additional windows virtual machines can be added to the cluster to support statistica scoring if required.
The helm install option, –set global.size=medium, defaults to :
Large - for larger teams
Minimum hardware is single virtual machine, 16 cpus, 64GB memory and 500G disk space. Recommend cloud infrastructure configured for cluster scaling to absorb variable demand. A useful cluster scaling configuration is a minimum of 1 virtual machine and maximum of 10 virtual machines.
Additional windows virtual machines can be added to the cluster to support statistica scoring if required.
The helm install option, –set global.size=large, defaults to :
Further sizing customizations
Each of the above values can be overridden as needed, for example to increase the git server disk space with the medium configuration, use –set global.size=medium –set global.medium.git.disk=50Gi.
The installation values file listed below shows the actual customization names.
Passwords and secrets
In order to avoid clear text passwords, Kubenertes provides a Secrets facility. So prior to installation, kubernetes Secrets have to be created to contain the passwords required by modelops.
These are :
| Description | Secret name | Key name | Comments |
|---|---|---|---|
| Elastic search | elasticsearch-es-elastic-user | Elastic search user name | See https://www.elastic.co/guide/en/cloud-on-k8s/master/k8s-users-and-roles.html - if not set elastic search generates a password |
| Git server | git-server | git user name | |
| Nexus server | nexus-server | admin | |
| Modelops server | modelops-server | admin | |
| Grafana server | grafana-server | admin | |
| Scoring flow admin | scoring-admin | admin |
These secrets may be created via the cloud infrastructure or on the command-line using kubectl. For example :
# elastic search
#
# note in this case we use apply to avoid elastic search re-creating the secret
#
kubectl create secret generic elasticsearch-es-elastic-user --from-literal=elastic=mysecretpassword --namespace modelops --dry-run=client --output=yaml 2>/dev/null > secret.yaml
kubectl apply --filename secret.yaml

# git server
#
kubectl create secret generic git-server --from-literal=modelops=mysecretpassword --namespace modelops

# nexus server
#
kubectl create secret generic nexus-server --from-literal=admin=mysecretpassword --namespace modelops

# modelops server
#
kubectl create secret generic modelops-server --from-literal=admin=mysecretpassword --namespace modelops

# grafana server
#
kubectl create secret generic grafana-server --from-literal=admin=mysecretpassword --namespace modelops

# scoring admin
#
kubectl create secret generic scoring-admin --from-literal=admin=mysecretpassword --namespace modelops
It is recommended to install an encryption provider for maximum security - see https://kubernetes.io/docs/tasks/administer-cluster/encrypt-data/.
Quick run through
The Helm CLI tool is used to install the ModelOps components to Kubernetes :
$ helm upgrade --install modelops modelops-1.0.0.tgz --atomic --set global.cloud=aks
This command first installs required Kubernetes operators - this takes a few seconds after which the helm command returns with a summary of the installation.
For example :
NAME: modelops
LAST DEPLOYED: Thu Oct 29 10:22:35 2020
NAMESPACE: modelops
STATUS: deployed
REVISION: 2
TEST SUITE: None
NOTES:
Thank you for installing modelops configured for aks in kubernetes v1.17.11


The installation pipeline has started which includes :

  Building tools image
  Building git server image
  Building sbrt base image
  Building modelops server image
  Building modelops scoring flow image
  Adding kubernetes permissions
  The following sub-charts :
    data-channel
    modelops-server
    pmml
    python
    sbrt-base
    scheduling-server
    scoring-flow
    statistica
    tensorflow
    test-datasink
    test-datasource
    tools


  Starting the git server at :

    Internal URL - http://git:3000/
    External web console URL - run kubectl get service git --namespace modelops -o jsonpath='http://{.status.loadBalancer.ingress[0].ip}:{.spec.ports[0].targetPort}'

  Starting the nexus server at :

    Internal web console URL - http://nexus:8081/
      Maven repository - http://nexus:8081/repository/maven-public/
      Helm repository - http://nexus:8081/repository/helm/
      PyPi proxy - http://nexus:8081/repository/pypi-group
      Container registry - container:8082
    External web console URL - run kubectl get service nexuslb --namespace modelops -o jsonpath='http://{.status.loadBalancer.ingress[0].ip}:{.spec.ports[0].targetPort}'

  Starting the modelops server at :

    Internal URL - http://modelops-server/
    External URL - run kubectl get service modelops-server --namespace modelops -o jsonpath='http://{.status.loadBalancer.ingress[0].ip}:{.spec.ports[0].targetPort}'

  Starting the data channel server at :

    Internal URL - http://data-channel/

  Starting the scheduling server at :

    Internal URL - http://scheduling-server/
    External web console URL - run kubectl get service scheduling-server --namespace modelops -o jsonpath='http://{.status.loadBalancer.ingress[0].ip}:{.spec.ports[0].targetPort}'

  Starting prometheus server at :

    Internal URL - http://prometheus.modelops.svc.cluster.local:9090
    External URL - run kubectl get service prometheus --namespace modelops -o jsonpath='http://{.status.loadBalancer.ingress[0].ip}:{.spec.ports[0].targetPort}'

  Starting grafana server at :

    Internal URL - http://grafana:3000
    External URL - run kubectl get service grafana --namespace modelops -o jsonpath='http://{.status.loadBalancer.ingress[0].ip}:{.spec.ports[0].targetPort}'

  Starting elasticsearch server at :

    Internal URL - http://elasticsearch-es-http:9200
    External URL - run kubectl get service elasticsearch-es-http --namespace modelops -o jsonpath='http://{.status.loadBalancer.ingress[0].ip}:{.spec.ports[0].targetPort}'

    Userid is elastic, password elastic

  Starting kibana server at :

    Internal URL - http://kibana-kb-http
    External URL - run kubectl get service kibana-kb-http --namespace modelops -o jsonpath='http://{.status.loadBalancer.ingress[0].ip}:{.spec.ports[0].targetPort}'

    Userid is elastic, password elastic


  Populating the nexus maven repository with TIBCO artifacts

To track the progress of the installation pipeline run :

  tkn pipelinerun logs installation-2 --follow --namespace modelops
The output depends on the cloud platform and any additional options selected. These details are also displayed with the helm status modelops command.
The zip of maven artifacts should be copied using kubectl cp command :
$ kubectl cp kubernetes-installer-1.0.0-mavenrepo.zip mavenrepo-0:/tmp/mavenrepo.zip
At this point the installation has been started and, as mentioned above, the status of the installation can be monitored with tkn pipelinerun logs installation -f. For example :
$ tkn pipelinerun logs installation-2 --follow --namespace modelops
[tools-prepare : prepare] Preparing directory for build tools image

[git-server : build-and-push] INFO[0005] Retrieving image manifest gitea/gitea:1.10.2
[git-server : build-and-push] INFO[0007] Retrieving image manifest gitea/gitea:1.10.2
[git-server : build-and-push] INFO[0010] Built cross stage deps: map[]
[git-server : build-and-push] INFO[0010] Retrieving image manifest gitea/gitea:1.10.2
[git-server : build-and-push] INFO[0011] Retrieving image manifest gitea/gitea:1.10.2
....
The installation process can run tasks in parallel - hence the output is prefixed with the task and lines are coloured.
The installation is completed when the tkn pipelinerun logs installation –follow –namespace modelops command completes. The tkn taskrun list command shows the task status :
$ tkn taskrun list --namespace modelops
 NAME                                             TASK NAME                   STARTED          DURATION     STATUS
 installation-2-modelops-server-scale-tq26d       modelops-server-scale       9 minutes ago    26 seconds   Succeeded
 installation-2-test-datasink-scale-7x6dv         test-datasink-scale         12 minutes ago   43 seconds   Succeeded
 installation-2-test-datasource-scale-n2bn4       test-datasource-scale       12 minutes ago   27 seconds   Succeeded
 installation-2-modelops-server-image-n8pc8       modelops-server-image       15 minutes ago   5 minutes    Succeeded
 installation-2-scoring-flow-image-dt5d6          scoring-flow-image          15 minutes ago   6 minutes    Succeeded
 installation-2-test-datasource-image-ldxrk       test-datasource-image       15 minutes ago   2 minutes    Succeeded
 installation-2-test-datasink-image-45thd         test-datasink-image         15 minutes ago   3 minutes    Succeeded
 installation-2-git-server-scale-pbclk            git-server-scale            16 minutes ago   21 seconds   Succeeded
 installation-2-modelops-server-maven-kc4s4       modelops-server-maven       16 minutes ago   1 minute     Succeeded
 installation-2-test-datasource-maven-m7ghv       test-datasource-maven       16 minutes ago   1 minute     Succeeded
 installation-2-test-datasink-maven-z9pd6         test-datasink-maven         16 minutes ago   1 minute     Succeeded
 installation-2-scoring-flow-maven-znt2n          scoring-flow-maven          16 minutes ago   1 minute     Succeeded
 installation-2-git-server-qq8dl                  git-server                  17 minutes ago   1 minute     Succeeded
 installation-2-test-datasource-prepare-lt6xd     test-datasource-prepare     17 minutes ago   53 seconds   Succeeded
 installation-2-test-datasink-prepare-4bmzj       test-datasink-prepare       17 minutes ago   51 seconds   Succeeded
 installation-2-scoring-flow-prepare-tmh55        scoring-flow-prepare        17 minutes ago   51 seconds   Succeeded
 installation-2-modelops-server-prepare-rm6d5     modelops-server-prepare     17 minutes ago   57 seconds   Succeeded
 installation-2-git-server-prepare-269qk          git-server-prepare          19 minutes ago   1 minute     Succeeded
 installation-2-data-channel-scale-5792c          data-channel-scale          19 minutes ago   1 minute     Succeeded
 installation-2-kibana-gzjr4                      kibana                      19 minutes ago   1 minute     Succeeded
 installation-2-scoring-pipeline-helm-qcx7d       scoring-pipeline-helm       19 minutes ago   1 minute     Succeeded
 installation-2-scheduling-server-scale-m5c5q     scheduling-server-scale     20 minutes ago   1 minute     Succeeded
 installation-2-python-image-j5l5q                python-image                25 minutes ago   7 minutes    Succeeded
 installation-2-tools-image-ddh4r                 tools-image                 25 minutes ago   6 minutes    Succeeded
 installation-2-statistica-image-mq5cq            statistica-image            25 minutes ago   24 minutes   Succeeded
 installation-2-pmml-image-sw2s6                  pmml-image                  25 minutes ago   6 minutes    Succeeded
 installation-2-data-channel-image-r7hs8          data-channel-image          26 minutes ago   7 minutes    Succeeded
 installation-2-scheduling-server-image-df9jh     scheduling-server-image     26 minutes ago   6 minutes    Succeeded
 installation-2-tensorflow-image-w6ssk            tensorflow-image            26 minutes ago   6 minutes    Succeeded
 installation-2-sbrt-base-image-xk6hg             sbrt-base-image             26 minutes ago   8 minutes    Succeeded
 installation-2-python-maven-ffsbw                python-maven                26 minutes ago   1 minute     Succeeded
 installation-2-statistica-maven-vkxvd            statistica-maven            26 minutes ago   59 seconds   Succeeded
 installation-2-pmml-maven-nvz42                  pmml-maven                  26 minutes ago   1 minute     Succeeded
 installation-2-tools-maven-8bm4r                 tools-maven                 27 minutes ago   1 minute     Succeeded
 installation-2-scheduling-server-maven-kf2br     scheduling-server-maven     27 minutes ago   1 minute     Succeeded
 installation-2-sbrt-base-maven-hdh67             sbrt-base-maven             27 minutes ago   1 minute     Succeeded
 installation-2-data-channel-maven-hwb7t          data-channel-maven          27 minutes ago   1 minute     Succeeded
 installation-2-tensorflow-maven-m4svb            tensorflow-maven            27 minutes ago   1 minute     Succeeded
 installation-2-pmml-prepare-b8mqn                pmml-prepare                28 minutes ago   1 minute     Succeeded
 installation-2-data-channel-prepare-77sk2        data-channel-prepare        28 minutes ago   47 seconds   Succeeded
 installation-2-tools-prepare-t4fgk               tools-prepare               28 minutes ago   53 seconds   Succeeded
 installation-2-statistica-prepare-prhn9          statistica-prepare          28 minutes ago   1 minute     Succeeded
 installation-2-tensorflow-prepare-kxfm6          tensorflow-prepare          28 minutes ago   48 seconds   Succeeded
 installation-2-scheduling-server-prepare-lfn8l   scheduling-server-prepare   28 minutes ago   54 seconds   Succeeded
 installation-2-python-prepare-5bwlm              python-prepare              28 minutes ago   2 minutes    Succeeded
 installation-2-sbrt-base-prepare-b94jj           sbrt-base-prepare           28 minutes ago   54 seconds   Succeeded
 installation-2-deploy-artifacts-fqckl            deploy-artifacts            33 minutes ago   4 minutes    Succeeded
 installation-2-nexus-repositories-7qvfx          nexus-repositories          33 minutes ago   12 seconds   Succeeded
The installation pipeline
The install process is controlled via a Tekton pipeline called installation. This pipeline first installs the following Kubernetes Operators during the pre-install hook :
- Operator Lifecycle Manager (if required)
- Tekton pipeline operator
- Tekton triggers operator
- Nexus 3 operator
- Prometheus operator
- Grafana operator
- Elastic Cloud on Kubernetes operator
Kubernetes permissions are added to support Role-based access control (RBAC), security context constraints (SCC) and Streaming discovery.
The following container images are built in Kubernetes :
- GIT server image - used to hold the ModelOps artifacts
Dependent helm sub charts also create :
- General purpose tools image - used for various build and deploy tasks
- TIBCO Streaming runtime base image - used as a base for further images
- TIBCO ModelOps Server image - scoring pipeline, flow, and model management
- TIBCO ModelOps Scoring Server image for for each runner - model scoring
- TIBCO Data Channel Registry - data source and sink registration and discovery
- TIBCO ModelOps Scheduling Server - job scheduling
The following services are started :
- GIT server
- TIBCO ModelOps Server
- Nexus repository configured with :
- Maven repository, populated with TIBCO artifacts
- Python repository (both proxy and hosted)
- Container registry
- Helm chart repository
- TIBCO Data Channel Registry
- TIBCO Scheduling Server
Finally the installation deploys a helm chart used to later deploy a ModelOps server.
Kubernetes rollout is paused during the installation process and resumed once new container images are available.
Individual pipeline tasks are scheduled by dependency and available resources.
Old pipeline runs left over from earlier upgrades are cleaned up so that the logs for the last 3 installations only are kept.

Cloud platform differences
Kubernetes features differs between platforms and so the installation process also varies slightly. In general, natively provided features are used in preference to custom provided features. These difference are shown below :
| Feature | Docker for desktop | Kind | OpenShift | AKS | EKS | Nutanix |
|---|---|---|---|---|---|---|
| Operator Lifecycle Manager | Installed | Installed | Provided | Installed | TBD | TBD |
| Container registry | Nexus | Kind | ImageStream | ACR | TBD | TBD |
| Network exposure | node port | node port | route | load balancer | TBD | TBD |
| RBAC supported | No | Yes | Yes | Yes | TBD | TBD |
| SCC supported | No | No | Yes | No | TBD | TBD |
| Windows images supported | No | No | No | Yes | TBD | TBD |
These differences are controlled via ModelOps helm chart values parameters - these can be viewed with the helm show values modelops-1.0.0.tgz command, for example :
$ helm show values modelops-1.0.0.tgz
#
# Default values for the chart
#

#
# declare as global so subcharts get the same
#
global:

#
# empty map for sub charts to populate to extend this chart
#
  buildsteps: {}
  supportedmodels: {}
  runafter: {}

#
# cloud environment
#
  cloud: docker-for-desktop

#
# Container timezone
#
  timeZone: Europe/London

#
# nexus specific settings
#
  nexus:
    nodePort:           30020
    containerNodePort:  30030
    adminPassword:      "admin123"
    hostname:           "nexus"

#
# The following values are defaulted depending on cloud type :
#
# installOLM - install the operator lifecycle manager
#
# containerRegistry - base URI of container registry.  Use the supplied one
#   if available.
#
# containerUsername/containerPassword - if set, used to access container registry
#
# networkExposure - mechanism to use to expose network
#
# createPVC - if true create persistent volume claim in helm chart, if false
#   the persistent volume claim must be created before installing the chart.
#
# selfSignedRegistry - if true then skip tls verification on registry
#
# httpRegistry - if true then use http registry
#
# adminRBAC - if true, create and use admin service account for admin tasks
#
# kubernetesRBAC - if true, create role for streaming pod to manage service (plain kubernetes)
#
# openshiftRBAC - if true, create role for streaming pod to manage service (openshift)
#
# openshiftOperator - if true, use the OpenShift operator hub
#
# windows - if true build windows container (currently statistica scoring server)
#
# dnsSuffix - AKS only, set azure annotation for pubic dns name, ie <container>-<dnsSuffix>.<region>.cloudapp.azure.com
#

  docker-for-desktop:
    installOLM:         true
    installMetrics:     true
    installLogs:        true
    containerRegistry:  "localhost:5000"
    networkExposure:    "nodePort"
    createPVC:          true
    httpRegistry:       true
    selfSignedRegistry: false
    adminRBAC:          false
    kubernetesRBAC:     false
    openshiftRBAC:      false
    openshiftOperator:  false
    windows:            false

  kind:
    installOLM:         true
    installMetrics:     true
    installLogs:        true
    containerRegistry:  "kind-registry:5000"
    networkExposure:    "nodePort"
    createPVC:          true
    selfSignedRegistry: false
    httpRegistry:       true
    adminRBAC:          true
    kubernetesRBAC:     true
    openshiftRBAC:      false
    openshiftOperator:  false
    windows:            false

  openshift:
    installOLM:         false
    installMetrics:     true
    installLogs:        true
    containerRegistry:  "image-registry.openshift-image-registry.svc:5000/default"
    networkExposure:    "route"
    createPVC:          true
    selfSignedRegistry: true
    httpRegistry:       false
    adminRBAC:          true
    kubernetesRBAC:     false
    openshiftRBAC:      true
    openshiftOperator:  true
    windows:            false

  aks:
    installOLM:         true
    installMetrics:     true
    installLogs:        true
    containerRegistry:  "myregistry.azurecr.io"
    containerUsername:  "azure appid"
    containerPassword:  "azure password"
    azureTenantId:      "azure tenantId"
    networkExposure:    "loadBalancer"
    domain:             "tobeset"
    createPVC:          false
    selfSignedRegistry: false
    httpRegistry:       true
    adminRBAC:          true
    kubernetesRBAC:     true
    openshiftRBAC:      false
    openshiftOperator:  false
    windows:            true

#
# sizing details
#
  small:
    nexus:
      disk: "20Gi"
      memory: "1.5Gi"
    git:
      disk: "5Gi"
    modelopsserver:
      disk: "5Gi"
    modelopsmetrics:
      memory: "10Gi"
      interval: "30"
    elasticsearch:
      disk: "5Gi"
      memory: "2Gi"
    prometheus:
      interval: "30s"

  medium:
    nexus:
      disk: "20Gi"
      memory: "1.5Gi"
    git:
      disk: "20Gi"
    modelopsserver:
      disk: "20Gi"
    modelopsmetrics:
      memory: "15Gi"
      interval: "10"
    elasticsearch:
      disk: "20Gi"
      memory: "5Gi"
    prometheus:
      interval: "10s"

  large:
    nexus:
      disk: "20Gi"
      memory: "1.5Gi"
    git:
      disk: "100Gi"
    modelops-erver:
      disk: "100Gi"
    modelopsmetrics:
      memory: "20Gi"
      interval: "10"
    elasticsearch:
      disk: "100Gi"
      memory: "10Gi"
    prometheus:
      interval: "10s"

#
# hence the chart may be installed :
#
#   helm install modelops target/helm/repo/modelops-1.0.0.tgz --set cloud=openshift
#
# or override individual settings
#
#   helm install modelops target/helm/repo/modelops-1.0.0.tgz --set cloud=openshift --set openshift.createPVC=true
#

#
# auto start deployments ( after image is built )
#
autostartdeployments:
  tools:              false
  statistica:         false
  pmml:               false
  tensorflow:         false
  scoring-flow:       false
  data-channel:       true
  scheduling-server:  true
  modelops-server:    true

#
#
# git specific settings
#
# if azureDiskURL is set, use azureDisk with that URL
#
git:
  nodePort:           30010
  username:           "modelops"
  password:           "modelops"
  repository:         "scoringpipelines"
  azureDiskURL:       ""

#
# modelops-server specific settings
#
# if azureDiskURL is set, use azureDisk with that URL
#
modelopsserver:
  nodePort:           30040
  username:           "admin"
  password:           "admin"
  azureDiskURL:       ""

#
# prometheus specific settings
#
prometheus:
  nodePort:           30050

#
# grafana specific settings
#
grafana:
  nodePort:           30060

#
# elasiticsearch specific settings
#
elasticsearch:
  nodePort:           30070
  password:           "elastic"

#
# kibana specific settings
#
kibana:
  nodePort:           30080

#
# scheduling-server specific settings
#
schedulingserver:
  nodePort:           30090
  logLevel:           "INFO"

#
# data channel specific settings
#
#
datachannel:
  nodePort:           30100
So to choose the defaults for a given environment, just set global.cloud to the right environment :
$ helm install modelops modelops-1.0.0.tgz --set global.cloud=kind
However individual settings can be overridden if required, using cloud name.parameter format. For example :
$ helm install modelops modelops-1.0.0.tgz --set global.cloud=docker-for-desktop \
    --set global.docker-for-desktop.containerRegistry=myserver:30030
Some examples are shown in the sections below :
FIX THIS - I wondered if we need to be more specific about creating these environments ?
Docker for Desktop
To install docker for desktop :
- Follow the instructions at https://www.docker.com/products/docker-desktop
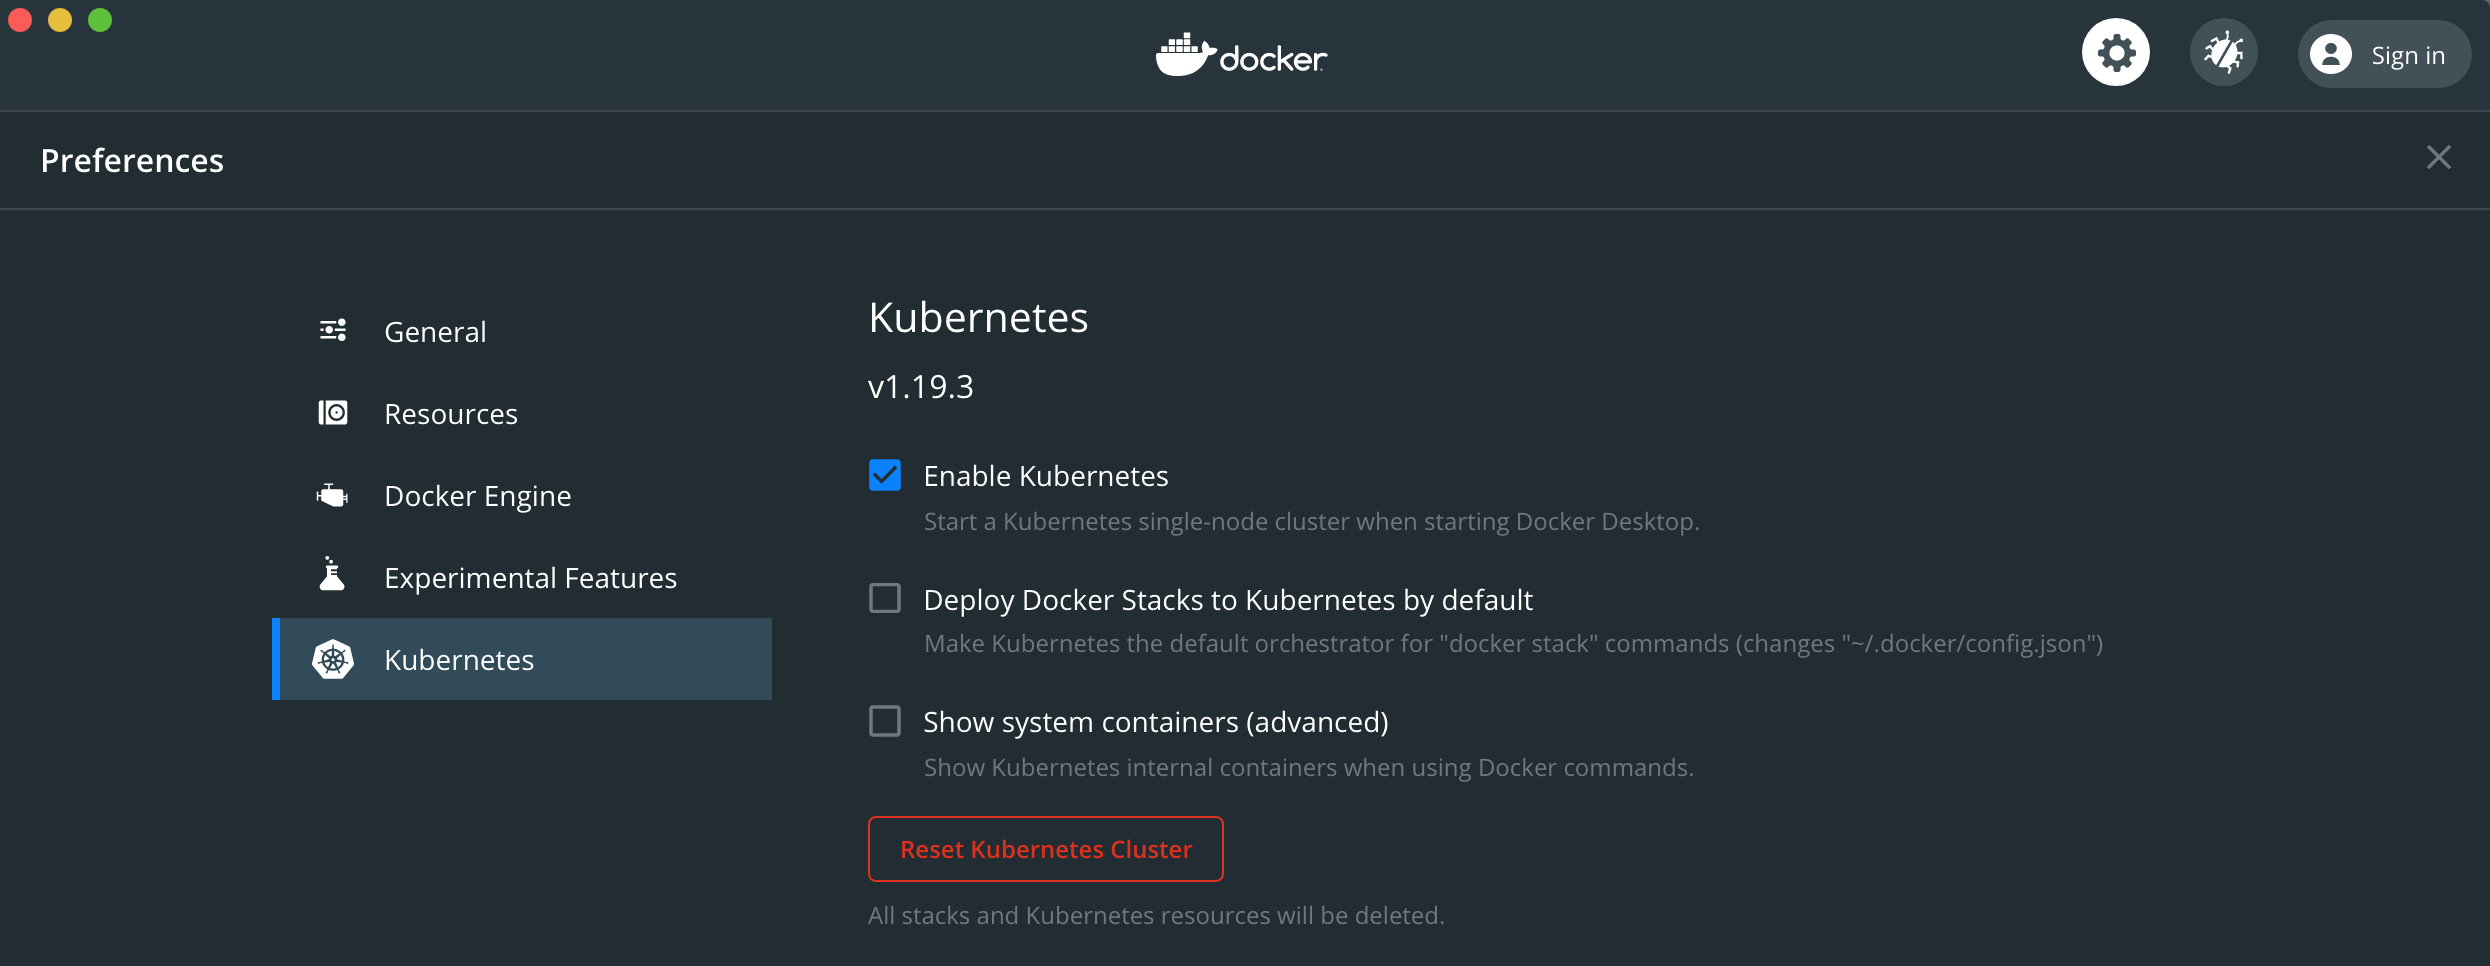
- Enable Kubernetes in the GUI
- Ensure there are sufficient resources allocated
ModelOps is installed using these commands:
//
//  Install ModelOps helm charts
//
$ cd ${TIBCO_EP_HOME}/ep-modelops/kubernetes-installer/target/helm/repo
$ helm install modelops \
    modelops-1.0.0.tgz \
    --set global.cloud=docker-for-desktop \
    --set global.docker-for-desktop.containerRegistry=$(hostname -s):30030
//
//  Populate the Maven repository inside the K8s cluster
//
$ cd ${TIBCO_EP_HOME}/ep-modelops/kubernetes-installer/target/
$ kubectl cp kubernetes-installer-1.0.0-mavenrepo.zip \
    mavenrepo-0:/tmp/mavenrepo.zip
Kind
To install kind :
- Install docker for desktop as above
- Follow the instructions at https://kind.sigs.k8s.io/docs/user/quick-start/
- Follow the instructions at https://kind.sigs.k8s.io/docs/user/local-registry/ to configure the registry
Once installed, a typical ModelOps installation command for kind is :
$ helm install modelops modelops-1.0.0.tgz --set global.cloud=kind
$ kubectl cp kubernetes-installer-1.0.0-mavenrepo.zip mavenrepo-0:/tmp/mavenrepo.zip
OpenShift Code Ready Containers (CRC)
To install code ready containers :
- Follow the instructions at https://cloud.redhat.com/openshift/install/crc/installer-provisioned
- Start with crc start –cpus 6 –memory 16384 –pull-secret-file ~/pull-secret.txt
Then a typical ModelOps installation command for OpenShift code ready containers is :
$ helm install modelops modelops-1.0.0.tgz --set global.cloud=openshift
$ kubectl cp kubernetes-installer-1.0.0-mavenrepo.zip mavenrepo-0:/tmp/mavenrepo.zip
AKS
To install AKS :
- Follow the instructions at https://docs.microsoft.com/en-us/azure/aks/kubernetes-walkthrough
- To support windows containers, follow the instructions at https://docs.microsoft.com/en-us/azure/aks/windows-container-cli#add-a-windows-server-node-pool
An example AKS script is :
namespace=modelops
group=modelops
cluster=modelops
acr=registry
azure_winpassword="set this"
azure_appId="set this"
azure_password="set this""
azure_tenantId="set this"

#
# create cluster
#
az group create --name ${group} --location uksouth
az acr create --name ${acr} --resource-group ${group} --sku basic
az aks create \
    --resource-group ${group} \
    --service-principal ${azure_appId} \
    --client-secret ${azure_password} \
    --name ${cluster} \
    --node-count 1 \
    --enable-cluster-autoscaler \
    --min-count 1 \
    --max-count 5 \
    --no-ssh-key \
    --windows-admin-password ${azure_winpassword} \
    --windows-admin-username azureuser \
    --vm-set-type VirtualMachineScaleSets \
    --node-vm-size Standard_B8ms \
    --network-plugin azure \
    --attach-acr ${acr}

#
# add windows pool and set taint to avoid default use
# (some operators will attempt to schedule linux pod on windows node)
#
az aks nodepool add \
    --resource-group ${group} \
    --cluster-name ${cluster} \
    --os-type Windows \
    --name npwin \
    --node-count 1 \
    --enable-cluster-autoscaler \
    --min-count 1 \
    --max-count 2 \
    --node-vm-size Standard_B8ms \
    --node-taints os=windows:NoSchedule

#
# create any persistent volumes ( external to kubernetes / namespace )
#
nodegroup=$(az aks show --resource-group ${group} --name ${cluster} --query nodeResourceGroup -o tsv)
az disk create \
  --resource-group ${nodegroup} \
  --name modelops-server \
  --size-gb 5 \
  --query id --output tsv
az disk create \
  --resource-group ${nodegroup} \
  --name git-server \
  --size-gb 5 \
  --query id --output tsv
Once installed, a typical ModelOps installation command for AKS is :
$ helm install modelops modelops-1.0.0.tgz --atomic --set global.cloud=aks \
    --set global.aks.containerRegistry=${acr}.azurecr.io \
    --set global.aks.containerUsername=${azure_appId} \
    --set global.aks.containerPassword=${azure_password} \
    --set global.aks.azureTenantId=${azure_tenantId}
$ kubectl cp kubernetes-installer-1.0.0-mavenrepo.zip mavenrepo-0:/tmp/mavenrepo.zip
Note that the chosen Azure registry URL and authentication details must be provided.
Upgrading
To upgrade the ModelOps components use :
$ helm upgrade modelops modelops-1.0.0.tgz ...
However, its common practice to use the same command for installation and upgrades :
$ helm upgrade modelops modelops-1.0.0.tgz --install ...
When the installation is upgraded the installation pipeline is re-executed and a rollout restart is performed on existing pods.
Uninstalling
To uninstall the ModelOps components use:
$ helm uninstall modelops
Note that this doesn’t uninstall the Kubernetes operators (so that a further install is faster).
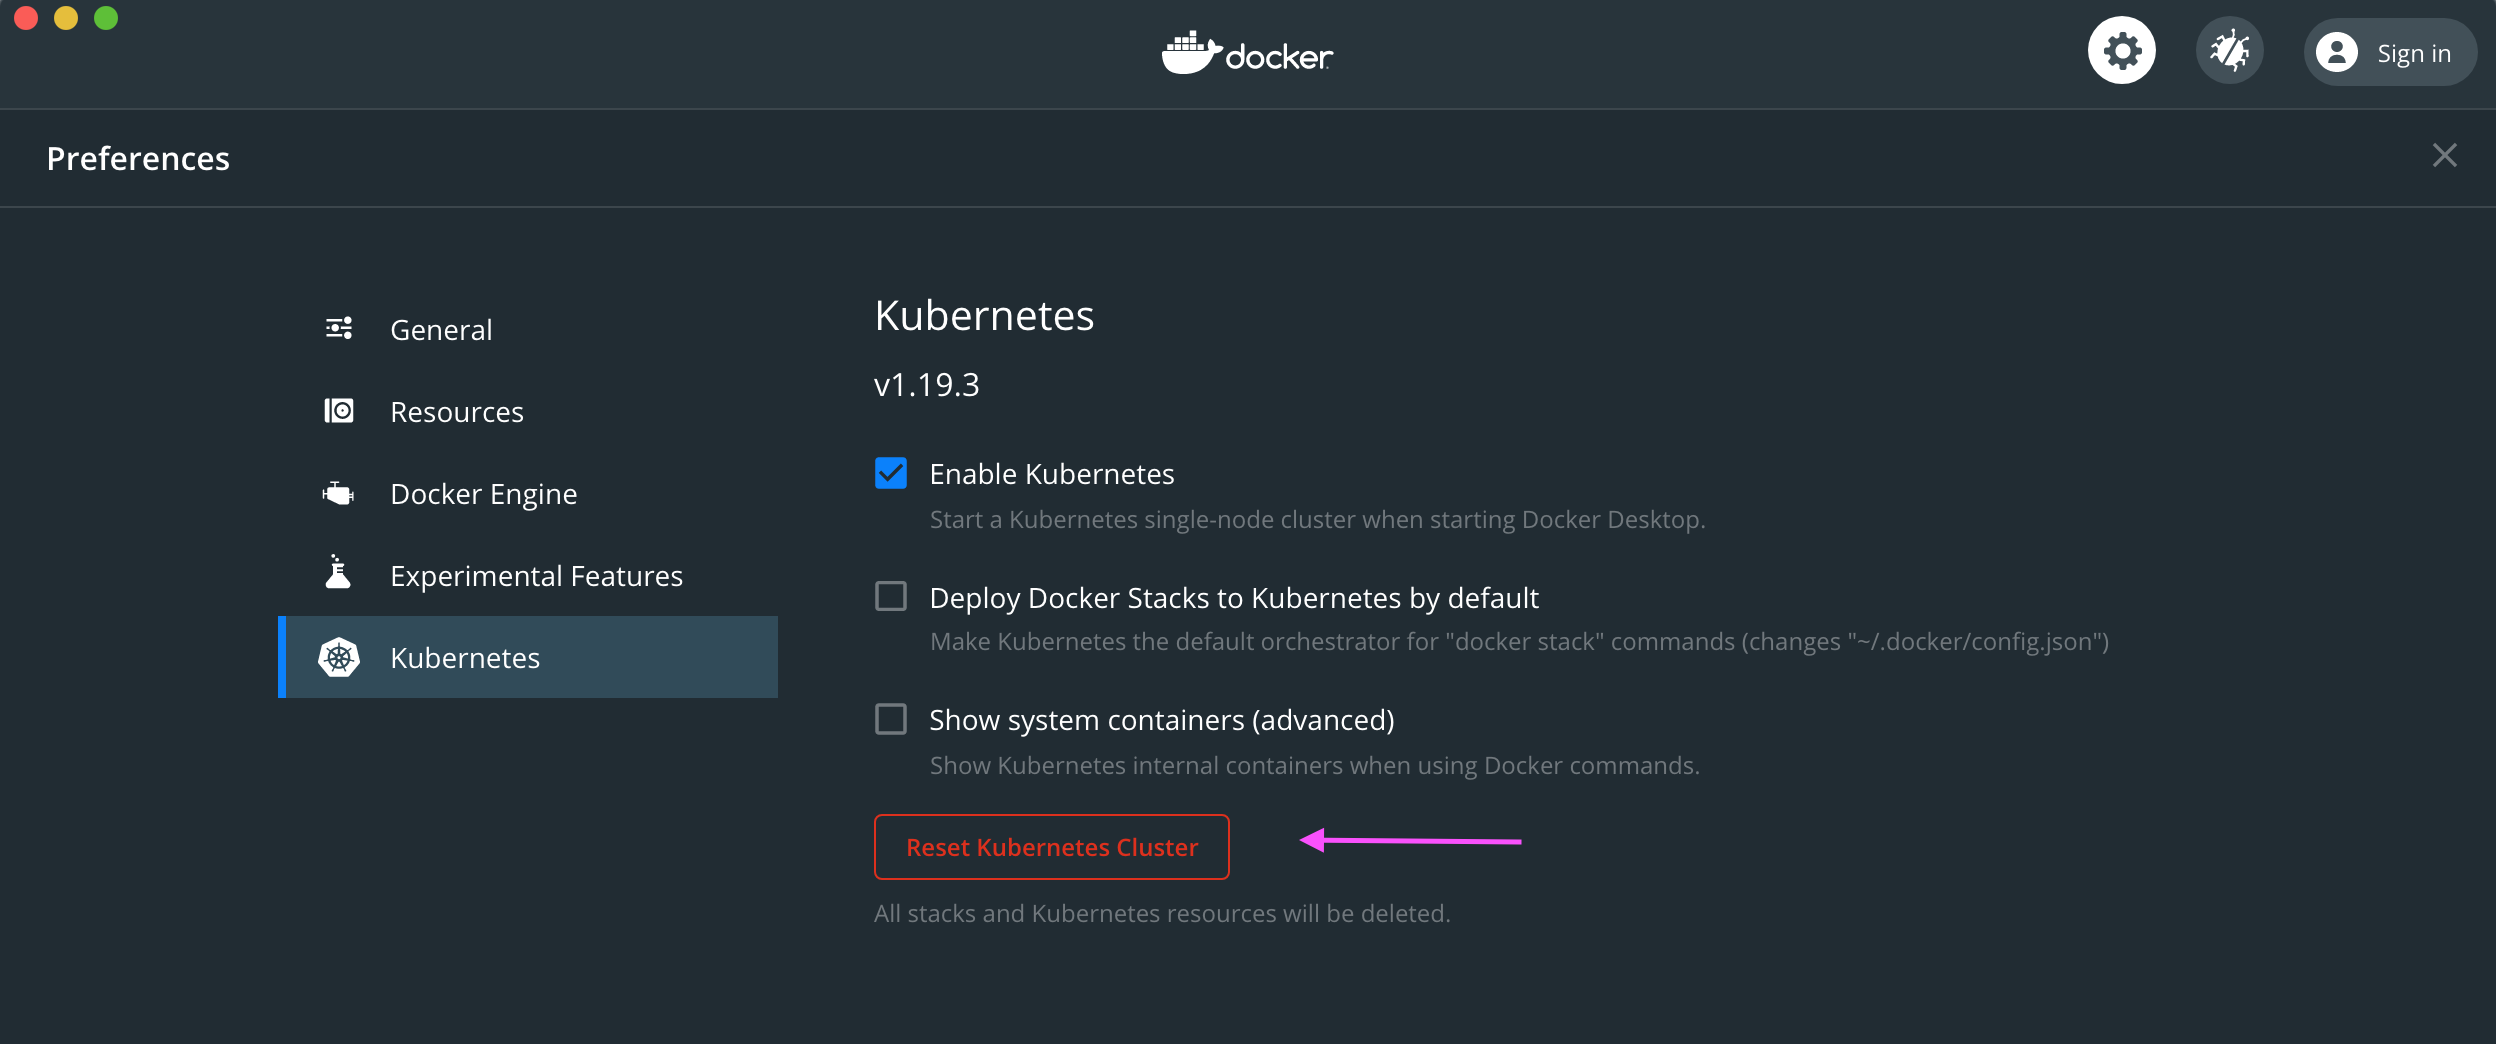
To uninstall everything to start from scratch reset the Kubernetes cluster, for example in Docker for Desktop:
Troubleshooting
Always ensure the kubernetes context is what you expect. For example with docker for desktop :
$ kubectl config current-context
docker-desktop
The context is also displayed in docker for desktop UI.