|
|
Import a statement set from CSV |


|
|
Existing statement sets in CSV format can be imported into TIBCO Nimbus® in order to centralize all compliance records and link them directly to the business processes. New statement sets can be created and existing statement sets updated. When updating an existing statement set, you can automatically schedule the import to occur at regular defined intervals.
Note: For information on how the CSV file should be constructed, see the examples below.
Create a new statement set from a CSV import file. 1.From the Tools menu choose Statement Sets. 2.From the File menu choose Import from CSV file. 3.From the File menu choose New. 4.In the Import Name field, enter a name for the statement set import routine. 5.In the CSV Filename field, click Browse and select the CSV file that you want to import. 6.In the Statements panel, specify the number of statement name columns and the number of data table field columns. Number of statement name columns is the maximum number of columns in the data set that are used for hierarchical statement names. Essentially, this is the maximum number of levels that exist in the statement set that you are importing. Number of data table field columns is the number of additional data field columns that exist within the data set. 7.In the Options panel, select any of the following options (if appropriate). Populate each statement record's data table will create an associated data table containing the additional data (Data1, Data2 and Data3 in Example 1 below) for each statement record generated in the statement set. Include statement descriptions will import any statement descriptions that are defined in the imported CSV file (see Example 2 below for information on how to include statement descriptions). 8.Select Create new statement set. 9.Click OK. The statement set import will appear in the Statement Set CSV Imports window. This window lists all of the available statement set imports from CSV. 10.To import the statement set, select the statement set import and from the File menu choose Run Now.
Update an existing statement set from a CSV import file. You can also schedule the import process to run at defined intervals. 1.From the Tools menu choose Statement Sets. 2.From the File menu choose Import from CSV file. 3.From the File menu choose New. 4.In the Import Name field, enter a name for the statement set import routine. 5.In the CSV Filename field, click Browse and select the import file that you want to import. 6.In the Statements panel, specify the number of statement name columns and the number of data table field columns. Number of statement name columns is the maximum number of columns in the data set that are used for hierarchical statement names. Essentially, this is the maximum number of levels that exist in the statement set that you are importing. Number of data table field columns is the number of additional data field columns that exist within the data set. 7.In the Options panel, select any of the following options (if appropriate). Populate each statement record's data table will create an associated data table containing the additional data (Data1, Data2 and Data3 in Example 1 below) for each statement record generated in the statement set. Include statement descriptions will import any statement descriptions that are defined in the imported import file (see Example 2 below for information on how to include statement descriptions). 8.Select Update Existing Statement Set and then choose the statement set that you want to update. Note: You can choose to backup the original statement set prior to the statement set being updated by selecting Backup statement set before update. 9.Click the Advanced tab. Advanced This tab allows you to specify which fields in the existing statement set to update and what action to take for unmatched statements. Import key / ID is used to match the data in the import file to the statement set. This can either be the statement name or a selected data table field in a data table that is associated with the statement set. Fields to update allows you to select which fields in the existing statement set to update with the information in the CSV file. Ignore Blank Fields from the CSV File will not update any fields in the existing statement set if the corresponding fields in the import file are blank. If this option is not selected then any blank fields will remove the data in the corresponding fields in the statement set. Unmatched Statements In the Unmatched Statements panel, you can specify what action to take for statements that are missing in the original statement set compared to the import file. Delete Statement will remove any statements in the original statement set that are not present in the import file. In such cases, you must specify what action the system will take from the following choices: Do Nothing will simply remove any statements that do not match up with the import file. Send Notification allows you to notify selected users and/or user groups of any deleted statements. Click Configure to add users and/or user groups. Note: You must specify what to do with orphaned statements that may be created when deleting unmatched statements (see Orphaned Statements below). Do Nothing will not remove statements from the original statement set that do not match up with the import file. In such cases, you must specify what action the system will take from the following choices: Do Nothing will leave any statements that do not match up with the import file. Send Notification will send a notification to selected users and/or user groups, notifying them of any unmatched statements. Click Configure to add users and/or user groups. Raise Statement Action will automatically create a preconfigured action and assign it to selected users. Click Configure to define the action and assign users and/or user groups. Orphaned Statements If you have selected to delete any unmatched statements in the existing statement set, you must specify what to do in cases where statements are linked to activities, as this will create broken activity statement links. Delete Statement will remove any statements in the original statement set that are not present in the import file. In such cases, you must specify what action the system will take from the following choices: Do Nothing will not remove broken activity statement links. Send Notification will send a notification to selected users and/or user groups, notifying them of any broken activity statement links. Click Configure to add users and/or user groups. Raise Process Action will automatically create a preconfigured action and assign it to selected users. Click Configure to define the action and assign users and/or user groups. Raise Change Request will automatically create a preconfigured change request and assign it to selected users. Click Configure to define the change request and assign users and/or user groups. Note: If you select to send a notification, raise an action or raise a change request, you must specify what map type(s) it applies to from the Apply this action to the following map types drop-down list. Scheduling and Logging This tab allows you to automatically schedule the import to run on a regular basis. Note that this is optional and if you do not set up automatic scheduling then you must run the import manually from the Statement Set CSV Imports window each time you want to update the existing statement set. To enable scheduling and logging, select Schedule Enabled. First Due Date is the date at which the first import will run. Recurrence Pattern is how often to run the import. Choose from daily, weekly, monthly, yearly or on custom dates. Email Log File To Statement Set Owner will send an import log to the owner of the statement set each time the import is performed.
Update an existing import. 1.From the Tools menu choose Statement Sets. 2.From the File menu choose Import from CSV file. 3.Double-click the import that you want to edit. 4.Make any changes, as required, and then click OK.
Manually start an ad hoc or scheduled CSV import. 1.From the Tools menu choose Statement Sets. 2.From the File menu choose Import from CSV file. 3.Select the statement set import and from the File menu choose Run Now.
The format of a 3-tier statement set is:
Level 1,Level 2,Level 3,Data 1,Data 2,...,Data n.
The first row of the file constitutes the names of the statements and data columns within the statement. Proceeding rows are treated as the actual statement names and corresponding data.
The following is an example of the structure of a CSV file relating to a statement set:
Level1,Level2,Level3,Data1,Data2,Data3 Example1,,,s1 d1,s1 d2,s1 d3 ,Example1.1,,s1.1 d1,s1.1 d2,s1.1 d3 ,,Example1.1.1,s1.1.1 d1,s1.1.1 d2,s1.1.1 d3 ,Example1.2,,s1.2 d1,s1.2 d2,s1.2 d3 Example2,,,s2 d1,s2 d2,s2 d3 ,Example2.1,,s2.1 d1,s2.1 d2,s2.1 d3 ,,Example2.1.1,s2.1.1 d1,s2.1.1 d2,s2.1.1 d3 ,Example2.2,,s2.2 d1,s2.2 d2,s2.2 d3 ,Example2.3,,s2.3 d1,s2.3 d2,s2.3 d3 ,,Example2.3.1,s2.3.1 d1,s2.3.1 d2,s2.3.1 d3
Statement descriptions can be included in the CSV file.
The format of a 3-tier statement set is:
Level1,Level1Description,Level2,Level2Description,Level3,Level3Description,Data1,Data2,Data3
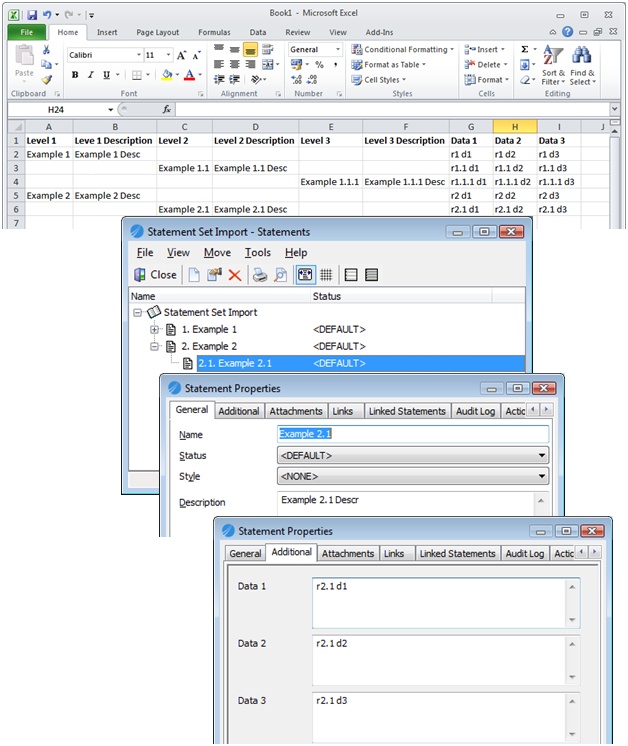
The following is an example of the structure of a CSV file relating to a statement set that incorporates information about the statements:
Level1,Level1Description,Level2,Level2Description,Level3,Level3Description,Data1,Data2,Data3 Example1,Example1 Statement Description,,,,,s1 d1,s1 d2,s1 d3 ,,Example1.1,Example1.1 Statement Description,,,s1.1 d1,s1.1 d2,s1.1 d3 ,,,,Example1.1.1,Example1.1.1 Statement Description,s1.1.1 d1,s1.1.1 d2,s1.1.1 d3 ,,Example1.2,Example1.2 Statement Description,,,s1.2 d1,s1.2 d2,s1.3 d3 Example2,Example2 Statement Description,,,,,s2 d1,s2 d2,s2 d3 ,,Example2.1,Example2.1 Statement Description,,,s2.1 d1,s2.1 d2,s2.1 d3
.....and so on
Click the image below to see an example
Attachments, including URL links, file links and SAP transaction links, can be included in the CSV import. The following rules apply:
1.URL Links. If the text begins with either http:, https: or file: then it will be imported as a URL link. 2.File Links. If the text begins with a drive letter or backslash, for example \\ or C:\, then it will be imported as a file link. 3.SAP Transaction Links. All other text will be imported as SAP transaction links. Here the first part of the text will be imported as the transaction code and the text following the first space will be imported as the title of the transaction link. For example, 'VA03 Create Sales Order' - 'VA03 is the transaction code and 'Create Sales Order' is the title. The format of a 3-tier statement set is:
Level1,Level1Description,Level2,Level2Description,Level3,Level3Description,Data1,Data2,Data3,Att1,Att2,Attx
The following is an example of the structure of a CSV file relating to a statement set that incorporates statement information and a number of attachments:
Level1,Level1Description,Level2,Level2Description,Level3,Level3Description,Data1,Data2,Data3,Att1,Att2,Attx Example1,Example1 Statement Description,,,,,s1 d1,s1 d2,s1 d3,http://www.tibco.com,VA03 Create Sales Order ,,Example1.1,Example1.1 Statement Description,,,s1.1 d1,s1.1 d2,s1.1 d3,C:\My documents\ISO Guidelines.PDF ,,,,Example1.1.1,Example1.1.1 Statement Description,s1.1.1 d1,s1.1.1 d2,s1.1.1 d3,https://salesforce.com ,,Example1.2,Example1.2 Statement Description,,,s1.2 d1,s1.2 d2,s1.3 d3,http://www.tibco.com
.....and so on
Commas within the text If there are commas within the text that you are importing, please ensure that you enclose them within quotation marks, otherwise the text will not be imported correctly. Also, there must be no space after the comma. The following will work: Example"," comma,text,text The following will not work (due to the space after the comma): Example", " comma,text,text |