Contents
This tutorial describes how to use StreamBase Studio to build a Docker image from a StreamBase application, and deploy the image to Docker. Docker is a third-party application used to create, deploy, and run applications by using containers of information across a network or the cloud. Describing Docker is beyond the scope of this document. Docker usage can be found on its website.
In this tutorial, you will:
-
Configure a simple StreamBase Application.
-
Build a Docker Image for the application with StreamBase Studio.
-
Run this image in a Docker container, exposing local ports to the running Docker container.
-
Confirm that you can communicate with the containerized application.
The steps on this page and the next two pages were tested using the Docker Community Edition of Docker for Windows and Docker for Mac from store.docker.com. Other Docker client solutions may work, but are explicitly not supported.
Docker for Windows requires 64-bit Windows 10 Pro or Enterprise with Microsoft Hyper-V available and enabled. The version of Windows 10 must be 1607 Anniversary Update (build 14393) or later. If you are running Windows 7 or an earlier version of Windows 10, the Docker Store redirects you to instead use an earlier product named Docker Toolbox. StreamBase 10 requires Docker for Windows, and does not interact with Docker Toolbox.
Note that installing Hyper-V disables VMware Workstation or Oracle VirtualBox on the same computer, because Windows 10 allows only one virtualization hypervisor to run at the same time.
Note
The virtual network interfaces configured by some hypervisor products, including Hyper-V, could conflict with earlier StreamBase 10 releases. See this troubleshooting page if you are using a StreamBase 10 release before 10.3.0.
-
From StreamBase Studio, select →
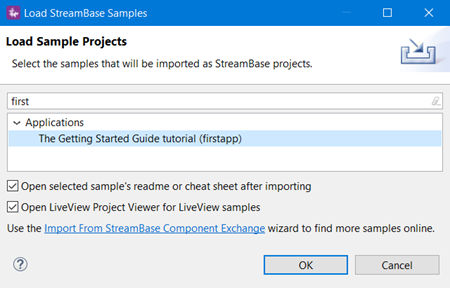
In the Load Sample Projects dialog, type
firstin the search field. Select theGetting Started Guidesearch result, then click to load the project.It may take some time for Studio to build the loaded project the first time as it resolves and copies Maven dependencies. The project is ready when there are no red marks on the project folders in the Project Explorer view.
-
Create an EventFlow fragment archive for the
firstappfragment:-
In the Project Explorer view, select the
sample_firstappproject folder. -
Right-click and select → from the context menu.
-
Look for the BUILD SUCCESS message in the Console view.
[INFO] ------------------------------------------------------------------------
[INFO] BUILD SUCCESS
[INFO] ------------------------------------------------------------------------
[INFO] Total time: 25.904 s
[INFO] Finished at: 2018-06-12T12:27:33-04:00
[INFO] Final Memory: 40M/647M
[INFO] ------------------------------------------------------------------------
-
The steps in this section create a StreamBase Application project that will build the Docker image.
-
Optional. Open the
firstappproject's/src/main/eventflowfolder to determine the Group ID used by the project, which iscom.tibco.sb.sample. -
Select → → .
-
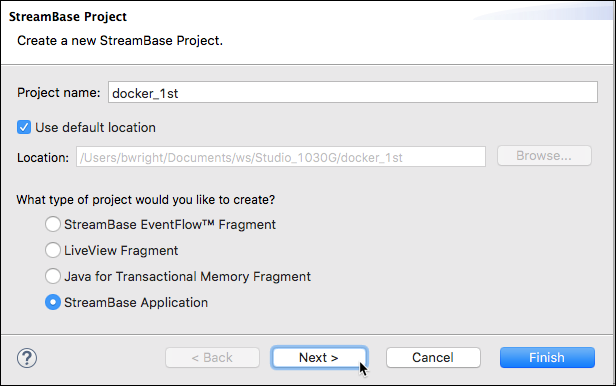
In the StreamBase Project dialog, enter a project name. This tutorial uses
docker_1stthroughout. -
Select the StreamBase Application option and click Next. (If you click in error, start over.)
-
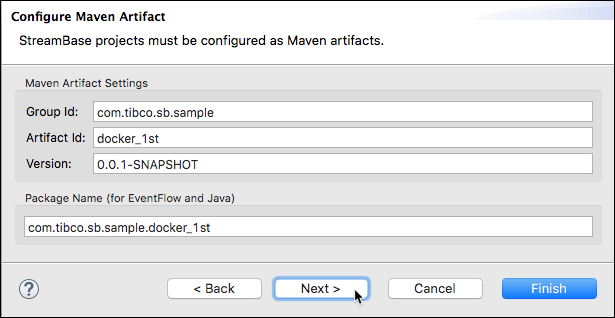
In the Configure Maven Artifact panel, change the value of the Group ID to
com.tibco.sb.sampleto match the Group ID of the fragment sample as determined in step 1. (You are not required to use the same Group ID for a StreamBase Application project as for its dependent fragment projects, but doing this brings clarity to the process.)Make sure the Group ID and Artifact ID are correctly reflected in the Package Name field before proceeding. If not, click , adjust the Project Name, then click to return to this panel.
When the Package Name field looks right, click .
-
In the Archetype Properties panel, change
buildDockerfromfalsetotrue. This is the entire difference between building an application that runs locally and one that runs in a Docker container.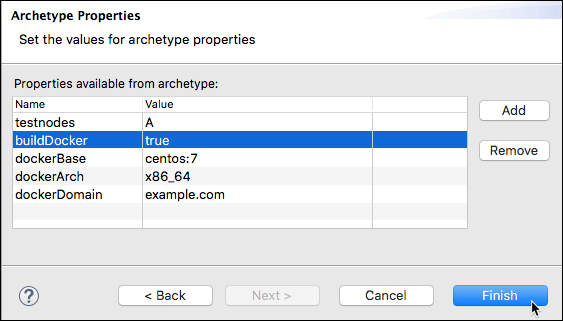
-
Optional. In the same panel, change the
testnodesproperty fromA,B,CtoAto reduce the number of test instances that need to be run during project creation. -
Set
dockerDomainto any domain that allows your Docker containers to communicate with their surrounding network environment.This specifies the domain to be assigned to the Linux instance running inside the Docker container to be created. The default domain,
example.com, is internationally reserved for use in documentation. To make sure your StreamBase nodes running in Docker containers can communicate, replaceexample.comwith a domain name under your organization’s control.For example, if
dockerDomain=localsite.web, and you start up a Docker node namedA.cluster, the Docker container's hostname is set toA.localsite.web. Connections are allowed to*.localsite.webso that hostB.localsite.webcan connect without further authentication. -
Click and if prompted with a follow-up dialog. This creates a new project named
docker_1stin the Project Explorer view.
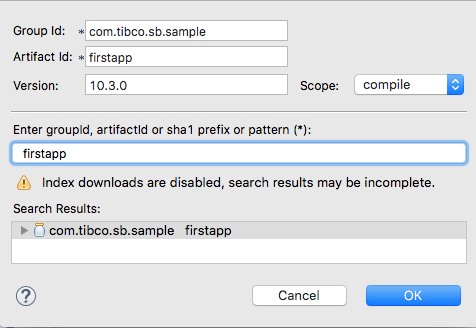
The next step is to add the firstapp project as a Maven dependency of the new docker_1st application project.
-
Select the
docker_1stproject name in the Project Explorer view, right-click and select → . -
In the Add Dependency Dialog, type
firstappin the Enter groupId filter box. -
Select com.tibco.sb.sample firstapp from the Search Results and click .
-
Confirm that the
pom.xmlfile for thedocker_1stproject is saved.
Build the Docker image as follows:
-
Make sure your development machine is connected to the Internet.
-
Make sure your Docker for Windows or Docker for Mac installation is currently running.
-
In the Project Explorer view, select and right-click the
docker_1stfolder. Select →(Be sure to select the option with periods.)
-
In the Run Configuration dialog:
-
In the Goals field, enter
clean install -
Select the Skip Tests check box.
-
Click , then click .
-
-
Keep an eye on the Console view as messages scroll by. Look for the BUILD SUCCESS message.
-
To confirm success, open a StreamBase Command Prompt (Windows) or a StreamBase-configured Terminal window (macOS). List your Docker images using either the
docker imagesordocker image lscommand:REPOSITORY TAG IMAGE ID CREATED SIZE sample/docker_1st latest afc1258b7098 About a minute ago 707MB sbrt-base 10.3.0 d4dc8ddc81af 2 hours ago 707MB centos 7 49f7960eb7e4 7 days ago 200MB
The steps in this section take you through creating a Docker container, running it, and exposing local machine ports to the running Docker container.
-
From a StreamBase Command Prompt (Windows) or a StreamBase-configured Terminal (macOS), navigate to the folder named
dockerin your StreamBase Application project'stargetfolder.cd
StudioWorkspace\docker_1st\target\dockerNote
The
targetfolder and its sub-folders are not populated until you run a Maven Build or Maven Install command, and thetargetfolder is erased when you run a Maven Clean command. You may need to right-click and select Refresh in the Project Explorer view to see the contents oftargetin Studio. -
Confirm the images that are available to run with the
docker imagesordocker image lscommand described in the previous section.Look for the image you just built:
sample/docker_1st. You will use the stringsample/docker_1stto add to the end of the command in the next step. Notice that the string uses a forward slash, even on Windows.Step 10 in the previous section shows
sample/docker_1stas the image name, but thesampleportion of this path may be different for you, depending on the Group ID you specified when creating your StreamBase Application project. TIBCO suggests usingcom.tibco.sb., and Docker uses the last portion of this Group ID as the folder name. If you used a different Group ID, the path will match accordingly. Use the image name shown in the output of your ownsampledocker imagescommand. -
Run a command like the following to name the Docker container, start it, and to map local machine ports 2000 and 10000 to the Docker container's ports with the same numbers:
docker run -d --name firstapp -p 2000:2000 -p 10000:10000 sample/docker_1st
Look for output similar to this:
d26c729222632a69b587a910f4386e5b4e71b6bf74947b0db771f139f1a8b340
Note
The --name firstapp argument names the Docker container as
firstapp. Think of this as a shortcut name or an alias. You can instead use whatever name you want.If your container name is in use, you will see an
already in usemessage. To remove a named container, run:docker rmor just use a different name in your docker run command.containerName -
Confirm that your Docker container is loaded by using the
docker psordocker container lscommand. -
Confirm that the Docker container is up and running the
firstappsample by using the following command:docker logs firstapp
Look for results like the following:
[A.docker_1st]  Installing node
[A.docker_1st]          PRODUCTION executables
[A.docker_1st]          File shared memory
...
...
[A.docker_1st]          Administration port is 2000
[A.docker_1st]          Discovery Service running on port 54321
[A.docker_1st]          Service name is A.docker_1st
[A.docker_1st]  Node started
COMMAND FINISHED
-
Confirm that you can connect to the StreamBase node running in the Docker container with commands like the following:
docker exec firstapp epadmin display services servicetype=node
This returns the name of the node in the containerized app:
Service Name = A.docker_1st
Service Type = node
Network Address = dtm-adm://96b621f6a71d:2000
Use this node name as the service name in two more commands:
docker exec firstapp epadmin servicename=A.docker_1st display node
docker exec firstapp epadmin servicename=A.docker_1st display engine
Notice that the locations of resources returned by these commands are Linux paths not available on your Windows or Mac host:
[A.docker_1st] Node Name = A.docker_1st
[A.docker_1st] Node Description = No description
[A.docker_1st] Node State = Started
[A.docker_1st] Host Name = 96b621f6a71d
[A.docker_1st] Administration Port = 2000
[A.docker_1st] Discovery Service = running on port 54321
[A.docker_1st] Container = tibco/sb
[A.docker_1st] Node Directory = /var/opt/tibco/A.docker_1st
[A.docker_1st] Deployment Directories = /var/opt/tibco/A.docker_1st/deploy
...
Next, try connecting to your Docker-hosted StreamBase Application to send and receive data:
-
Legacy Connection to Docker Images shows how to use the legacy StreamBase command-line tools to connect to a redirected StreamBase URI port in the containerized application.
-
epadmin Connection to Docker Images shows how to connect to a containerized application using only an administrative port and epadmin commands.