Contents
This page describes the use of LiveView Alerts. LiveView supports real-time alerts that notify you of critical conditions. For example, the following are some of the tasks for which you can configure an alert:
-
You can be notified via email if you have run out of a particular product.
-
You can save all unusually large customer orders to a table.
-
You can create a dashboard view into a particular item by setting up a table with one row that corresponds to that item where the row is updated when the product data changes.
When you configure an alert rule, you define a condition and an action or set of actions that are to be executed when the condition is detected.
-
Alert conditions are query predicates written in LiveQL.
-
Alert actions are executable actions by the server. When actions are executed, we say the the alert has fired.
Every LiveView project has configured table that holds alert records. When you start LiveView server, it automatically generates an LVAlerts table in the LiveView project's root directory.
An alert rule contains the following user-defined conditions:
- Enabled
-
A Boolean value that sets whether or not the alert will fire. The default value is TRUE. You can manually disable alerts; under some circumstances (such as when the alert creates a risk to your system), LiveView server may automatically disable alerts. Alerts that are disabled by LiveView server persist as disabled until they are manually re-enabled.
- Name
-
The alert rule name is stored as a string. When you create an alert rule, a unique ID for the alert rule, independent of the name, is created on the server. This means that you can create any number of alert rules with the same name and not overwrite any existing alert rules.
- Table
-
The name the table against which the alert conditions are checked.
- Condition
-
A LiveQL query predicate specifying data conditions in the selected LiveView Table. When the predicate evaluation changes from FALSE to TRUE, the alert fires.
- Severity
-
Severity values are stored as integers. The values provided are 1 (Low), 3 (Medium), and 5 (High). The default value is 3 (Medium). You can use any integer value for alert rule severity.
- Message
-
A string that sets the default notification message for the alert.
An alert rule also contains actions. When you configure an alert, you can set the following fields to control alert actions:
- AlertKey
-
A string identifier for an alert rule, generated by the server at the time that the alert actions are executed. You can create a custom string or use the server-generated default.
- Recipient
-
The username of an intended recipient of the alert. The default is "*" to indicate "anyone". This field can be configured by publish alert actions.
In addition, every alert has several server-generated fields. Some of the fields you may find useful are:
- AlertRuleID
-
A unique string identifier generated by the server at the time you save an alert rule. Since the server uses this field to recognize the rule, you can use any convention for Name, including identical names, if desired.
- Created
-
The time an alert rule was created.
- LastModified
-
The last time an alert rule was modified.
- Status
-
This field is empty unless the alert rule has been disabled by LiveView server. If the alert rule was disabled, the reason is contained in this field.
The alert actions are the actions that LiveView server performs when an insert or update to the Table satisfies the Condition predicate. The available actions are:
-
Publish the alert tuple as a row in the LVAlerts table.
-
Delete rows from a LiveView table.
-
Send an email message to specified username (or usernames).
-
Send the alert-generated tuple to another application.
-
Execute Java code (disabled by default).
-
Execute an operating system command on the system (disabled by default).
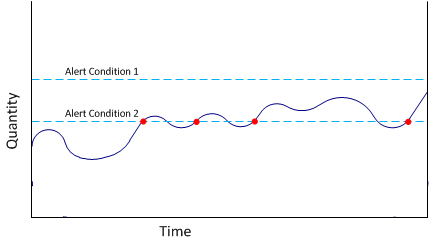
An enabled alert is executed only when the specified alert conditions turn from false to true. The following picture represents two simple alert conditions, where Quantity greater than a certain fixed value (shown by the dotted blue lines) is created against a single quantity (represented by the black line). For Alert Condition 1, the alert is never executed. For Alert Condition 2, the alert was executed at four points (indicated by the red dots) where the alert condition changed from false to true.
|
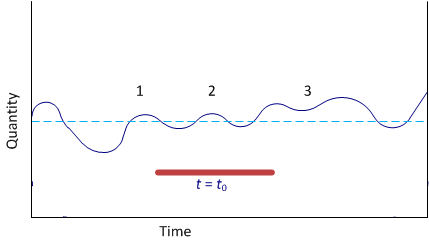
For some situations, you may want to be alerted only when alert conditions are true for a specified period of time. For example, you can configure an alert to fire only if the conditions are true for some time t0. In this case, the alert would only fire if the alert conditions were true for longer than t0, which only occurs at the area indicated by 3 in the plot here:
|
You can configure alert rules with LiveView Desktop or through one of the other LiveView clients.
-
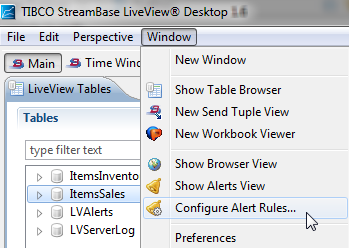
To create new alert rules or edit existing alert rules from LiveView Desktop, select → .
You can also create new alert rules or edit existing alert rules against a specific table by right-clicking the table name in the Tables pane and selecting .
LiveView ships a sample alerting project that demonstrates many of the alert capabilities of LiveView. The sample lv-sample-alerting-advanced demonstrates:
-
How to customize the configuration of the LVAlerts table.
-
How to use table-level rules to modify field values and add fields to a table.
-
How to use a preprocessor to have alerts be cleared when the alert conditions turn from true to false.
To load these samples, follow these steps:
-
Select → from Studio's top-level menu.
-
In the Load StreamBase Projects dialog, open the TIBCO Live Datamart category.
-
Select the sample whose description is
Shows advanced
                    alerting features with pre-configured alert rules
and press .
This section shows you how to use LiveView Desktop to configure an alert for a data table in the example project lv-sample-helloliveview. To follow this example, load and run Hello LiveView sample.
Hello LiveView has three alerts configured against the ItemsSales table.
-
Low inventory on Item publishes a row in the LVAlerts table when the quantityRemaining field of the ItemsSales table is less than 30.
-
Out of Item publishes a row in the LVAlerts table when the quantityRemaining field of the ItemsSales table is zero.
-
Trim ItemsSales table deletes rows older than five minutes from the ItemsSales table.
Follow these steps to create an alert against the ItemsSales table from LiveView Desktop and publish the alert to
the LVAlerts table.
-
In the LiveView Desktop Tables pane, right-click the ItemsSales table and select .
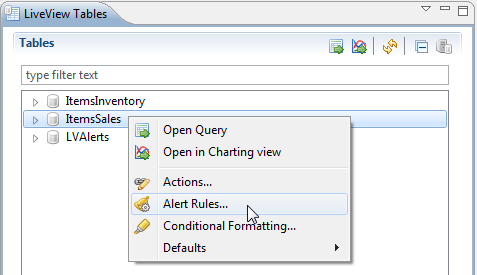
This opens the Alert Rules dialog with the ItemsSales table selected.
-
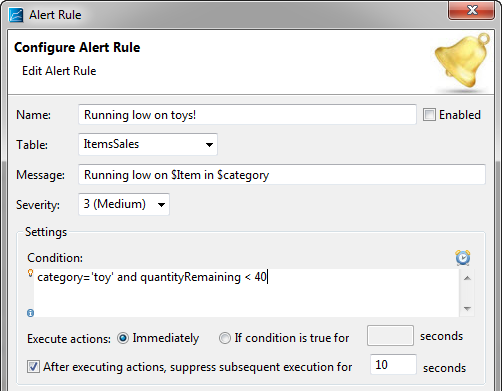
Click the button. This opens the Configure Alert Rule dialog. By default, the Enabled check box is selected, the Severity is set to 3 (Medium), and the Immediately radio button is selected for the Execute actions field.
-
Set the Name field to
Running low on toys!. -
Set the Message field to
Running low on $Item in $category. The expressions$Itemand$categoryperform text substitutions when the alert rule is executed and return the value of the Item and category fields from the row of the ItemsSales table that meets the alert conditions. -
Enter the query predicate
category='toy' and quantityRemaining <
                            40
in the Condition field. -
Select the check box for After executing actions, suppress subsequent execution for and enter 10 for the seconds field.
The top part of the window now looks like the following:
-
In the Actions pane, click the button and select . This opens the Alert Action window.
-
By default, the Alert key radio button is set to Generated, the Message field is set to Use default rule message, and the Recipient field is set to asterisk (*). Click to save the action. The Actions pane now looks like this:

Notice the Enabled check box is selected by default. As soon as you click , the Low Inventory alert is saved and enabled.
-
-
Click . The dialog box Validating Rule on the Server appears momentarily before you return to the Alert Rules window. LiveView Server validates alert rules before saving them. If the rule is not correctly configured, you are returned to the Configure Alert Rule window.
The alert rule you just created is now visible in the window.
-
Click . This returns you to LiveView Desktop.
-
Double-click LVAlerts in the Tables pane of LiveView Desktop. This opens the LVAlerts table in a tab. You can see that the alert you just created is populating this table.
Since published alerts are stored in a LiveView Table, the table is populated during a LiveView Server session. Every new LiveView Server session starts populating the table.
You can also delete rows with an alert action. For example, you may want to control the number of rows published to the LVAlerts table. This example deletes all the rows of the LVAlerts table when it gets larger than 30 rows.
Warning
The delete rows action works on the running LiveView Server instance. Deleted rows cannot be recovered, so use this action with care.
-
Click the system tables icon (
 ) in the tables view to
show the system tables.
) in the tables view to
show the system tables.
-
Right-click the LiveViewStatistics table and select .
-
Click .
-
Configure the alert rule as shown here:

The LiveViewStatistics table is a system table that display information about the LiveView Server instance. The RecordCount field shows the number of rows in each LiveView table. Note that the alert will fire as the alert conditions turn to true; if your LVAlerts table already has more than 30 rows the alert will not fire.
-
Click the button and select . The Alert Action dialog opens.
-
In the Table field, select LVAlerts.
-
In the query field, enter
LastModified < now()-seconds(30). -
Click .
LiveView alert actions are controlled by system properties.
Two of the configurable alert actions Execute Java, and Execute OS Command, are disabled by default, as these alert actions can represent a security issue for some systems. To enable these alert actions in a LiveView project, create a project-specific server configuration file that sets the system properties. Follow these steps:
-
Double-click to open the project's
sbd.sbconffile in Studio's Package Explorer view. (Or invoke → → if the project does not yet have this file.) -
Copy the following text into the file as a child of the root element
<streambase-configuration>:<java-vm> <sysproperty name="liveview.alert.action.execos.enabled" value="true"/> <sysproperty name="liveview.alert.action.execjava.enabled value="true"/> </java-vm>
Save this file and run the project. When LiveView Server next runs, directives in the
sbd.sbconf file that you just created is automatically
merged into the primary configuration file for the server. Thus, once LiveView Server
starts, alerts that use the Execute Java and Execute OS Command actions are ready to
run.
In the same manner, the three actions that are enabled by default are Publish Tuple, Send Tuple, and Send Email. To disable these properties, set these system properties to false:
<java-vm>
  <sysproperty name="liveview.alert.action.publishtuple.enabled" value="false"/>
  <sysproperty name="liveview.alert.action.sendtuple.enabled" value="false"/>
  <sysproperty name="liveview.alert.action.email.enabled value="false"/>
</java-vm>
Before you use the send email alert action, you must configure LiveView server to tell it the parameters of your site's SMTP server. You perform this configuration by setting system properties as well. The system properties are shown here:
<java-vm>
  <sysproperty name="liveview.alert.email.from" value="LiveViewServer@example.com"/>
  <sysproperty name="liveview.alert.email.replyto" value="LiveViewServer@example.com"/>
  <sysproperty name="liveview.alert.email.smtpclient" value="null"/>
  <sysproperty name="liveview.alert.email.smtpServer" value="smtp.yourcompany.com"/>
  <sysproperty name="liveview.alert.email.smtpPort" value="25"/>
  <sysproperty name="liveview.alert.email.useAuthentication" value="false"/>
  <sysproperty name="liveview.alert.email.useSSL" value="false"/>
  <sysproperty name="liveview.alert.email.username" value="null"/>
  <sysproperty name="liveview.alert.email.password" value="yourEmailPassword"/>
  <sysproperty name="liveview.alert.email.enableSMTPDebugging" value="false"/>
</java-vm>
If an alert rule is misconfigured, a large number of alerts might be generated in a short time, and the associated alert actions might negatively impact the performance of LiveView server or other systems. LiveView Server has a safety mechanism that monitors each rule's alert triggering rate, and disables a rule if the rate is too high for that rule. The default limit is 600 alerts per minute. For example, if you configure an alert rule whose actions include sending an email, and the rule is triggering alerts too rapidly, LiveView Server disables this alert if the rule attempts to send more than 600 emails per minute. This protects your email server from excessive email volume. In LiveView Desktop, the check box in the Enabled field is cleared and the reason why the rule was disabled is in the Status column of the Alert Rules dialog.
You can be notified when LiveView Server disables an alert rule by configuring an alert rule against the LVAlertsStatus table. The LVAlertsStatus table is a system table that appears in every compiled LiveView project. To see this table from LiveView Desktop, click the Show System Tables icon:
|
|
Double-click the LVAlertsStatus table in the Tables pane to open the table in a tab. Your LVAlertsStatus table looks something like the following:

|
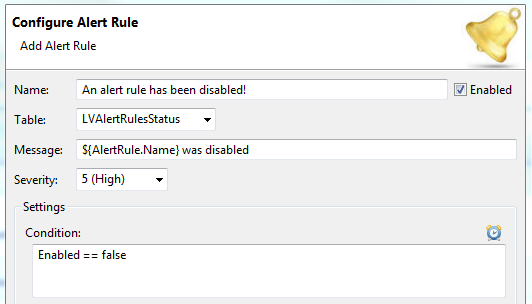
The Enabled field is currently set to true for both rules. If you want to be notified
when an alert rule is disabled, configure a rule against the LVAlertsRulesStatus
table for the condition Enabled == false:
|
You can change the server-wide threshold by setting a system property, liveview.alert.threshold.
-
Double-click to open the project's
sbd.sbconffile in Studio's Package Explorer view. (Or invoke → → if the project does not yet have this file.) -
Copy the following text into the file as a child of the root element
<streambase-configuration>:<java-vm> <sysproperty name="liveview.alert.threshold" value="
ALERTS_PER_MINUTE"/> </java-vm>
LiveView Desktop also provides client-side notification functionality. These notifications work like alerts, except they are not stored on the server and cannot be seen or edited by multiple clients or on multiple LiveView Desktop installations. A client-side alert notification is only valid for the LiveView Desktop instance in which it is defined.
To set up client-side notifications from LiveView Desktop, follow these steps:
-
Select any row in the Items table in LiveView Desktop. Right-click and select Notifications.
-
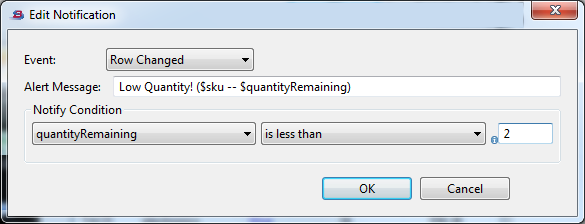
In the Notifications dialog, click . Fill in the resulting dialog like this example:
-
Click twice.
-
On Windows, look for notification pop-ups appearing in the lower right corner of your primary monitor when the specified row contains a
quantityRemainingvalue less than 2.