Contents
- Minimal Configuration Required
- Loading LiveView Samples into StreamBase Studio Workspace
- Starting LiveView Server from StreamBase Studio
- Stopping LiveView Server from StreamBase Studio
- Starting LiveView Server from the Command Prompt
- Stopping LiveView Server at the Command Prompt
- Connecting with LiveView Desktop
This page provides basic start and stop instructions for running TIBCO StreamBase LiveView® and for connecting to it with TIBCO StreamBase LiveView® Desktop.
When a LiveView server instance starts, its first task is to compile a set of configuration specifications that you provide into one or more working LiveView data tables. On subsequent starts, LiveView server recompiles only the configuration specifications that have changed, if any.
A LiveView table is a data table with a particular schema that is ready to accept a stream of incoming data and queries. In the absence of the configuration specifications for at least one data table, there is nothing for LiveView Server to do, and it cannot start.
Thus, to start LiveView server even for a simple test requires some configuration. The LiveView installation provides a sample that includes a minimal configuration. The smallest possible LiveView configuration requires a valid LiveView table configuration file to define a data table.
LiveView configuration files are often called lvconf files (pronounced ell-vee-conf).
All lvconf files that constitute a single LiveView project must reside in the same top-level project folder. When you run a LiveView Server instance, you are running the configuration defined in the project folder that contains your lvconf file(s).
StreamBase Systems recommends loading LiveView samples into the StreamBase Studio workspace, even if you plan to run LiveView server from the command prompt. Doing so copies the sample files from the StreamBase installation directory (to which you rarely have write privileges) to a single project folder in your StreamBase Studio workspace directory, which is always writable. Follow these steps:
-
Start StreamBase Studio.
-
Select → from Studio's top-level menu.
-
In the Load StreamBase Projects dialog, open the StreamBase LiveView category.
-
Select the sample whose description is
Shows the minimum
                    configuration to start LiveView Server
and press .
The sample loads into Studio with the project name sample_lv-minimal.
Installing LiveView adds support to StreamBase Studio for starting and stopping LiveView server instances from within StreamBase Studio. Follow the steps below to start LiveView server running the Minimal sample loaded as described in the previous section. These steps apply equally to the Windows and Linux editions of StreamBase Studio.
-
In the Package Explorer view, select the project's folder,
sample_lv-minimal. -
Click the button (
 ).
).
-
Studio opens the Console view, and begins to show messages from LiveView server. After a few minutes, look for a Console view message at or near the end that says:
{ Server Started } - (... "All tables have been loaded. LiveView is ready
to accept client connections. ")
(This message shows as a single, unbroken string in the Console view, and is shown here on two lines for clarity.)
Notice that LiveView server runs in Studio independently of any StreamBase Server run or debug session you might want to run at the same time. The only constraint are the port numbers, which must be different for each running server. You can configure StreamBase Server to automatically try another port if Studio's default port, 10000, is in use by LiveView Server.
You can also run two or more instances of LiveView server by editing one instance's launch configuration to use a different port.
If you started LiveView Server from StreamBase Studio, as described in
the previous section, stop it by
clicking the red and green square Terminate button ( ) in the
Console view's toolbar.
) in the
Console view's toolbar.
This button is configured to send an lv-client shutdown command when the currently selected Console view launch is a LiveView Server instance. You can also run lv-client shutdown manually from a Linux terminal prompt or a StreamBase Command Prompt on Windows.
The LiveView installation provides the lv-server command for starting LiveView Server from
a Linux terminal prompt or a StreamBase Command Prompt. This command has
the .cmd extension on Windows and no extension on
Linux; in either case, the command is run as lv-server.
Note
The Windows instructions on this page require you to use a StreamBase Command Prompt, which you open from a link in the → → menu. Do not use a standard Windows command prompt.
To start LiveView Server from a command prompt, the lv-server command takes two arguments:
-
The first argument is always the literal string
run. -
The second argument is the path to a directory containing the set of LiveView configuration files that define a single project.
The lv-server command is provided in
%STREAMBASE_HOME%\liveview\tools ($STREAMBASE_HOME/liveview/tools on Linux). On Linux systems only,
the tools directory is not on the PATH by default.
The standard StreamBase runtime tools and libraries must be available on the PATH when you start LiveView Server. This condition is met when you install StreamBase CEP on Linux as described in the StreamBase Installation Guide, and when you run the lv-server command from a StreamBase Command Prompt on Windows.
- Windows Example
-
If you loaded the sample into StreamBase Studio as described above, the sample's lvconf file is in a folder in your local workspace. For Windows Vista and Windows 7, the default Studio workspace location is:
C:\Users\
sbuser\Documents\StreamBase Studion.mWorkspaceFor the Windows username sbuser, launch LiveView server running the Minimal sample as follows. (This single command is shown on two lines for clarity.)
lv-server run "C:\Users\
sbuser\Documents\ StreamBase Studio 7.2 Workspace\sample_lv-minimal"The StreamBase Command Prompt opens at the root of
%STREAMBASE_HOME%, which is on the PATH by default. - Linux and Mac OS X Example
-
On Linux and Mac OS X, the default workspace is:
$HOME/streambase-studio-
n.m-workspaceUse a command like the following to run LiveView server with the sample if your current directory is $HOME:
/opt/streambase/liveview/tools/lv-server run
    streambase-studio-n.m-workspace/sample_lv-minimal
It is easier to navigate to the sample's directory and run the command from there:
cd $HOME/streambase-studio-7.2-workspace/sample_lv-minimal
/opt/streambase/liveview/tools/lv-server run .
On any operating system, the command prompt window in which you start LiveView server shows a series of messages reporting the progress of the server as it starts. Wait for a final message at or near the end that says:
{ Server Started } - (... "All tables have been loaded. LiveView is ready
to accept client connections. ")
The command prompt window then pauses and waits to display any runtime messages that may be necessary. To communicate with or load data into the running server, open a separate terminal window or StreamBase Command Prompt, or use LiveView Desktop.
If you started LiveView Server from the command prompt, as described in the previous section, you must use the lv-client shutdown command to stop the server.
Open a separate terminal window on Linux or StreamBase Command Prompt on Windows, and enter:
lv-client shutdown
The window in which the server is running issues a series of shutdown messages, then returns to the command prompt.
When LiveView server is running, start LiveView Desktop and connect to the running server.
- On Windows
-
On Windows, run LiveView Desktop by selecting:
-
Start
-
All Programs
-
StreamBase LiveView
n.m -
LiveView Desktop (User Workspace)
-
- On Linux
-
On Linux, run LiveView Desktop with the following command:
/opt/streambase/liveview/desktop/liveview &
LiveView Desktop opens the Connect to LiveView dialog.
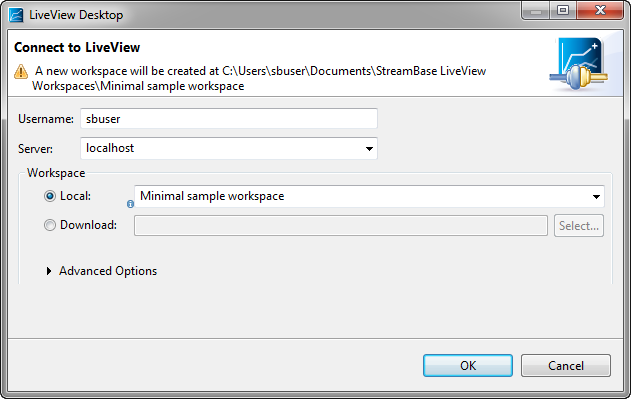
Enter your username. This example uses sbuser.
Connections to LiveView server are made with a URI that uses the lv protocol. For LiveView Server running on the default port, 10080,
on the same machine as LiveView Desktop, you can use the localhost entry. The localhost entry
loads the simplest URI: lv://localhost:10080
For Workspace, enter a name to for the sample's Desktop Workspace. This example uses
Minimal sample workspace.This is different
than the StreamBase Studio workspace. The workspace you create will be
used for LiveView workspaces. Since this sample does not currently have a saved
workspace, you create one locally.
Click .
The LiveView Tables section of the interface is empty:

Double-click the Minimal table in the Tables section to open a query window that
shows that table's contents. The query window shows an empty table with column
headers pkey and val.