Contents
A StreamBase JUnit test is a Java file based on the org.junit and com.streambase.sb.unittest packages. To use the
StreamBase JUnit test feature, you must be able to write Java code, and
you should be familiar with Java JUnit in general. Use the StreamBase
JUnit feature with the following steps:
-
Library Requirements. Before generating your JUnit code, you must prepare your StreamBase project folder by adding libraries to its Java Build Path.
-
Generating JUnit Test Code. Run the StreamBase JUnit wizard to generate starting point Java test code for your project.
-
Editing StreamBase JUnit Tests. Edit and complete the generated test code.
-
Running StreamBase JUnit Tests in Studio. Run the completed JUnit test file in Studio or at the Command Prompt.
See StreamBase JUnit Test Tutorial for a step by step tutorial that walks through each step of generating a StreamBase JUnit test for one of the StreamBase samples.
When you create a new StreamBase project using the New StreamBase Project wizard, Studio offers the option to include the StreamBase Test Library to the new project's Java Build Path.

For existing projects, you must add both the JUnit 4 Library and StreamBase Test Library to the project's Java Build Path for your JUnit test code to be generated without errors. You can do this:
You can add the two necessary libraries to the Java Build Path before running the wizard that generates your StreamBase JUnit test class. Follow these steps:
-
Select the project in the Package Explorer view.
-
Right-click and select → from the context menu.
-
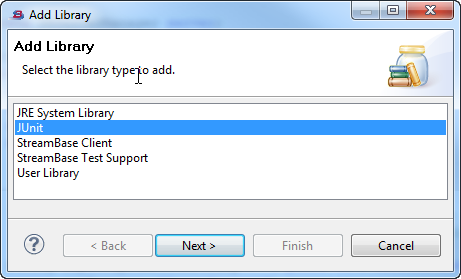
In the Add Library dialog, select JUnit and click .
-
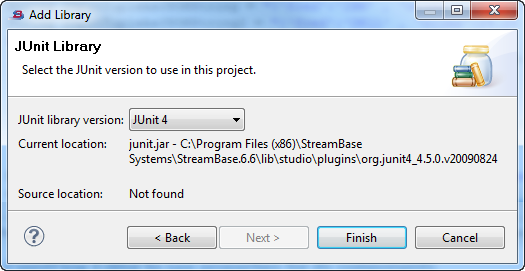
In the next panel, select JUnit 4 from the drop-down list, and click .
-
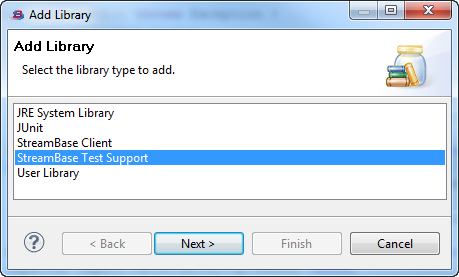
Back in the Package Explorer, reselect the same project, right-click, and select → from the context menu. This time, in the Add Library dialog, select StreamBase Test Support.
-
Click , then .
You can add the two necessary libraries to the Java Build Path as part of running the wizard that generates your StreamBase JUnit test class. Follow these steps:
-
If the New StreamBase Unit Test Class dialog shows a warning that the Test Support library is not on the project's Java build path, select the Click here link.
-
This opens the Studio Preferences dialog, with the Libraries tab of the Java Build Path panel already open.
-
Hold the Ctrl key and select both JUnit4 and StreamBase Test Support.
-
Click .
-
This adds the two libraries to the project's build path, then returns you to the New StreamBase Unit Test Class dialog.

-
If the necessary libraries are not on the build path when the New StreamBase JUnit wizard generates your StreamBase JUnit test class, then the generated class shows dozens of errors.
Use these steps to correct this situation:
-
Add the two libraries to the project's Java Build Path, using the steps in Adding the Libraries in Advance.
-
With your generated JUnit Java file open in Studio, run → from Studio's top-level menu.
To create a new StreamBase JUnit Test:
-
Prepare the target project folder by adding libraries to its Java Build Path, as described in the previous section.
-
In the Package Explorer, first select the module unit you want to test. Select an EventFlow or StreamSQL module, or a deployment file that specifies the module of interest.
-
Open the New StreamBase Unit Test Class wizard using any of the following methods:
-
Select → → .
-
Click the New StreamBase Unit Test (
 ) button in the
tool bar.
) button in the
tool bar.
-
Click the New StreamBase Unit Test (
) button under
the Application Input and Output tabs in the SB Test/Debug perspective.
-
Click the drop-down arrow next to the New tool bar button (
 ), and select StreamBase Unit Test (JUnit) from the drop-down menu.
-
Right-click anywhere in the Package Explorer, and select → from the context menu.
-
With the cursor in any Studio view, press Ctrl+N to open the New dialog. Select StreamBase Unit Test (JUnit) and click .
-
With the cursor in any Studio view, press Alt+Shift+N to open the → menu at the cursor location. Select –StreamBase Unit Test (JUnit) and press Enter.
-
-
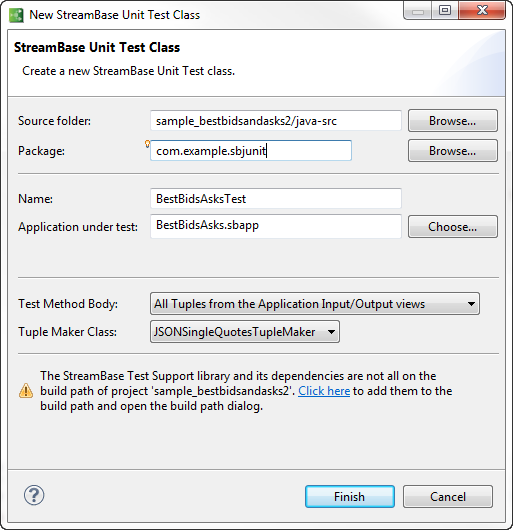
Fill in the fields of the New StreamBase Unit Test Class dialog:
Source folder If you entered the dialog by first selecting any file in a Package Explorer project, the java-srcfolder of that project is entered for you. Otherwise, use to navigate to thejava-srcfolder of the project folder of interest.Package Enter a Java package name that conforms to your site's standards. You can leave this field blank to use the default Java package, but Studio warns against this practice. If the current workspace folder already has one or more Java package directories in place, use Ctrl+Space to select among them from the content completion dialog. Name Enter a name for your Java test class, using standard Java class naming rules. Application under test By default, the name of the most recently run application is entered for you.
Test Method Body Select the method for creating the body of the test. The options are:
-
All Tuples from the Application Input/Output Views
-
Selected Tuples from the Application Input/Output Views
-
Example code for StreamBase Unit Tests
Tuple Maker Class The Tuple Maker Class drop-down selects CSV or JSON single quote tuple maker types. The JSON tuple maker is the default, but it does not handle tuples that contain slashes or double quotes in field values. Use the CSV tuple maker for those cases.
Container application This field only appears when you specify a deployment file in the Application under test field. This field shows a drop-down list of the modules specified in the deployment file. Select the container and module that you want to create the test for. 
-
-
When done, press .
-
Studio inspects the specified module or deployment file named and generates a StreamBase JUnit Java test file. The new file is opened for editing in Studio.
The generated Java test file is a starting point only, with incomplete sections. You must customize the file by adding the exact tuple content you want to send to the module's input streams, and the exact tuple content you expect to see on the module's output streams. See Editing StreamBase JUnit Tests for a discussing of the required and optional edits for your JUnit test file.
From StreamBase Studio 7.4 on, you can control the passing of time in EventFlow applications. This enables running unit tests of applications that react to time (containing timeouts or metronomes for example). You can, for example, run a unit test, enqueue events that should all be received by the application within one second, and then tell the server that one second has elapsed, aligning the EventFlow logic more closely with a real-world input stream.
What you need to do to control time is:
-
Modify the BaseTestEnvironment's
NowImplementationto use anIMPL_TIME_SERVICE. -
Create a ControllableTimeService and set that as the server's time service.
-
In your test, use
timeService.advanceBy()andadvanceTo()to manage the clock.
The TimeServiceFactory class methods create
TimeService objects to manage time:
-
getWallClockTimeService()— Returns a TimeService that uses the "wall clock" (that is, it uses your operating system's clock); this is the default. -
getControllableTimeService()— Returns a ControllableTimeService instance initialized with the current system time. This is the usual starting point if you are trying to control time. -
getControllableTimeService(long
                      initTargetTimeMsec)
— Returns a ControllableTimeService instance initialized with a specified time.
In the SBTestEnvironment interface, the enum
NowImplementation indicates how now() behaves. It takes these values:
-
IMPL_SYSTEM— Uses calls toSystem.currentTimeMillis()on the calling thread -
IMPL_THREAD— Uses calls toSystem.currentTimeMillis()on a dedicated thread -
IMPL_TIME_SERVICE— Uses the currentTimeServiceimplementation to get the current time
To get the current implementation use getNowImpl().
To set it to one of the above, use setNowImpl(NowImplementation).
In addition, the SBServerManager class has two methods
for time services:
-
getTimeService()— Returns the current TimeService implementation used by StreamBase server -
setTimeService(TimeService timeservice)— Set a TimeService for the StreamBase Server controlled by this Manager.The input TimeService value can be either a valid object or null. In the latter case it is assumed to be
WallClockTimeServiceobject.Caution
The
setTimeServicemethod is not thread safe. It can be called from any thread but it should not be called from more than one thread at the same time.
When you select an application to test and click → , the StreamBase Unit Test Class wizard opens. When you click , it generates code that begins like this:
package com.sb.support.test;

import com.streambase.sb.unittest.SBServerManager;
import com.streambase.sb.unittest.ServerManagerFactory;

public class baseMainTest {

  private static SBServerManager server;

  @BeforeClass
  public static void setupServer() throws Exception {
    // create a StreamBase server and load applications once for all tests in this class
    server = ServerManagerFactory.getEmbeddedServer();
    server.startServer();
    server.loadApp("main.sbapp");
  }
As the default time service is wall clock time, the wizard generates no code to
control time service. To establish control of time, modify the the @BeforeClass block as follows:
  @BeforeClass
  public static void setupServer() throws Exception {
    // create a StreamBase server and load applications once for all tests in this class

    // Set NowImplementation to IMPL_TIME_SERVICE instead of the default
    BaseTestEnvironment.DEFAULT_ENVIRONMENT.setNowImpl(NowImplementation.IMPL_TIME_SERVICE);

    server = ServerManagerFactory.getEmbeddedServer();

    // Create a ControllableTimeService to use as the server's time service
    timeService = TimeServiceFactory.getControllableTimeService();
    server.setTimeService(timeService);

    server.startServer();
    server.loadApp("main.sbapp");
  }
Then, at the beginning of each test, you must initialize the time with this code:
timeService.advanceTo(System.currentTimeMillis());
When you advance the clock, specify the advance interval size and unit. In this example, the advance is 15 seconds:
timeService.advanceBy(15, TimeUnit.SECONDS);
See Java API Documentation
in the StreamBase API
Documentation for documentation on the classes involved, which are in the
packages com.streambase.sb and com.streambase.sb.unittest.
Run a StreamBase JUnit test like any other Java code in Studio: with the
StreamBase JUnit test file selected, click the black triangle to the
right of the ![]() Run button in the Studio tool bar. Select
→ . You can also open the Run Configurations dialog to create and edit a
launch configuration for your test file.
Run button in the Studio tool bar. Select
→ . You can also open the Run Configurations dialog to create and edit a
launch configuration for your test file.
Note
When running a StreamBase JUnit Test, be sure to select → , which first starts StreamBase server, not as a , which does not.
The StreamBase JUnit mechanism performs the following actions:
-
Starts StreamBase Server in the background.
-
Directs StreamBase Server to load and run the application module to be tested.
-
Sends one or more tuples to input streams as specified in the test file.
-
Monitors the specified output streams of the module for output tuples.
-
Compares the output tuples to the expected output as specified in the test.
-
Shuts down StreamBase Server.
-
Reports success or failure.
Success or failure is shown in the JUnit view, which shares the bottom pane of the SB Authoring perspective. A successful run shows with a long green bar and statistics, like the following example:
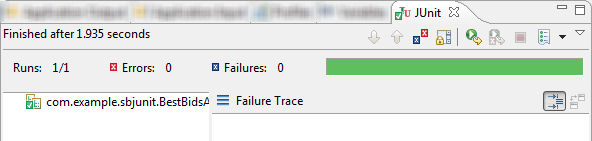
|
A failing run shows a stack trace that includes the tuples that failed to match the expected output:
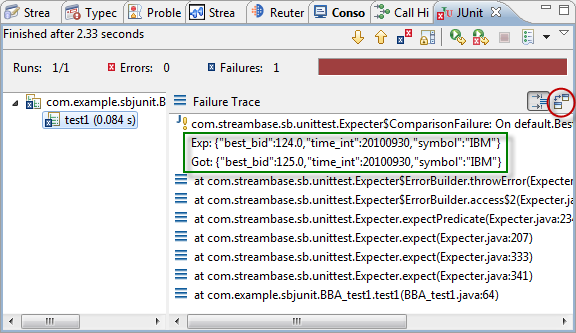
|
Use the sbunit command to run a StreamBase JUnit test class at the command prompt. To use the sbunit command, you must have:
-
A StreamBase Junit test file, developed and tested in StreamBase Studio, and known to produce results.
-
A server configuration file for the project, with the following minimum setting:
-
A
<dir>child element of the<java-vm>element, specifying the path to the package directory containing the test class. For test classes developed in StreamBase Studio, the package directory is usually thejava-binfolder of the project folder in your Studio workspace.
-
The minimum server configuration file for running sbunit is like this example:
<?xml version="1.0"?>
<streambase-configuration>
  <java-vm>
    <dir path="./java-bin" />
  </java-vm>
</streambase-configuration>
Run the test at the command prompt with a command like the following:
sbunit -f sbd.sbconf com.example.sbjunit.TestName
For information on the sbunit command, see sbunit.
If you specified a StreamBase deployment file in the Application under test field in the test-generating wizard, the
generated JUnit test file includes a loadDeploy()
line (instead of loadApp()), like the following
example:
server.loadDeploy("deployFileName.sbdeploy");
The specified deployment file must have an <application> element with module
and container attributes. The deployment file can also
specify container connections, module parameters, and extension point external
modules, as required.
The following deployment file example shows the minimum configuration that can be run with StreamBase JUnit:
<?xml version="1.0" encoding="UTF-8"?>
<deploy xmlns:xsi="http://www.w3.org/2001/XMLSchema-instance"
  xsi:noNamespaceSchemaLocation="http://www.streambase.com/schemas/sbdeploy/">
<runtime>
  <application container="default" module="BestBidsAsks.sbapp"/>
</runtime>
</deploy>