Contents
Follow these steps to configure and run a StreamBase Test for your StreamBase application modules:
-
Make sure the application module to be tested is free of typecheck errors.
-
Optional. Create feed simulation files for your application's input streams and prepare any CSV input data files needed by the feed simulations.
-
Run the application and confirm that it operates as expected with your feed simulation files, or with other input data.
-
Create a StreamBase Test configuration by running the application and recording its interaction with input data. The input data can come from manual input, from your development feed simulation files, or from playback in the Recording view of the SB Test/Debug perspective.
When you record a test configuration, StreamBase creates the following:
-
A StreamBase Test feed simulation file for each input port, that records what went in that port during the recording. (These are not the same as your application's data feed simulation files.)
-
A data validation CSV file for each output port that records what came out that port during the recording.
-
A StreamBase Test configuration file with an
.sbtestextension to tie all the pieces together into a single test.
-
-
Modify the Test configuration file and the recorded data validation CSV files as required:
-
Specify which CSV data values can be excluded from the test. That is, specify values that can differ from the original recording without causing a test failure.
-
Specify any CSV data values or other criteria that might differ from the recorded behavior, but must be true for a test to pass.
-
-
Run the StreamBase Test in Studio and observe the pass or fail results.
-
If the test fails, modify the test configuration and data validation CSV files. Keep running the test until you get consistent pass results.
-
Optional. When the StreamBase Test produces consistent pass results in Studio, run the test again with the sbtest command line utility.
-
Optional. Add the command line test scenario to your build and test automation procedures.
Once a StreamBase Test is developed and verified, you can use it later to confirm correct behavior of your application or module, or to confirm there have been no regressions in desired behavior. A developed test can be run in Studio, from the command line interactively, or from test scripts that call the command line test. You can also run it as part of a group of tests by creating a StreamBase Test Folder.
Note
To get started with StreamBase Tests, you can create a test configuration by recording your application receiving input from the Manual Input view in Studio instead of from feed simulations. However, to create a production-ready test with real-world input stream speed, use feed simulations.
Advanced users can create unit test configurations manually by creating data validation CSV files and creating a StreamBase Test file in the StreamBase Test Editor. StreamBase Systems recommends starting with a unit test recording and editing the generated test files.
If you have two or more tests for an application and you want to run the tests together, create a StreamBase Test Folder, as described in Creating and Running Test Suites.
Use the following procedure to create a StreamBase Test configuration by recording the interaction of a running application with feed simulations:
-
Run the application as described in Running Applications in Studio.
-
While the application is running, invoke → → → . This brings up the New StreamBase Test dialog.
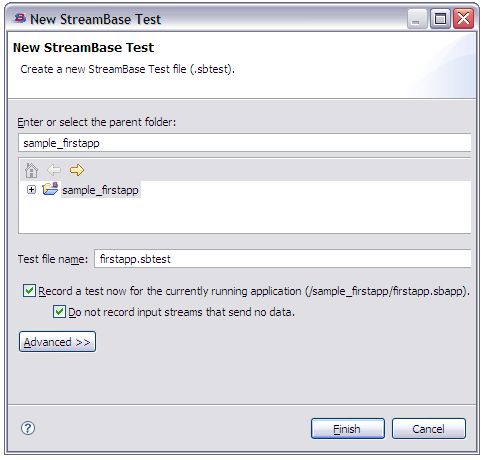
The Record a test check box is selected by default. (This check box is dimmed if you run → → → without running an application first.)
The Do not record input streams that send no data check box is also selected by default. This reduces the number of input test data files generated to cover only the input streams actually in use as you record the test.
-
Select a folder in your workspace, and enter a base name for the test file. Click .
-
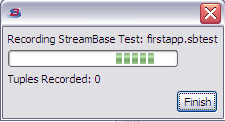
Clicking Finish starts the recording and opens the Recording StreamBase Test dialog. This dialog stays open while the test is recording input and output data.
-
Supply data to the application using the Manual Input view, the Feed Simulations view, the Recordings view, or from an external source. The Recording dialog continuously reports the number of tuples recorded for use by the test.
-
To stop recording, click in the Recording dialog.
-
The Test Editor opens, showing the current settings for the test just recorded.
-
Save the test configuration file and run it, or modify the test settings as described in Using the StreamBase Test Editor.
The test recording saved one data validation CSV file in the project folder for each
output port in the application under test. These files are named with a combination
of the test name and the port name, with .csv
extension. You may need to edit these CSV files to include or exclude certain fields
from causing a test failure, as described in Editing Data Validation CSV Files.
Advanced users can create StreamBase Test configurations without a running application. The following procedure creates a new, empty test configuration file in which you must specify all components of the test manually.
-
With no application running, invoke → → → . This brings up the New StreamBase Test dialog. (The Record a test check box is dimmed in these circumstances.)
-
Select a folder in your workspace, and enter a base name for the test file. You can optionally use to link to an existing test configuration file instead of creating a new one. Click .
-
A dialog pops up offering to add the StreamBase Test Support Library to this project's Java Build Path. Click , then to perform this action. See Test Support Library for more information.
-
The Test Editor opens showing default and empty settings for the new test.
-
Edit the test configuration, specifying the feed simulation files and data validation CSV files to use, as described in Using the StreamBase Test Editor.
-
Save the test configuration file.
-
Copy or create one or more data validation CSV files for the test to validate against.
You can also create a StreamBase Test configuration by copying an
existing test configuration file. Use copy and paste in the Package Explorer to
select and copy an existing, known working test configuration file with .sbtest extension. Then double-click the copied file in Package
Explorer, which opens the Test Editor. Edit the copied test file as described in
Using the StreamBase Test Editor.
Running a test requires a test launch configuration. Studio provides a default test launch configuration that lets you test right away without stopping to configure a launch configuration. You can also create and edit customized test launch configuration the same way you would configure run and debug launch configurations. See Editing Launch Configurations for details.
-
Your test configuration's Target Application section uses either a Specified Application File or Specified StreamBase URI to locate the application to test. In this case, you can run the test immediately, using the default test launch configuration.
-
Your test configuration's Target Application section specifies Default. In this case, you must start the application to test before running the test, or you must use an application-specific test launch configuration.
To run a StreamBase Test using Studio's default launch configuration, follow these steps:
-
Open the EventFlow or StreamSQL file for the application under test.
-
Open the test configuration file that tests this application. This places both editor sessions side by side.
-
Run the application by making the application's editor session active, then clicking the
 Run button. This opens the SB Test/Debug perspective and
starts the application.
Run button. This opens the SB Test/Debug perspective and
starts the application.
-
Now make the Test Editor session active and click the
Run
button again. The Run button always runs the file in the currently selected
editor session. Thus, this time, the test is run, using the default test
launch configuration.
-
The test runs. Remember that a running test takes about as much time as it took to record the test, so give the test time to finish.
-
When the test finishes, look for results in the JUnit view. A long green bar in this view denotes test success. A red bar is accompanied by information in the Failure Trace pane to help you track down the cause of the test failure.
To run a test with a test-specific launch configuration, follow these steps:
-
Save a test configuration that specifies a Specified Application File or Specified StreamBase URI to locate the application to test.
-
Open → .
-
Select StreamBase Test and click the New Configuration button (or use the Duplicate button to copy an existing configuration).
-
Studio automatically selects the configuration temporarily named New_configuration.
-
Give the test launch configuration a name.
-
Use Browse to locate the test configuration file you saved in step 1.
-
Studio reads the name of the Target Application from the test configuration file.
-
Click , then .
Once a launch configuration has run, Studio places its name in the → menu. To run this configuration again, select it from the this menu.
When you run a saved launch configuration, Studio starts the application named in the StreamBase Test configuration, then runs the test. You do not need to start the application first.
Test progress and results are shown in the JUnit view. The test begins automatically and takes about as long to complete as the test recording took. On completion, look for a green bar to indicate success or a red bar to indicate test failure.
If the test failed, the Failure Trace pane shows information to help you track down the cause of the failure.
Studio inherits the JUnit view from the Eclipse Java Development Tools feature. Many of the controls in this view apply to Java unit testing, but not to StreamBase testing. For instructions on using controls in the JUnit view, search for "JUnit" in the in the Studio help system.
StreamBase provides the utility sbtest to run StreamBase tests at the command line. Use this utility in a terminal window on UNIX or in a StreamBase Command Prompt on Windows. Use steps like the following:
-
Save a StreamBase Test configuration that specifies a Specified Application File or Specified StreamBase URI to locate the application to test.
-
In a UNIX terminal or StreamBase Command Prompt, navigate to the workspace directory that contains the project with your test file.
-
Run the test with a command like the following:
sbtest
test-name.sbtest -
The test reports a single period to the console to indicate it is running.
-
On completion, the test returns 0 for success and non-zero for failure. This allows runs of sbtest to be included in test scripts appropriate for the operating system.
On completion, sbtest reports the time taken to execute the test in seconds and milliseconds and either OK for successful completion or There was 1 error followed by the stack trace and a summary count of the total number of tests, failures, and errors.
The data validation CSV files used by the StreamBase Test framework for output streams have field names on the first row, which must match field names in the schema of the target stream. Validation CSV files for input streams do not need to have a header row. Subsequent column values must be convertible from type string to the target StreamBase data type. The only exception is for CSV files representing output stream values where the field value matches the Ignore Field Character defined in the test configuration. If a value in an incoming field matches the Ignore Field Character, then any value is accepted for that field on the output stream does not cause the test to fail. If a specific value is defined, then that specific value must appear in the output stream tuple when it is expected.
If a test is created by recording a running application, timestamp fields in the recorded output are usually not correct for subsequent runs of the test. Instead, replace the timestamp value in the output CSV file with the Ignore Field Character. This prevents tests from failing because of mismatched timestamps.
To run a StreamBase Test in Studio, the StreamBase Test Support Library must be in the Java Build Path of the project that contains the test. This library does not have to be in the path when recording a test, or when editing a test configuration. This library is not required when running a test with the command-line utility, sbtest, because sbtest already includes the library.
When you click in the New StreamBase Test dialog, another dialog offers to add the Test Support library for you under the following circumstances:
-
No application is running.
-
An application is running, but you did not check the Record a test now check box. In this case, Studio prompts for permission to shut down the currently running application in order to add the library.
If you create a new StreamBase Test configuration while an application is running, and you check the Record a test now check box, the New StreamBase Test dialog does not offer to add the Test Support Library for you. (Doing so would require stopping the application you are about to record.) In this case, you must add the Test Support Library manually after recording the test.
Follow these steps to add the StreamBase Test Support Library to a project:
-
Select the project in the Package Explorer.
-
Right-click and select Build Path → from the context menu.
-
Select StreamBase Test Support and click .
-
On the next panel, click .
-
Click .
Adding the StreamBase Test Support Library automatically adds the StreamBase Client Library as well.
Be aware of the following limitations of StreamBase Tests.
-
Test resources must reside in the same directory as the test configuration file. Test resources include:
-
Feed simulation files for each input stream.
-
Any CSV input data files used by those feed simulations.
-
The data validation CSV files created by the test recording (or created manually).
-
-
The StreamBase Test mechanism runs in a separate Java VM than the application under test. For applications with large memory requirements, this can lead to memory resource conflicts. While you can adjust the runtime parameters of the VM running your application, there are no adjustments available for the VM running the test.
-
StreamBase tests the top-level application or module it is given to test. If that application refers to another StreamBase application as a module, the operation of the referenced module is treated normally, as a simple component at the top level with inputs and outputs. If your application is composed of several modules, create separate unit tests for each module and test each module independently.
-
If the application under test contains an output adapter, the output streams of that adapter cannot be tested. Output adapters send output to file formats or data sources not under the control of the StreamBase Test mechanism.
If your application is constructed in a way that allows you to exclude an output stream that goes to an adapter (exclude without breaking the application), then you can create a test that excludes the output adapter. If the output adapter is more closely integrated with your application, you cannot create a StreamBase test for that application.
-
Be cautious when recording a test against an application with inputs derived from input adapters. The general recommendation is that you exclude from a test any input adapters whose output is not always the same with each application execution. Do this by removing from the test's expected output data definition any streams that are downstream from the adapter.
-
Some applications to be tested have components with predicate settings that change the stream in non-repeatable ways. For example, a component might call the
random()function as part of its processing. The tests for such applications are likely to fail with each run. You may be able to exclude the column that contains such fields by using the Ignore Field Character. Alternatively, you may be able to exclude from the test an input or output stream so as to avoid the path with the non-repeating predicate setting.