Creating a TIBCO Hawk Component
The TIBCO Hawk component creates a TIBCO Domain and starts Hawk services.
To create and configure a TIBCO Hawk component, perform the following tasks:
- Task A, Create a TIBCO Hawk Component
- Task B, Configure TIBCO Domain values
- Task C.1, Hawk Agent Transport settings for Rendezvous® connection
- Task C.2, Hawk Agent Transport settings for EMS
- Task C.3, Hawk Agent Transport settings for Transmission Control Protocol
- Task D.1, SSL Configurations for EMS Transport for TIBCO Hawk (optional)
- Task D.2, SSL Configurations for TCP Transport for TIBCO Hawk (optional)
- Task E, TIBCO Hawk AMI configuration
- Task F.1, Configure Hawk Console ports
- Task F.2, Configure SSL for Hawk Console ports
- Task G, Monitoring EMS by using HMA
- Task H, Configure Hawk for use of SSL with EMS (optional)
- Task I, Configure Hawk Agent running condition
- Task J, Set the Hawk Configuration Management Home
- Task K, Add or edit Enabler-specific run time context variables
- Task L, Upload a content file
- Task M, Edit configuration file directly (optional)
- Task N, Finish configuring the component
At run time, you can access Hawk interfaces by using an HTTP redirector with the following URL:
http://<address>:<port_number>//HawkConsole
This automatically redirects to the machine where the Hawk Console is running with a redirected URL and port value, which is calculated by using the base port set in Task F.1, Configure Hawk Console ports.
Create a TIBCO Hawk Component
Procedure
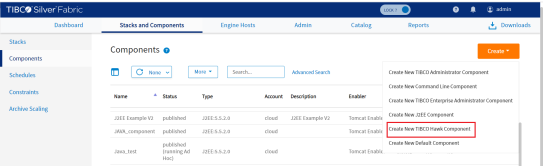
- By using the TIBCO Silver® Fabric Administration tool, select Stacks > Components.
- On the Components page, select Create New TIBCO Hawk Component in the Global Actions drop-down list.
Figure 19: Create a TIBCO Hawk Component
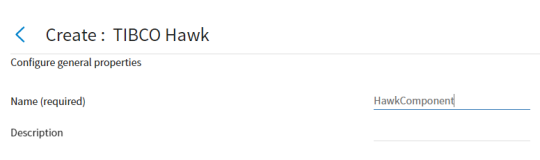
- Provide a name for the component and optionally provide a description to characterize the configuration you set.
Figure 20: Configuring General properties
- Select the TIBCO product distribution versions to publish. Refer to Selecting TIBCO Product Distribution Version.
Select a version of each of the installed distributions. It is a good practice to use the latest version of a product distribution. For more information, see the TIBCO Silver Fabric Enabler for Hawk Readme for more information on supported distributions. The product versions that are displayed are compatible with the component being defined.
Figure 21: Selecting TIBCO Product Distribution Version

- Click the Next button after selecting the TIBCO product distribution versions and the TIBCO Administrator: <ComponentName> - Basic configuration panel is displayed as is shown in Configure TIBCO Domain values.
Configure TIBCO Domain values
The TIBCO Hawk Agent Configuration page and each of the configuration parameters are described here. Enter appropriate values for each field as applicable.
Figure 22: Editing TIBCO Hawk Agent Configuration
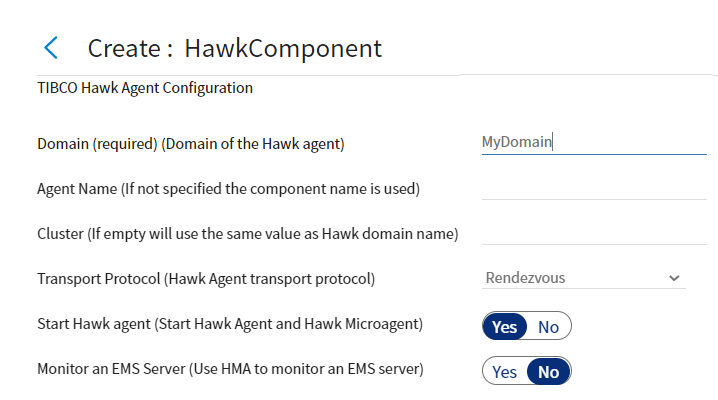
Domain
Choose a unique name that clearly identifies the Hawk Domain. If a Hawk Server is already running in the sub net, you cannot use that name for a second server with the same messaging parameters. Do not reuse the name of a Hawk Domain. Domain name length must be fewer than 64 characters. Alphanumeric characters, hyphens (-), and underscores (_) are accepted, but other characters including periods and commas are not allowed.
Agent Name
Enter a Hawk Agent name here or the component name is used to name the Hawk Agent. Alphanumeric characters, hyphens (-), and underscores (_) are allowed. The password is not case sensitive, cannot contain spaces, and it cannot start with ! [ z # or a period.
Cluster
Enter a Hawk Cluster name here or the domain name is used for the Cluster name.
Transport Protocol
The messaging transport protocol can be set to use Rendezvous, EMS, or Transmission Control Protocol (TCP). Selection of the transport protocol determines what pages are presented by the Component Wizard for your implementation configuration.
- If you set transport protocol to EMS, the Hawk Agent and the Hawk Console uses EMS for messaging.
- The messaging between TIBCO Hawk Agent, Hawk Microagents, or other Hawk AMI applications requires use of Rendezvous as it is implemented in TIBCO Enterprise Messaging Service.
-
Whenever you choose TCP as the transport protocol, then TCP is used to communicate between Hawk Console and the different Hawk entities like Hawk Microagents, Hawk Agent and the other Hawk AMI applications.
Start Hawk agent
Select this to start the Hawk Agent and Hawk Microagent after the component publishes TIBCO Hawk Distribution for TIBCO Silver Fabric to the engine. You can clear the checkbox to control manually the start of those agents.
Monitor an EMS Server
You can publish your TIBCO Hawk Component with the configuration settings to monitor aEMS instance. Select Monitor an EMS Server and the Component Wizard shows the Hawk Micro Agent Settings for TIBCO Enterprise Message Service page to expose configuration settings defining how your TIBCO Hawk Component connects with a EMS. For more information, see Hawk Agent Transport Settings for EMS for more information on this setting. Clear the checkbox if you do not want a TIBCO Hawk Microagent to monitor a EMS Server instance.
Hawk Agent Transport settings for Rendezvous connection
When using Rendezvous for the messaging transport, set the protocol, the network, and the service connection port between your TIBCO Hawk implementation and the Rendezvous distribution that is published with it.
Figure 23: TIBCO Rendezvous Configuration
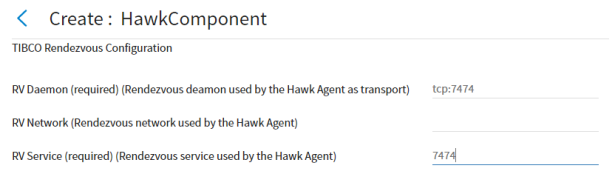
RV Daemon
Set the TCP port to configure Hawk to use the Rendezvous Daemon as a message transport mechanism between the Hawk Agent and HMA.
The default value is tcp:7474.
Rendezvous (RV) is used as the transport when your implementation does not use EMS as a transport (TIBCO Hawk Agent Configuration page > Use EMS as transport is unchecked). The TIBCO Rendezvous Configuration page provides an interface for configuration of Rendezvous and TIBCO Hawk.
RV Network
This specifies the Rendezvous Network used for client-server communication.
By default an empty field means that your Hawk run time uses the local Rendezvous instance.
This variable needs to be set only on computers with more than one network interface. If specified, the Rendezvous Daemon uses that network for all outbound messages.
In the following conditions you can use a remote TIBCO Rendezvous Daemon:
- Your working environment has no UDP network protocol.
- All your machines are part of the TIBCO Silver Fabric Cloud in different networks, but there are no Rendezvous Daemons between the networks.
For example, you can set the value to
tcp:ADMINMACHINE:7500. All machines that join this TIBCO Domain use this remote daemon.
RV Service
This specifies the TIBCO Rendezvous Service used for communication. The Rendezvous Daemon divides the network into logical partitions. Each transport communicates on a single service. A transport can communicate only on the same service with other transports.
The default TIBCO Rendezvous port setting is 7474, but your specific Hawk implementation may be set to publish according to your needs. If changed, you need to change the Rendezvous configuration too, so use the default unless you are an experienced Rendezvous user.
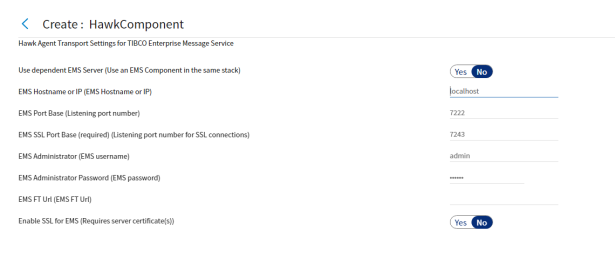
Hawk Agent Transport Settings for EMS
The Component Wizard displays the Hawk Agent Transport Setting for EMS page when the Transport Protocol is set to Enterprise Message Service. EMS Server can be configured to use the Fault Tolerance feature. For information about Fault Tolerance, see the Fault Tolerance for the Messaging Service topic. Your TIBCO Hawk component can be set to depend on a EMS component published in the same stack or you can specify a EMS instance running on an accessible host. Select the Use dependent EMS Server checkbox and later set a component dependency.
If you wish to monitor a dependent EMS component and use EMS as the transport protocol, you must configure this TIBCO Hawk component to use an independent instance of EMS as the transport by clearing the Use dependent EMS Server checkbox and entering appropriate connection profile parameter values.
Figure 24: EMS Configuration
Hawk Agent Transport Settings for Transmission Control Protocol
When using the Transport Control Protocol (TCP) as the messaging transport, set the unique socket addresses for all the components individually along with the security policy that is to be applied. All of this together is used to establish the connection between your TIBCO Hawk implementation and the Hawk Console via TCP.
Figure 25: TCP Configuration Page
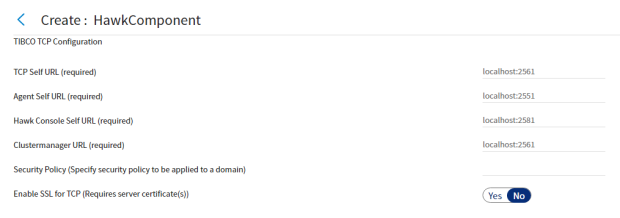
Table 1 - UI functionality for TCP
| UI functionality | Description |
|---|---|
| TCP Self-URL | It is the unique socket address of the Hawk Console connecting the TCP Transport for TIBCO Hawk cluster. The syntax is: <self IP>:<self:port> |
| Agent Self-URL | It is the unique socket address of the Hawk Agent connecting the TCP Transport for TIBCO Hawk cluster. The syntax is: <self IP>:<self:port> |
| Hawk Console Self-URL | It specifies the socket address of the Hawk Console for joining the cluster. |
| Cluster manager URL | It specifies the socket address of the cluster manager acting as the seed node for the cluster. This socket address is the same as <cluster_manager_IP>:<self:port> that is also specified for the -tcp_session parameter in the Hawk Cluster Manager. |
| Security Policy | It is used to specify the security policy that has to be applied to a domain. The default value is "". |
| Enable SSL for TCP | Toggle this button to enable or disable the SSL for TCP. |
SSL Configurations for EMS Transport for TIBCO Hawk (optional)
When you select the Enable SSL for EMS checkbox, the Component Wizard prompts the user to specify the SSL parameters used by TIBCO Hawk when connecting to the EMS Server. You use the Upload SSL Key/Certificates for EMS Server page to upload the required certificates to configure TIBCO Hawk to use SSL with EMS.
To use SSL to secure communications between the Hawk components through EMS, upload the required certificates, enter their keys and password and the vendor name on this page:
Figure 26: EMS Transport for SSL
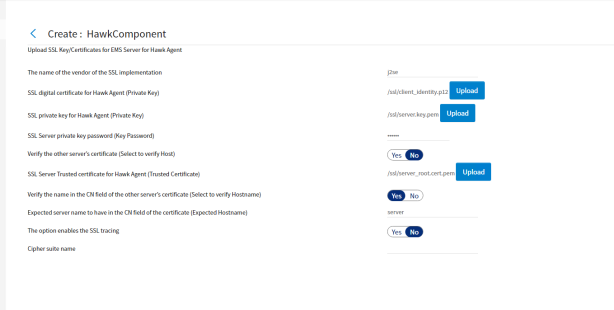
| UI functionality | Description |
|---|---|
| The name of the vendor of the SSL implementation | The name of the vendor of the SSL implementation. |
| SSL digital certificate for Hawk Agent (Private Key) | This option indicates the private key of the TIBCO Hawk component. |
| SSL Server private key password (Key Password) | The password to decrypt the identity file of the Hawk component. |
| Verify the other server's certificate (Select to verify Host) | If selected as yes, it indicates that the TIBCO Hawk component verifies the server. |
| SSL Server Trusted certificate for Hawk Agent (Trusted Certificate) | The option specifies the file name of the server certificates. |
| Verify the name in the CN field of the other server's certificate | If selected as yes, this option specifies that the client should verify the name in the CN field of the server certificate. |
| Expected server name to have in the CN field of the certificate (Expected Hostname) | The name that is expected in the name of the CN field of the server certificates is specified by this option. |
-
The default name of the vendor of the SSL implementation is j2se.
-
The default expected hostname is server.
-
Only when the Verify the name in CN field of the other server's certificate option is selected as Yes, then you can choose to change the Expected hostname
For more information about using these component configurations for SSL with EMS, see the section "Using the SSL Protocol" in the TIBCO Enterprise Message Service User Guide.
SSL Configurations for TCP Transport for TIBCO Hawk
Similarly, to create a secure communication channel between Hawk components, you can configure TCP transport for TIBCO Hawk to use two-way SSL authentication. When you select the Enable SSL for TCP checkbox on the TIBCO TCP Configuration page, the Component Wizard directs you to the Upload SSL Key/Certificates for TCP Daemon page. It helps to configure TIBCO Hawk SSL when the TCP connection is in use.
To use SSL to secure communications between TIBCO Hawk and TCP, upload the Key Store and Trust Store for both, TCP and the Agent. Enter the passwords for each of them:
Figure 27: TCP SSL Page
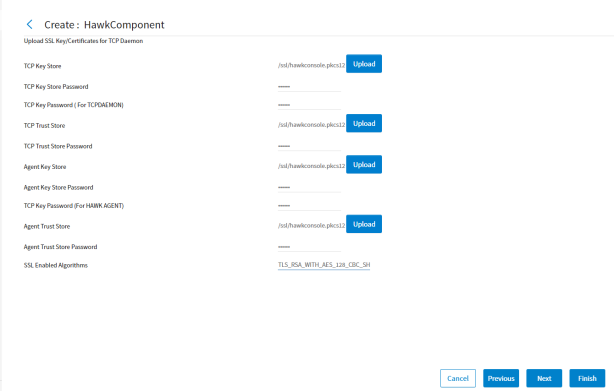
Table 2 - UI functionality to configure Hawk for use of SSL with TCP
| UI functionality | Description |
|---|---|
| TCP Keystore | Upload the key store file. |
| TCP Keystore Password | Enter the password for the key store file. |
| TCP Key Password | Enter the encrypted key password. |
| TCP Truststore | Upload the trust store file. |
| TCP Truststore Password | Enter the password for the trust store file. |
| Agent Keystore | Upload the agent key store file. |
| Agent Keystore Password |
Enter the password for the key store file. |
| TCP Key Password (Hawk Console) | Enter the encrypted key password. |
| Agent Truststore | Upload the trust store file. |
| Agent Truststore Password | Enter the password for the trust store file. |
| SSL Enabled Algorithms | Algorithms used for the security protocol. |
TIBCO Hawk AMI Configuration
TIBCO Hawk Application Management Interface (AMI) is an API used to instrument applications for management and monitoring by a TIBCO Hawk Agent. TIBCO Silver Fabric Enabler for Hawk provides the configuration page to set the Hawk instance AMI service port, daemon location, and network for session initiation.
For management and monitoring of TIBCO Hawk instrumented applications, configure the TIBCO Hawk Agent to start with appropriate service, network, and daemon settings so that a Rendezvous session can be set up to connect with the application. The TIBCO Hawk AMI Configuration page defines how TIBCO Hawk uses Rendezvous with TIBCO Hawk Microagent (HMA). Even when EMS is used as the primary transport, HMA uses Rendezvous as the transport.
Figure 28: TIBCO Hawk AMI Configuration
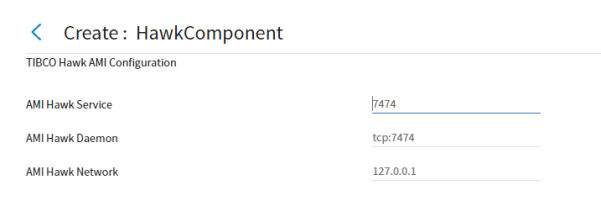
AMI Hawk Service
The AMI Hawk Service specifies the TIBCO Hawk port number, for example, Rendezvous connects with TIBCO Hawk on the default port 7475.
AMI Hawk Daemon
The AMI Hawk Daemon specifies the location of the TIBCO Hawk Daemon. A value of "tcp:yyyy" would correspond to a local Hawk Daemon where "yyyy" would be the port number. A Hawk Daemon located elsewhere would be specified by a value of the protocol, IP address, and port number: "tcp:xxx.xxx.xxx.xxx:yyyy".
The AMI Hawk Service and the AMI Hawk Daemon ports may be the same or they may be different. By default, different TLMs on the same domain (physical machine) are using the same RV transport (default AMI Hawk Service=7474, and default AMI Hawk Daemon=tcp:7474). This setting enables visibility of all of the deployed applications on each TLM even if some applications are not deployed on this particular TLM.
AMI Hawk Network
Generally, AMI Hawk Network is an empty string, and all three fields may be left empty. But if a value is set for either AMI Hawk Service or AMI Hawk Daemon, then they must both be set with valid values together. Setting only one of them results in an error.
Configure Hawk Console Ports
Review and set the appropriate base ports for your implementation.
Figure 29: Hawk Console Settings
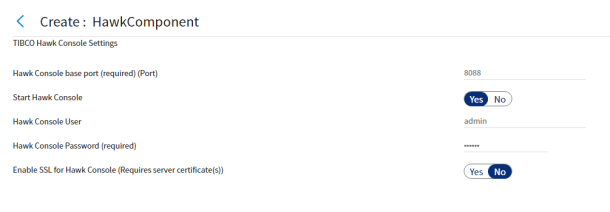
Table 3 - UI functionality to configure Hawk Console ports
| Run time variables | Description |
|---|---|
| Hawk Console Base Port | Use this server port to access Hawk Console. The default port used in 8088. |
| Start Hawk Console | Toggle this button to enable or disable Hawk Console. |
| Hawk Console User | Enter the Hawk Console login username. |
| Hawk Console Password | Enter the Hawk Console login password. |
| Enable SSL for Hawk Console | Toggle this button to enable or disable SSL for Hawk Console. |
-
When running the component in Hawk Console interface, use the same login ID and password which is used to configure the Hawk Console ports.
-
The Hawk Console base port is 8088 by default.
Configure SSL for Hawk Console
When you toggle the button to yes for the Enable SSL for Hawk Console, the Component Wizard displays the Upload SSL/Key Certificates for Hawk Console page. It would help you configure the TIBCO Hawk Console with SSL.
To secure the Hawk Console with SSL, upload the key alias, key store, and enter the appropriate passwords.
Figure 30: Configure SSL for Hawk Console
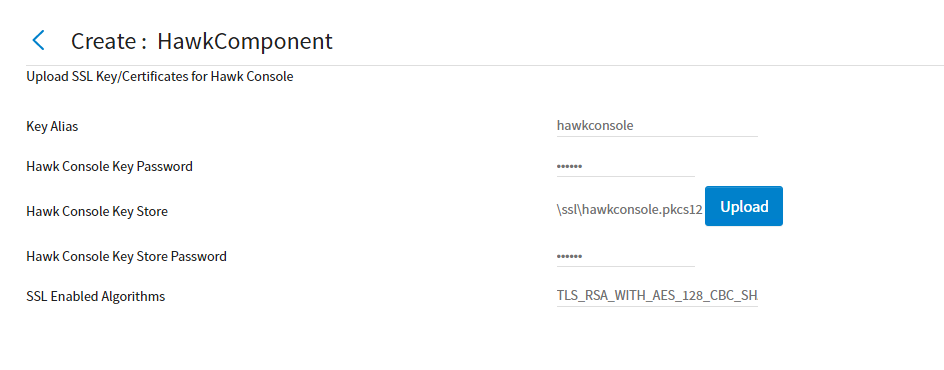
Table 4 - Configure SSL for Hawk Console
| UI functionality | Description |
|---|---|
| Key Alias | Enter the alias name for the key |
| Hawk Console Key Password | Enter the encrypted key password |
| Hawk Console Key Store | Upload the key store file |
| Hawk Console Key Store Password | Enter the password for the key store file |
Monitoring EMS by using HMA
When TIBCO Hawk Agent is set to Monitor an EMS Server, the Hawk Micro Agent Settings for TIBCO Enterprise Message Service page provides configuration parameters for connection type and specification.
Use Dependent EMS Server
Selecting the Use dependent EMS Server checkbox means that you monitor a EMS component instance that you publish in the same stack with this TIBCO Hawk component instance. Include the TIBCO Enterprise Messaging Service Distribution for TIBCO Silver Fabric by using the settings on the Optional Distribution settings page and you must set a component dependency on that EMS component. The EMS location settings are grayed out and disabled, but the Hawk Microagent can be extended by using the HawkController JMS class. For more information, see the TIBCO Hawk Plug-in Reference Guide for more information.
By default, the Use dependent EMS Server checkbox is cleared so you can monitor an independently published instance of the TIBCO Enterprise Messaging Service. If your TIBCO Hawk component monitors an independent instance of EMS, you must specify how and where your TIBCO Hawk Microagent establishes that connection.
Figure 31: Hawk Micro Agent Settings for EMS
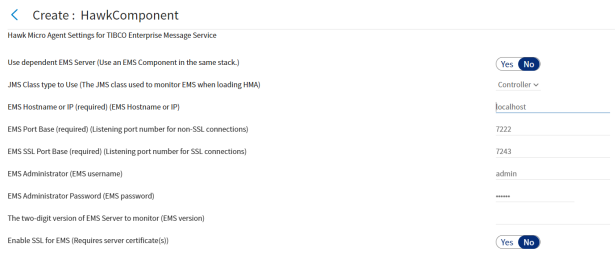
JMS Class Type to Use
You can use either the Listener (COM.TIBCO.hawk.tibjms.HawkListener class) if you only want to monitor the EMS Server, or you can specify the Controller (COM.TIBCO.hawk.tibjms.HawkController class) if you want to monitor and manage the EMS Server.
For more information on implementing and extending these classes, For more information, see the TIBCO Hawk Plug-in Reference Guide.
Configure Hawk for use of SSL with EMS (optional)
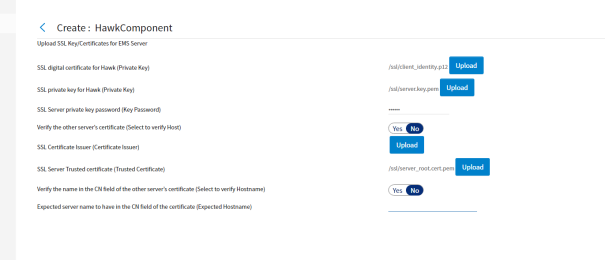
When you check the Enable SSL for EMS checkbox on the Hawk Micro Agent Settings for TIBCO Enterprise Message Service page, the Component Wizard displays the Upload SSL Key/Certificates for EMS Server page to allow you to configure TIBCO Hawk to use SSL when monitoring or controlling EMS. To use SSL to secure communications between TIBCO Hawk and EMS upload the digital certificate, enter the private key, certificate chain member, and trusted certificate, as well as enter the private key password for the EMS Server on this page:
Figure 32: Upload SSL Key/Certificates for EMS Server
Configure TIBCO Hawk Agent running condition
You can ensure continuous Hawk service by setting a running condition check, polling periodically to verify TIBCO Hawk responsiveness.
Polling Period (in seconds) for detection of TIBCO Hawk Agent running verification (required)
Enter an integer to specify the number of seconds between periodic verification checks that the TIBCO Hawk Agent is still running. If the TIBCO Hawk Agent becomes unresponsive to this verification then the process is automatically restarted. The running condition check may be disabled with a value of 0.
Figure 33: TIBCO Administrator and Hawk Agent running conditions

Automatically Restart TIBCO Silver Fabric Engine if TIBCO Hawk Agent fails to restart N successive times (required)
Enter an integer to specify the number of restart retries for the TIBCO Hawk Agent before the TIBCO Silver Fabric Engine restarts. A successful restart resets the count. Disable automatic restart of the TIBCO Silver Fabric Engine with a value of 0.
Set the Hawk Configuration Management Home
Figure 34: Hawk Configuration Management Home Setting page

Leave the default TIBCO Hawk configuration home setting unless you have good reason to change it.
Add or edit Enabler-specific run time context variables
String, Environment, System, or Encrypted variables may be added and changed in the component to define and set runtime-specific context variables. Select a variable type from the Add Variable pull-down list or Add from Enabler to use a variable from a selected enabler.
Figure 35: Adding a run time context variable
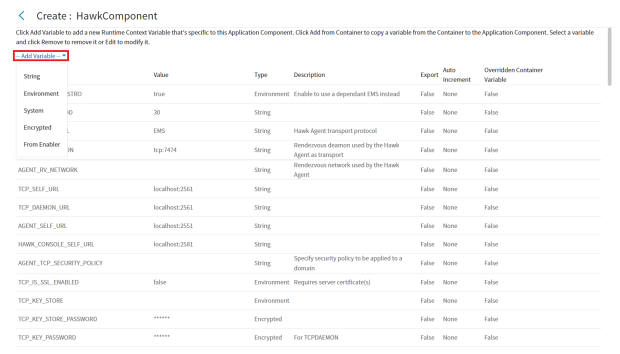
Variable values from an enabler may be added to the run time as well. Use the Add from Enabler button to add enabler-specific context variables. After you have added any run time context variable, you may select the variable (selected row is highlighted) and Edit to change its attributes. Selected rows may also be removed.
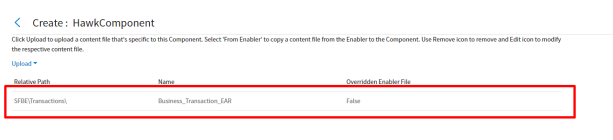
Upload a content file
Content files may be uploaded, added from an enabler, edited with a simple text editor, or removed by using the "Add/override/customize Container and Component-specific content files" page. Add files associated with the component that may be required for the Stack to be run according to design.
Figure 36: Uploading content files
Edit Configuration file directly (Optional)
One page that must be used only with extreme caution is the Edit the Configuration File page. It should not be used unless the configuration .xml is backed up and specific knowledge about the TIBCO Silver Fabric system is applied. This interface is being exposed to allow for more advanced customizations and normally it should be left alone. For more information about what and how the configure.xml might be changed, see the "The configure.xml File" section in the TIBCO Silver® Fabric Developer’s Guide. As an example, if you wanted to change the default Java heap size of the JVM in file hawkagenttra.template from 256M to 1024M.
<?xml version='1.0' encoding='utf-8' standalone='yes' ?>
<containerConfig>
<configFiles baseDir="${TIBCO_HOME}/tra/5.7/template/domainutility" include="hawkagenttra.template"><regex pattern="java\.heap\.size\.max\s+[0-9]+[a-zA-Z]+"replacement="java.heap.size.max 1024M" />
</configFiles>
</containerConfig>
The property, baseDir, in the <configFiles> element is used to specify the path that includes the file to be updated. It can be modified if needed. For example, if the TIBCO Runtime Agent (TRA) version was 5.8 instead of 5.7, then the baseDir value defined in the code snippet would be changed to:
${TIBCO_HOME}/tra/5.8/template/domainutilityThe property, include, in <configFiles> element is used to specify which file needs to be replaced. It can specify whatever files you want to change. The asterisk wild card may be used to represent a string of characters like for instance: "*.tra" to change all of the .tra files in %baseDir%.
The property, pattern, in the <regex> element is used to specify the contents that need to be replaced within the previously specified files. The value of pattern can be a regular expression.
The property, replacement, in <regex> element is used to specify the new contents of the node specified by the pattern property value.
Finish Configuring the Component
The remaining screens of the Component Wizard are generic for all Silver® Fabric Enablers. The configuration of these is optional for TIBCO Administrator component. For more information, see TIBCO Silver® Fabric User’s Guide for more information on these configuration screens.
After you click the Finish button, make sure that the component is published to make it available to create a Stack. To do this, select Publish Component in the Actions drop-down list in the line of the component you just created.