Guia do Usuário do Cliente Web Spotfire®

Editing column matching or other settings for added rows

If you have added rows from a different source to a data table, there might be occasions when you must update the settings used for matching the data from different sources together. For example, a column used for matching linked data can have been renamed or removed in either of the sources.

About this task

Tip: In the Data canvas, you will see a red exclamation mark on the Added rows node, if the current settings need updates.

Before you begin

Rows must have been added to a data table in the analysis. See Adding rows to a data table for information on how to add rows. The analysis must be in Editing mode.

Procedure

  1. On the authoring bar, click Data canvas .
  2. Make sure the data table of interest is selected.
    This step is only applicable if you have two or more data tables in the analysis.
  3. In the Data canvas, click the settings button on the Added rows node.

  4. In the Settings for added rows dialog, verify that the column matching is still valid, or edit the matching as desired. This is done by adding or removing matches.
    Click on the plus sign and select a column from the list to add a match for one of the columns from the original data. Click on the x on a row to remove a match. If an earlier match is broken, click on the exclamation mark and select a new match, when possible, or remove the match. Alternatively, you can select Use auto-match to automatically match on name and data type, if you know that these are the same in both sources.
    Tip: When adding rows, you will append new rows to the original data table. This means that you should probably try to match as many columns as possible. See the preview for a hint on how data will be matched.
  5. Optionally, if there are additional columns in the added data, you can select to include or exclude these columns under Include additional columns from new data by selecting or clearing the check box for each column.
    Note: If the data source from which columns were added can be reloaded, and new columns become available after a reload, then the new columns will automatically become included. If this was not desired, you may want to exclude new columns after reloading data.
  6. Optionally, change the settings under Identify origin of rows.
    Select Do not identify origin to skip this option, Create new column to add a new column with different values for data from the original source and data from the added source, or select Use existing column to add the information about where rows come from to an existing column.
    Note: If a previously used column has been removed or renamed, you might need to select a different option before you can choose a different, existing column here.
  7. When you are done, click OK.

Example: Editing added rows when matching is broken

In this example, rows have been added from Salesforce to a data table that was originally opened from a local Excel file. The local file was saved using the data loading setting "New data when possible" and it has been reloaded at some time. Before the Excel file was reloaded it was modified; the name of the column used in the matching was changed. Therefore, the previous matching of columns is now broken, which is indicated with a red exclamation mark in the Data canvas:


To fix the broken match, first click the settings icon on the Added rows node. This opens the Settings for added rows dialog, and the broken match is indicated with red exclamation marks:

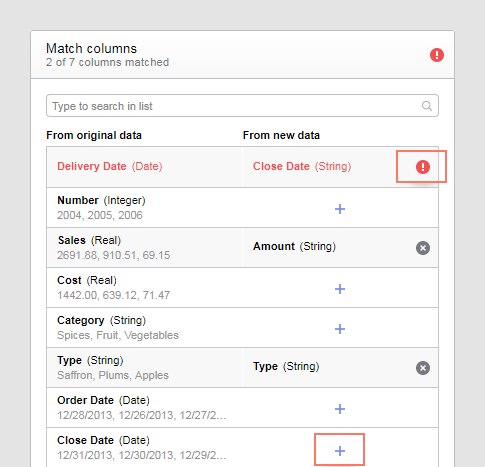
Click on the red exclamation mark and then click Remove match. Add a new match for the renamed column in the original data by clicking on the plus sign next to the new column name and selecting a matching column from the new data.