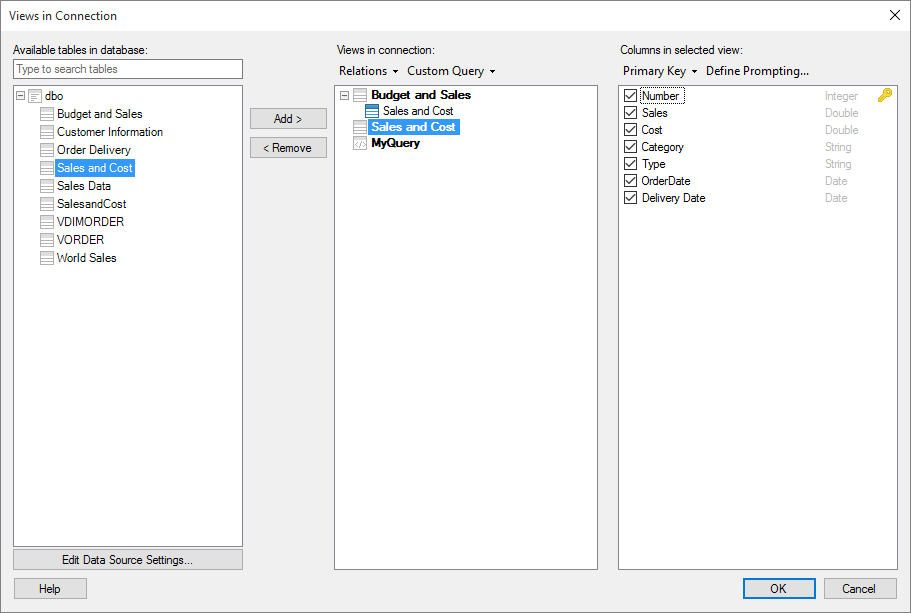
This dialog is automatically shown when you are setting up data connections to some relational data sources. You use it to select which views should be included in the connection. If tables are related, they can be joined into a single view, or virtual table. When you add a connection to an analysis, you will be prompted in the Files and data flyout to select and confirm which of the views in the connection should actually result in a data table in the analysis.
To reach the Views in Connection dialog when working with a shared connection in the library:
Select Data > Manage Data Connections.
Click on the connection of interest and click Edit.
On the General tab, click Edit .
To reach the Views in Connection dialog when working with an embedded connection in an analysis:
Select Data > Data Connection Properties.
In the list of Connections, select the connection with the data tables of interest.
Click on Settings....
On the General tab, click on Edit....
Comment: You can only edit data tables for data connections that are embedded in the current analysis by using these steps. For shared library connections it is recommended to use the Manage Data Connections tool as described above instead.
Option |
Description |
Available
tables in database |
Lists all the existing tables in the database. |
[Type to
search tables] |
Type a search string to limit the number of items in the Available columns list. It is possible to use the wildcard character * in the search. See Searching in Spotfire for more information. |
Edit Data Source Settings |
Click to open the data source connection dialog, where you can edit the settings you used when connecting to the data source. You can change the database, authentication method and other settings, that you might want to edit in your connection. |
Add > |
Adds the tables selected in the Available tables in database list to the Views in connection list. |
< Remove |
Removes the selected view, relation or custom query from the Views in connection list. |
Views in connection |
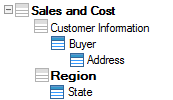
Lists the views that you have added from the Available tables in database list. The views listed in bold letters here are those that will become data tables in Spotfire. You can add related tables using the Relations menu, see below, or the right-click menu. If a source table with structural relations to other tables is added, then all related tables will be included in the list, so that a virtual, joined, view is produced. Click on a bold name to edit the resulting view name. This name will be the default name for a data table added from the view in the analysis, but it can be changed later. A plus sign next to a table indicates that
the table has been set up with one or more structural relations
to other tables in the database.
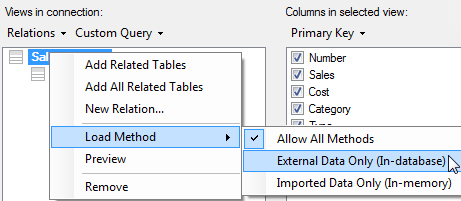
The expanded view above shows that the table Sales and Cost is related to the tables Customer Information and Region. Customer Information is in turn related to the table Buyer, and so on. You can use the relations that have been set up in the database to join database tables into a single view in Spotfire by adding a table at the top level of a relation and selecting Relations > Add Related Tables. You can also create your own relations by clicking on a table and then selecting Relations > New Relation.... These manual relations are indicated by a blue table icon and they are the only ones that can be edited or deleted from within Spotfire. Tip: Hover the mouse-pointer over a view for information about the original name. You can specify that a view should be available as external data only, or as imported data only, using the pop-up menu. Right-click on the view and select Load Method > External Data Only (In-database) or Load Method > Imported Data Only (In-memory):
|
Relations |
|
New Relation... |
Opens the New Relation dialog where you can set up a structural relation between two tables. |
Edit Relation... |
Opens the
Edit Relation
dialog where you can edit a structural relation that already
exists between the selected table and another table. |
Add Related Tables |
Adds database tables that are directly related to the selected table (one level down) to the Views in connection list. |
Add All Related Tables |
Adds all database tables that are in some way related to the selected table (all levels) to the Views in connection list. |
Custom Query |
[Custom queries are not supported in Spotfire Cloud offerings.] |
New
Custom Query |
Opens the Custom Query dialog where you can create your own custom database query. The added custom query will show up in the Available tables in database list and can be used to set up views as any other database table. |
Edit
Custom Query |
Opens the Custom Query dialog where you can edit the selected custom query. |
Delete
Custom Query |
Deletes the selected custom query. |
Columns
in selected view |
Lists the columns that the selected view in the Views in connection list contains. In the list, you can see the name and the data type that the column will have in Spotfire. Click on a column name to edit it. A parenthesis after a column name indicates that the column is included in a table that is the primary key table in the relation with the selected table. The name in the parenthesis is the name of the column that was used as the foreign key column when joining the tables together.
Clear a check box to exclude a column from the resulting view in Spotfire. You can easily select or clear all check boxes by right-clicking the columns list and, in the pop-up menu, selecting Select all or Deselect all. If all check boxes are already selected, only the option Deselect all will be shown in the pop-up menu, and if all check boxes are already cleared, only the option Select all will be shown. Click on a column name to edit it. Tip: Hover the mouse-pointer over a column to see detailed information, such as the original name of the column in the database. For hierarchies, the tooltip displays which columns are used to build the hierarchy. |
Primary
Key |
[Available when no primary key has been defined in the data source.] Allows you to manually specify a custom primary key. |
Set
Selected as Primary Key |
Specifies that the selected column or columns should be used as the primary key for the selected view.
|
Remove
Primary Key |
Removes a previously defined primary key. |
Define
Prompting... |
Opens the Define Prompting dialog where you can set up prompting for columns or parameters to be shown when an end user opens the data connection. This allows the end users to filter the data to view in runtime. |
See also: