StreamBase Studio supports two methods for taking a schema from one location and reusing it in another location:
- Copy Schema From Dialog
-
Use the Copy Schema From dialog to insert an existing schema into the Fields grid of an Edit Schema tab in the Properties view, or in an Edit Named Schema or Edit Table Schema dialog. Copy Schema From is also available in the Properties view for arcs when you select the Declare option.
- Export Schema to Clipboard Command
-
Use the command to copy an existing schema to the system clipboard in JSON (default) or XML format. This feature is designed to help you work with external applications that need to interact with StreamBase or LiveView streams, or to paste a schema definition into StreamBase JUnit test file, if required. This is also used for pasting decision table schemas into the TIBCO® Artifact Management Server (AMS) web client for the purpose of creating new decision table artifacts.
Artifact Management Server is a separately installed product that describes schema usage in its documentation. Obtain its installer from the site that provides your licensed TIBCO® Streaming installers.
Copying schemas allows you to use an existing schema to avoid manually entering the fields. However, the copied fields are only copies, and are inserted as a private schema into the currently selected field grid. If the original schema changes, the copy does not change. For most purposes, TIBCO recommends using named schemas if your goal is to implement reusable schemas.
-
To display the Copy Schema From dialog, with an input stream or arc selected, choose the Schema tab or Edit Schema tab and click the
 Copy Schema from Existing Component button. You can also click this button from the Edit Named Schema or Edit Table Schema features in the Definitions tab. The following image shows a Copy Schema From dialog.

-
Select a source from which you are copying the schema. For schema source details, see below.
-
From system container schemas
-
From File (CSV, XML, XSD, ZIP)
-
From schemas in any workspace module or interface
-
-
Confirm the contents of the selected schema in the Schema Preview section.
-
Click to close the dialog.
-
If your current component's schema grid already contains schema fields, a dialog is displayed prompting you to confirm that you want to replace those fields. Click to overwrite the current fields in the current schema grid.
The fields of the schema you selected are inserted in the Fields grid of the current component. If you invoked the Copy Schema From dialog from an Edit Named Schema dialog, the converted schema is copied to the named schema's definition grid.
You can copy schemas from the following places:
- From system container schemas
-
Copy from the schema of a stream in the global system container. For example, you can copy the schema of the standard StreamBase error tuple by selecting error:schema from the first drop-down list after selecting the From system container schemas radio button.
- From File (CSV, XML, XSD, ZIP ...)
-
Opens the specified file and attempts to convert its contents into StreamBase schema format. Supported file types are:
-
CSV — Comma-separated value files, with or without a header row.
-
XML — Structured data in XML files.
-
XSD — Standard XML Schema files that define a schema.
-
ZIP — Compressed files in zip format that contain one of the above file types.
After selecting a file from a workspace or file system, a preview of the file is shown, if possible.
For CSV files, specify delimiter and quote characters before copying the CSV format into a schema. When you click , Studio attempts to infer data types from the first few column values; you can change the inferred data type later. Auto-detection of int, double, boolean, string, timestamp and tuples are supported, but not lists or functions. When indicating tuples, the CSV header must identify sub-tuples with dot notation, such as
stock.symbolandstock.price.For XML files, Studio attempts to infer data types from attribute values for elements.
For XSD files, Studio uses the XSD data type definitions to generate the schema. XSD files are used by many TIBCO products to save schema structure information. Use this feature to migrate schemas in XSD format from other TIBCO products.
-
- From schemas in any workspace application or interface
-
Copy from the schema of any component in any EventFlow application or interface in any project in the current Studio workspace. You can copy the schemas from named schemas defined in the current module, or from any intermediate stream in any module.
-
Select the project of interest from the Project drop-down control.
-
Select an application or interface based on the project selected in the previous step.
-
Select a schema from one of the components listed in the Copy schema from section. Click the chevron to expand component sections to see the available schemas of each type.
-
Exporting schemas to the system clipboard allows you to copy and paste an existing schema to avoid having to manually enter its fields. This feature is designed to help you work with external applications that need to interact with StreamBase or LiveView streams, or to paste a schema definition into StreamBase JUnit test file, if required. This is also used for pasting decision table schemas into the TIBCO® Artifact Management Server (AMS) web client for the purpose of creating new decision table artifacts.
Note
To re-use a schema within the processing logic of an EventFlow fragment, use the named schema feature instead of copying the schema.
-
Select a component on the EventFlow Editor canvas that has a self-contained schema, right-click and select Export Schema to Clipboard. You can also select the name of a named schema in the Definitions tab of the editor.
The Export Schema to Clipboard menu item does not appear if you select a component that lacks an easily discernible single schema. To isolate a schema at a certain point in the stream, select an arc entering or exiting a component. (Arcs always have self-contained schemas.) For example, select the arc exiting a Decision Table component to copy its schema.
The Export Schema to Clipboard menu item does not appear if you select two or more components that have different schemas. You can select two or more components that have the same schema, such as a Union operator and arcs on either side of it. The rule is that the schema of all selected components must be the same before Export Schema to Clipboard appears in the context menu.
-
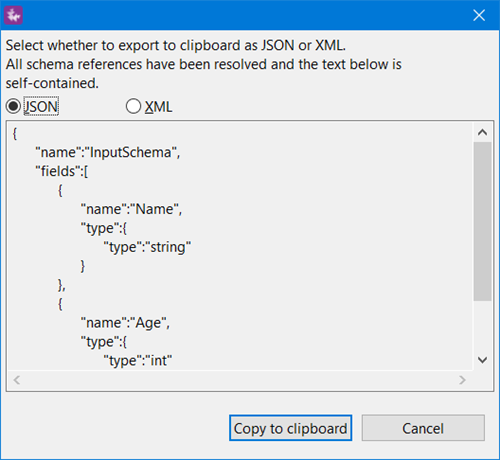
Select JSON (default) or XML format.
-
Click .