Lists represent captured knowledge from one or many data sources. For example, you may have identified a number of transactions where the sum of cost was high. You can then create a list containing the rows representing these transactions. This will make it easier to access the interesting items for further analysis based on the findings. See Creating Lists, to learn more about adding new lists.
Lists are available from one session to the next and are automatically saved when you modify them. Lists are similar to Tags, but with Lists you work with the same collection of lists all the time, while Tags are specific to the current analysis. Combining the functionality from Lists and Tags can be very useful. You can create tag collections from lists, and you can create lists from tag collections. This means that Lists can be a way to transfer knowledge from one analysis to another, while Tags can be a way to use lists within an analysis. See What are Tags? and Creating Tag Collections from Lists to learn more.
You can view and
manage lists in a popover or in a docked panel. See Panels
and Popovers for more information. Click on the Lists button on the
toolbar, ![]() , or select View > Lists to open Lists. The
Lists panel or popover will open in the mode it was opened the last time
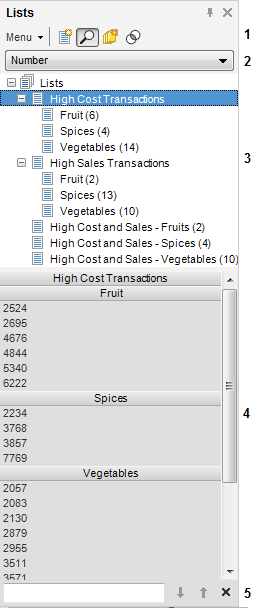
you had it open. The image below shows the docked Lists panel.
, or select View > Lists to open Lists. The
Lists panel or popover will open in the mode it was opened the last time
you had it open. The image below shows the docked Lists panel.
The Lists panel user interface
Number |
Description |
1 |
Toolbar |
2 |
Identifier Selector |
3 |
Lists |
4 |
List Items |
5 |
Search Field |
Toolbar
The toolbar, consisting of buttons and a menu, is located in the upper part of the panel. You can perform most of the actions in the Lists panel from the toolbar.
Identifier selector
The identifier column selector is where you select which column in the data set to use as the identifier. You can choose the identifier from any column that contains any of the following types: string, integer, longinteger, or date. In the example above, the column "Number" was selected. It contains values representing ID numbers of sales transactions. The values in the chosen column are the ones that are displayed as list items when you select one or more lists.
Lists
The collection of lists has a hierarchical structure where the top level, named "Lists", cannot be removed. In the example above, five lists have been added on the level below the top level. Two of them, "High Cost Transactions" and "High Sales Transactions" contain three sublists each. You can expand and collapse lists with sublists by clicking on the +/- sign to the left of the list name. The number of items in a list is displayed to the right of the name. In the example above, the selected list (highlighted in blue) "High Cost Transactions" does not contain any list items itself, but its sublists do, as can be seen in the parentheses beside the sublists' names: Fruit (6), Spices (4), and Vegetables (10). To view the items of a list, click on the list to select it. The items will then be displayed in the lower part of the panel. To learn more about selecting lists, see Selecting Lists and List Items.
List items
In the lower part of the panel, the list items of the selected lists are displayed. In the example above, the items of the "High Cost Transactions" list are displayed. To learn more about how to select lists and items, see Selecting Lists and List Items.
Search field
You can search lists, list items, and annotations by entering a text string in the search field. To learn more about searching in the Lists panel, see Searching the Lists Panel.
Read-only mode
As mentioned, you always work with the same list collection.
This means that if more than one instance of Spotfire is open, you can
only modify lists and items in one of these instances. The Lists panel
will be in read-only mode in the other Spotfire instances. This is indicated
by the read-only button, ![]() , on the toolbar. Click on
the button to update the Lists panel view in case it was modified in the
other instance. When a read-only instance of the Lists panel becomes available
for editing again you must click the button,
, on the toolbar. Click on
the button to update the Lists panel view in case it was modified in the
other instance. When a read-only instance of the Lists panel becomes available
for editing again you must click the button, ![]() , before
you can make any changes.
, before
you can make any changes.
See also:
Selecting Lists and List Items