You can create new lists in two ways. One way is to mark items in a visualization and make a new list based on these. Another way is to add a list from list logic, which means that you create a new list by comparing existing lists using boolean operators. This lets you determine which list items are present or not in a certain combination of lists. The result of the comparison is then added as a new list in the Lists panel.
To add a list from marked items:
If Lists are not already visible, select View > Lists.
Select a list under which you want the new list to be added. To learn more about how to select lists and list items, see Selecting Lists and List Items.
In the visualization, mark the items you want to include in the new list.
Right-click in the visualization to display the pop-up menu.
Select Marked Rows to open the submenu.
Select New List from Marked....
Response: The New List from Marked dialog is opened.
In the Name field, type a name to use for the list.
Optionally, select a column to group the list by.
Comment: If you select to group the list by a column, then the new list will have sublists, one sublist for each value in the column.
Click OK.
Response: The new list is added as a sublist in the selected list. If more than one list is selected, the new list will be added on the hierarchical level below the closest common parent of the two lists.
Example:
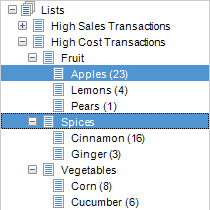
In the example above, two lists which are not on the same hierarchical level are selected. If you add a list from these selections, the new list will be added to the level just beneath the closest common parent of the selected lists; in this case, High Cost Transactions. If the two selected lists are on the same hierarchical level, the new list will be added on the same level as the selected lists.
To add a list from List Logic:
If Lists are not already visible, select View > Lists.
Optionally, select the lists you want to compare in the Lists panel.
Click on the New List from
List Logic button on the Lists panel toolbar, ![]() .
.
Response: The New List from List Logic dialog is opened. If you selected one or more lists in the panel before opening the dialog, the check boxes corresponding to these lists will be selected in the dialog.
Type a Name to use for the list in the provided text field.
In the Lists to use list, choose which lists to compare by selecting the corresponding check boxes.
Comment: When you select a list, all its sublists are automatically included in the selection. Clear the check boxes for the sublists you do not want to include.
Under Include items appearing, select one of the three methods of logical operation to use when comparing the previously selected lists.
Comment: You can select either In all lists (AND), In any list (OR), or ONLY in this list. If you select ONLY in this list, you need to select a list in the drop-down menu.
When done, click OK to close the dialog.
Response: The new list is added in the Lists panel. Note that lists created from List Logic are always added to the top level in the list hierarchy.
See also:
Details on New List from Marked
Details on New List from List Logic