Home > Tools > Manage Data Connections > Example: Moving a Shared Data Source from Test to Production
Example: Moving a Shared Data Source from Test to Production
This example assumes that you have an analysis based on
a shared Microsoft SQL Server data source and a shared data connection
already set up in your library. See How
to Work with Data Connections and their Data Sources in the Library
if you need help setting them up. The steps described in these instructions
show how you can export copies of the current test items to a different
Spotfire server and then change the URL to the data in the exported copies.
Tip: You can skip the export
and import steps and redirect the shared data source directly, if you
only want to update the database URL .
Note: To export a folder and
its contents to file you must be a member of the Library
Administrator group and have sufficient folder permissions.
Start Spotfire and log into
the server (and deployment area) from which you want to export items.
Open Tools
> Library Administration and browse to the folder you want
to export.
Select the folder and, on
the toolbar, click Export.
Tip: Make sure that
all dependencies (columns, filters, etc.) needed by the exported elements
are included in the exported folder. You can select separate items
and use the Copy button if you
need to copy certain items to the folder before the export.
Type a File
name for the exported file.
Comment: The folder and its contents will be saved
as a zip archive, placed in a specific folder (or in its subfolders)
on a specific machine. See the TIBCO Spotfire Server - Installation
and Configuration Manual for more information about how to set this
up.
In the Export
items of type drop-down list, select if you want to limit the
export to only include certain types of items.
Select whether to Include
permissions or not.
Click Close
when the Log states Export
done.
Note: To import a folder and
its contents to file you must be a member of the Library
Administrator group and have sufficient folder permissions.
Copy the exported file to
the new Spotfire server. Make sure you place the file in the shared
disk location of the new server.
Start Spotfire and log into
the server to which you want to import items.
Click on the Import
button.
Click Browse.
Select the file you want to
import, and click OK.
Select if you want to Include permissions if such are
stored in the file. If you do not include any permissions, the imported
items will inherit the permissions of the destination folder.
Click OK.
Select a folder to import
to, and click OK.
Click Close
when the Log states Import
done.
Go to Tools
> Manage Data Connections.
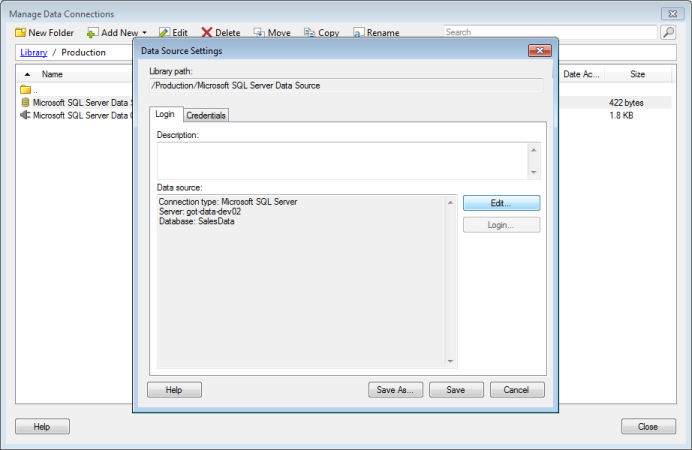
Go to the folder where the
data source to redirect is located and select the data source.
On the toolbar, click Edit.
Response: The Data Source Settings dialog opens.

In the Data Source Settings
dialog click Edit....
Response: The Microsoft SQL Server Connection dialog
opens.
Change the Server
address to point to the production server, click Connect
and then select the Database.
Click OK
to close the Microsoft SQL Server Connection dialog.
Click Save.
Response: The data source has now been redirected
to the new SQL server instance.
Close
the Manage Data Connections dialog.
After exporting or copying items in the library, you also
need to replace the data source item used by the data connection, so that
it is the exported version of the data source that is in use in the exported
connection.
Go to Tools
> Manage Data Connections.
Go to the folder where the
data connection to redirect is located and select the data source.
On the toolbar, click Edit.
Response: The Data Connection Settings dialog opens.
In the Data Connection Settings
dialog, go to the Data Source tab.
Click Settings....
Response: The Data Source Settings dialog opens.
Click Replace.
Browse to the new data source
and click OK.
Click OK
to close the Data Source Settings dialog.
Click Save.
The data connection has now been redirected to
use the new data source instance.
Close
the Manage Data Connections dialog.
Comment: All analyses that use this particular
data connection will now base their data on the new data source. However,
note that if you copy entire analyses from one Spotfire server to
another, then you may also need to open the analysis on the new server
and switch to a different connection.
Select File
> Open From > Library....
Browse to the folder of interest,
select the analysis and click Open.
Go to Edit
> Data Table Properties.
Select the data table and
click on the Source Information tab.
Select File
> Open From > Library....
Browse to the folder of interest,
select the analysis and click Open.
Go to Edit
> Data Connection Properties.
Select the connection that
should be replaced and click on Settings....
Click Replace.
Browse to the new data connection
and click OK.
Click OK
to close the Data Connection Settings dialog.
Click OK
to close the Data Connection Properties dialog.
Save
the analysis.
See
also:
What
is a Data Connection?
What
is a Connection Data Source?
