
AWS EKS Installation
INTRODUCTION
TIBCO Streaming Model Management Server (MMS) is a cloud native model management and scoring environment supporting deployment of machine learning pipelines, models, and data source and sinks. It is installed onto the customers cloud infrastructure via a number of steps. These instructions outline how to gather your cloud subscription information, download the necessary tools, create various AWS resources and then install the helm chart.
This guide’s intention is to help a user deploy MMS to AWS using AWS CLI commands. You should not need to be an AWS or cloud expert to follow these instructions; the goal is to provide enough context to allow even novice cloud users to complete the installation. Where possible, additional reference information is linked for additional study, if so desired. More experienced AWS users should be able to skim through the guide without taking in all the context.
Table of Contents
Overview of the installation steps
These are the installation steps that must be performed. These steps must be executed in this order.
- Run MMS Installer, Unpack Necessary Items
- Login To Aws Cli
- Create An EKS Cluster (With Autoscale)
- Add Nodegroup
- Verify Nodes And Show Nodegroup
- Add Service Account
- Assign IAM Policies
- Configure Kubectl
- Assign Taint To Windows Node
- Create MMS Namespace
- Install The Secrets
- Install The Helm Chart
- Copy Maven Artifacts (Using
Kubectl) - Monitor Installation Process (With
Tkn) - Cleaning Up Completed Taskruns And Jobs
- Update DNS
- Change The Passwords Of The Secret Required By MMS
PREREQUISITES
In order to accomplish the AWS command line installation, you need access to a number of resources and tools.
REQUIRED RESOURCES
-
The platform specific MMS installer
The MMS installer contains platform specific helm charts and maven repositories which are required in subsequent steps. These will be available as a result of running the MMS installer (step 1)
-
An active assume-role AWS account with admin access.
REQUIRED TOOLS
Installation instructions for these tools are in the prerequisites installation section.
- AWS CLI Tools (AWS CLI tool)
- Eksctl CLI Tools (Eksctl CLI tool)
- Helm CLI Tools (Helm CLI tool)
- Kubectl (Kubectl)
- Tekton CLI Tools (Tekton CLI tool)
- Docker (Docker)
AWS PREREQUISITES
- AWS (Individual) user account should have admin access OR AWS (federated / shared) user account should have Assume role access with Administrative role.
- User should be able to modify below AWS services
- EKS
- ECR
- Route53
- IAM
- VPC
- EC2
- CloudFormation
INSTALLATION OF PREREQUISITES
Download and install AWS CLI tools (AWS CLI Tools)
On macOS, install via brew:
brew install awscli
On Linux, install via curl:
    curl "https://awscli.amazonaws.com/awscli-exe-linux-x86_64.zip" -o "awscliv2.zip"
    unzip awscliv2.zip
    sudo ./aws/install
On Windows,
    Download and run the AWS CLI MSI installer for Windows (64-bit):
    C:\> msiexec.exe /i https://awscli.amazonaws.com/AWSCLIV2.msi
Download and install EKSCTL CLI tools (EKSCTL CLI Tools)
On macOS, install via brew:
brew install weaveworks/tap/eksctl
On Linux, install via curl:
    Download and extract the latest release of eksctl with the following command.
    curl --silent --location "https://github.com/weaveworks/eksctl/releases/latest/download/eksctl_$(uname -s)_amd64.tar.gz" | tar xz -C /tmp
    Move the extracted binary to /usr/local/bin.
    sudo mv /tmp/eksctl /usr/local/bin
    Test that your installation was successful with the following command.
    eksctl version
On Windows, install via choco:
    choco install -y eksctl
    Test that your installation was successful with the following command.
    eksctl version
Download and install Helm (Helm CLI tool)
On macOS, install via brew:
brew install helm
On Linux, install via curl:
    curl https://baltocdn.com/helm/signing.asc | sudo apt-key add -
    sudo apt-get install apt-transport-https --yes
    echo "deb https://baltocdn.com/helm/stable/debian/ all main" | sudo tee /etc/apt/sources.list.d/helm-stable-debian.list
    sudo apt-get update
    sudo apt-get install helm
On Windows, install via choco:
choco install kubernetes-helm
Install Kubectl (Kubectl)
On macOS, install via brew
brew install kubectl
On Linux, install via curl:
    Download the latest release with the command:
    curl -LO "https://dl.k8s.io/release/$(curl -L -s https://dl.k8s.io/release/stable.txt)/bin/linux/amd64/kubectl"
    sudo install -o root -g root -m 0755 kubectl /usr/local/bin/kubectl
    kubectl version --client
On Windows, install via choco:
    choco install kubernetes-cli
    kubectl version --client
Download and Install Tekton CLI tool (Tekton CLI tool)
On macOS, install via brew:
brew install tektoncd-cli
On Linux, install via curl:
    curl -LO https://github.com/tektoncd/cli/releases/download/v0.21.0/tkn_0.21.0_Linux_x86_64.tar.gz
    sudo tar xvzf tkn_0.21.0_Linux_x86_64.tar.gz -C /usr/local/bin/ tkn
On Windows, install via choco:
choco install tektoncd-cli --confirm
Download and Install Lens (Lens)
On macOS, install via brew:
brew install lens
On Linux, install via snap:
sudo snap install Lens-{version}.amd64.snap --dangerous --classic
On Windows,
    Download the Windowsx64.exe from https://k8slens.dev/
    Once it is downloaded, run the installer Lens-Setup-{version}.exe
    By default, Lens is installed under C:\users\{username}\AppData\Local\Programs\Lens
INSTALLATION STEPS
RUN MMS INSTALLER, UNPACK NECESSARY ITEMS
Run the installer for your platform. The installer names are:
| Platform | Name of the installer |
|---|---|
| Linux | TIB_mms_11.2.0_linux_x86_64.archive-bin |
| macOS | TIB_mms_11.2.0_macosx_x86_64.archive-bin |
| Windows | TIB_mms_11.2.0_win_x86_64.msi |
Agree to the EULA.
Set location for installation (or accept default)
On Windows you may be asked to allow the app from an unknown publisher to make changes to your device. Select “Yes”.
The MMS installer will place a Helm chart and Maven repository in the install directory. You will need both these artifacts when you deploy the product onto your cloud infrastructure. After the installation these items can be located in the following locations by default:
| Platform | Helm Chart |
|---|---|
| Linux | /opt/tibco/str/n.m/mms/kubernetes-installer-1.4.0.tgz |
| macOS | ./TIBCO Streaming/n.m/mms/kubernetes-installer-1.4.0.tgz |
| Windows | C:\TIBCO\str\n.m\mms\kubernetes-installer-1.4.0.tgz |
NOTE: Here, MMS n.m represents the release version, where n represents major release and m represents minor release.
| Platform | Maven Repository |
|---|---|
| Linux | /opt/tibco/str/n.m/distrib/tibco/mms/repo/product-repository-mavenrepo.zip |
| macOS | ./TIBCO Streaming/n.m/distrib/tibco/mms/repo/product-repository-mavenrepo.zip |
| Windows | C:\TIBCO\str*n.m*\distrib\tibco\mms\repo\product-repository-mavenrepo.zip |
LOGIN TO AWS CLI
Login to AWS CLI from command line. Below are two ways of user access to login through AWS CLI.
-
AWS (Individual) user account having Admin Access.
- Quick configuration with
aws configure(AWS CLI Configuration) - To use the CLI you need to use the user access key from your individual account.
- To get your access key and secret, log into the console using your account.
- Go to Services and choose “IAM”, On the left go to “Users” and select your user name in the panel on the right, then click on the Security credentials tab. Click on “Create access key” to generate a new key and secret.
In a terminal, run:
- Quick configuration with
aws configure --profile $PROFILE_NAME
e.g.
aws configure --profile federated
It will prompt you to enter your access key and secret, the default region and default output mode (optional). This will create or update two files in ~/.aws on Linux/Mac or C:\Users<user name>.aws on Windows. The files are called credentials and config. The following example shows sample values. Replace them with your own values as described in the following sections.
        $aws configure --profile federated
        AWS Access Key ID [None]: AKYTUYTFODNN7EXAMPLE
        AWS Secret Access Key [None]: wJalrXUtnFEMI/K7MDENG/bPxRfiCYEXAMPLEKEY
        Default region name [None]: us-west-1
        Default output format [None]: json
        aws --version
-
AWS (shared) user account having Assume role access with Administrative role.
-
Assuming you have configured the AWS CLI using above steps and your AWS administrator has provided you the assume role access.
-
Edit the ‘.aws/config’ file and add two extra lines under the new profile:
-
role_arn : To show the role you want to assume.
-
source_profile : To show the name of the profile in the credentials file.
[profile federated] role_arn = arn:aws:iam::ChangeThisWithTheSharedAccountID:role/ChangeThisWithTheRoleName source_profile=SharedAccount output = json region = us-west-2
-
The credentials file should look something like this:
[federated] aws_access_key_id = YourAccessKey aws_secret_access_key = YourSecretKey
-
To switch to your assume role user, you have to execute below command.
-
aws sts assume-role –role-arn “arn:aws:iam::$sharedaccount-id:role/example-role” –role-session-name $role-seession-name –duration-seconds 43200
eg.
        aws sts assume-role \
            --role-arn arn:aws:iam::30942343569:role/Administrator \
            --role-session-name Assume-role \
            --profile federated \
            --duration-seconds 43200
Above command outputs several pieces of information. Details inside the credentials block, you need AccessKeyId, SecretAccessKey, and SessionToken.
        {[[A
           "Credentials": {
            "AccessKeyId": "ASIAUQDZSVBWS5ETW7ET",
            "SecretAccessKey": "GrowYTjtvgrMjpdWrW0wDa5YcpOzQRLaUq2e3/Ry+6csZs4",
            "SessionToken": "IQoJb3JpZ2luX2VjEKT//////////wEaCXVzLWVhc3QtMiJHasdasdaMEUCIEEvv0raHD7CahCXa95brWPyKBR8gAu7izrMAiEAsrY9sZOizSn81OZTiU0YqCDhsV79h1MdzvBIqBudLhAqngII/f//////////ARADGgwzMDk0OTI2MjM0NjkiDOEHEsy0mtHDwfAkryryAWPZbcONL+ohB7SfdQrQKcAXukkGNOb0OSLESMLL1pIP5GyPkFGKPyCs/A5dFQnJPp96u2ZuhjDerkkqKrWp0CzJHs3+GyEmfjydnbyDsOvpLm10yT1SnvluNZUf9ZgNwkb2++YxUxBIfUeW3hKHM/aDbQ85X8wswpaQ98X0BgdgV1l68PK+qw2u9b/ndzb3T5Mvw0ic063YJt3ZASZCH593+UK/dFfXOiQc4gUmd8QYYbqbpYSjncJSWoWmO/kwzy7GiEs8DVv2f3Bk9TW4BVL6xg6eACYBCrh+eD7AGq1Fxg8KdkIzgu/I67tytr0Jy5s7MIHdqooGOp0BPwISyZc6Zlq7JO5tZQ0tJNQ1eeaQPRgfppB+/+VfYu+qHiS/BZyWsHYZZ7OS50WBNxcWsLP8FhRpmoIsyCXnfWRkOhdizb5noT7F/p+nVvQp/X7F1o7/2ys9J+kZphLfp4A535fKTqkRi9dtQawJryyHgZ4zR891tO2cVAjQo7jRCFhOC3NxgpFxJmRyFvbiEtx2HkhJZr1fSSDIIQ==",
            "Expiration": "2021-09-22T05:18:09+00:00"
            },
        "AssumedRoleUser": {
            "AssumedRoleId": "AROAJFXHVJ3THL3E5L7TE:agulhane",
            "Arn": "arn:aws:sts::30942343569:assumed-role/Administrator/testuser"
            }
        }
Now, modify the ‘.aws/credentials’ file from your home directory by creating [default] profile, aws_access_key_id, aws_secret_access_key, aws_session_token.
        [default]
        aws_access_key_id = ASIAUQDZSVBWS5ETW7ET
        aws_secret_access_key = GrowYTjtvgrMjpdWrW0wDa5YcpOzQRLaUq2e3/Ry+6csZs4
        aws_session_token = IQoJb3JpZ2luX2VjEKT//////////wEaCXVzLWVhc3QtMiJHasdasdaMEUCIEEvv0raHD7CahCXa95brWPyKBR8gAu7izrMAiEAsrY9sZOizSn81OZTiU0YqCDhsV79h1MdzvBIqBudLhAqngII/f//////////ARADGgwzMDk0OTI2MjM0NjkiDOEHEsy0mtHDwfAkryryAWPZbcONL+ohB7SfdQrQKcAXukkGNOb0OSLESMLL1pIP5GyPkFGKPyCs/A5dFQnJPp96u2ZuhjDerkkqKrWp0CzJHs3+GyEmfjydnbyDsOvpLm10yT1SnvluNZUf9ZgNwkb2++YxUxBIfUeW3hKHM/aDbQ85X8wswpaQ98X0BgdgV1l68PK+qw2u9b/ndzb3T5Mvw0ic063YJt3ZASZCH593+UK/dFfXOiQc4gUmd8QYYbqbpYSjncJSWoWmO/kwzy7GiEs8DVv2f3Bk9TW4BVL6xg6eACYBCrh+eD7AGq1Fxg8KdkIzgu/I67tytr0Jy5s7MIHdqooGOp0BPwISyZc6Zlq7JO5tZQ0tJNQ1eeaQPRgfppB+/+VfYu+qHiS/BZyWsHYZZ7OS50WBNxcWsLP8FhRpmoIsyCXnfWRkOhdizb5noT7F/p+nVvQp/X7F1o7/2ys9J+kZphLfp4A535fKTqkRi9dtQawJryyHgZ4zR891tO2cVAjQo7jRCFhOC3NxgpFxJmRyFvbiEtx2HkhJZr1fSSDIIQ==
        [federated]
        aws_access_key_id = AGGHSLISNHSHSGVMSKAD
        aws_secret_access_key = HSnDvdaSDDsdDSDtvgrMjpdWrW0wDa5YcpOzQRLaUq2e3/Ry
Check assume role identity by executing.
aws sts get-caller-identity
You should see output such as this:
        {
           "UserId": "AROAKJHJH3THL3E5L7TE:testuser",
            "Account": "30942343569",
            "Arn": "arn:aws:sts::30942343569:assumed-role/Administrator/testuser"
        }
CREATE AN EKS CLUSTER (with autoscale)
ADDITIONAL VALUES REQUIRED FOR THIS STEP
- aws_winpassword
- aws_winuser
The aws_winpassword and aws_winuser values set the admin credentials for any Windows Server containers created on the cluster and must meet Windows Server password requirements. If you don’t specify the windows-admin-password parameter, you will be prompted to provide a value.
Example: aws_winpassword=P@ssw0rd1234567!
Example: aws_winuser=azureuser
-
cluster
You can name your cluster as you wish, keeping in mind the naming conventions described in [registering the application] (#register-application). Failure to adhere to this convention will lead to an error such as this when the $CLUSTER parameter is used to name a DNS domain:
*a DNS-1123 subdomain must consist of lower case alphanumeric characters, ‘-’ or ‘.’, and must start and end with an alphanumeric character (e.g. ‘example.com’, regex used for validation is
'[a-z0-9]([-a-z0-9]*[a-z0-9])?(\.[a-z0-9]([-a-z0-9]*[a-z0-9])?)*')Assign values to aws_winpassword, aws_winuser, and cluster. Once you have those values set, issue the following command:
        eksctl create cluster \
            --name $CLUSTER \
            --region $REGION_NAME \
            --without-nodegroup \
            --with-oidc \
            --max-pods-per-node 200
This command will takes several minutes. When it completes, you will see a message such as:
    2023-01-19 17:59:25 [ℹ]  eksctl version 0.124.0
    2023-01-19 17:59:25 [ℹ]  using region us-east-2
    2023-01-19 17:59:26 [ℹ]  setting availability zones to [us-east-2b us-east-2c us-east-2a]
    2023-01-19 17:59:26 [ℹ]  subnets for us-east-2b - public:192.168.0.0/19 private:192.168.96.0/19
    2023-01-19 17:59:26 [ℹ]  subnets for us-east-2c - public:192.168.32.0/19 private:192.168.128.0/19
    2023-01-19 17:59:26 [ℹ]  subnets for us-east-2a - public:192.168.64.0/19 private:192.168.160.0/19
    2023-01-19 17:59:26 [ℹ]  using Kubernetes version 1.24
    2023-01-19 17:59:26 [ℹ]  creating EKS cluster "mmscluster" in "us-east-2" region with
    2023-01-19 17:59:26 [ℹ]  if you encounter any issues, check CloudFormation console or try 'eksctl utils describe-stacks --region=us-east-2 --cluster=mmscluster'
    2023-01-19 17:59:26 [ℹ]  Kubernetes API endpoint access will use default of {publicAccess=true, privateAccess=false} for cluster "mmscluster" in "us-east-2"
    2023-01-19 17:59:26 [ℹ]  CloudWatch logging will not be enabled for cluster "mmscluster" in "us-east-2"
    2023-01-19 17:59:26 [ℹ]  you can enable it with 'eksctl utils update-cluster-logging --enable-types={SPECIFY-YOUR-LOG-TYPES-HERE (e.g. all)} --region=us-east-2 --cluster=mmscluster'
    2023-01-19 17:59:26 [ℹ]
    2 sequential tasks: { create cluster control plane "mmscluster",
        4 sequential sub-tasks: {
            wait for control plane to become ready,
            associate IAM OIDC provider,
            2 sequential sub-tasks: {
                create IAM role for serviceaccount "kube-system/aws-node",
                create serviceaccount "kube-system/aws-node",
            },
            restart daemonset "kube-system/aws-node",
        }
    }
    2023-01-19 17:59:26 [ℹ]  building cluster stack "eksctl-mmscluster-cluster"
    2023-01-19 17:59:29 [ℹ]  deploying stack "eksctl-mmscluster-cluster"
    2023-01-19 17:59:59 [ℹ]  waiting for CloudFormation stack "eksctl-mmscluster-cluster"
    2023-01-19 18:00:34 [ℹ]  waiting for CloudFormation stack "eksctl-mmscluster-cluster"
    2023-01-19 18:01:36 [ℹ]  waiting for CloudFormation stack "eksctl-mmscluster-cluster"
    2023-01-19 18:02:37 [ℹ]  waiting for CloudFormation stack "eksctl-mmscluster-cluster"
    2023-01-19 18:03:39 [ℹ]  waiting for CloudFormation stack "eksctl-mmscluster-cluster"
    2023-01-19 18:06:35 [ℹ]  waiting for CloudFormation stack "eksctl-mmscluster-cluster"
    2023-01-19 18:07:37 [ℹ]  waiting for CloudFormation stack "eksctl-mmscluster-cluster"
    2023-01-19 18:08:40 [ℹ]  waiting for CloudFormation stack "eksctl-mmscluster-cluster"
    2023-01-19 18:09:41 [ℹ]  waiting for CloudFormation stack "eksctl-mmscluster-cluster"
    2023-01-19 18:11:53 [ℹ]  building iamserviceaccount stack "eksctl-mmscluster-addon-iamserviceaccount-kube-system-aws-node"
    2023-01-19 18:11:54 [ℹ]  deploying stack "eksctl-mmscluster-addon-iamserviceaccount-kube-system-aws-node"
    2023-01-19 18:11:54 [ℹ]  waiting for CloudFormation stack "eksctl-mmscluster-addon-iamserviceaccount-kube-system-aws-node"
    2023-01-19 18:12:27 [ℹ]  waiting for CloudFormation stack "eksctl-mmscluster-addon-iamserviceaccount-kube-system-aws-node"
    2023-01-19 18:12:27 [ℹ]  serviceaccount "kube-system/aws-node" already exists
    2023-01-19 18:12:28 [ℹ]  updated serviceaccount "kube-system/aws-node"
    2023-01-19 18:12:29 [ℹ]  daemonset "kube-system/aws-node" restarted
    2023-01-19 18:12:29 [ℹ]  waiting for the control plane to become ready
    2023-01-19 18:12:31 [✔]  saved kubeconfig as "C:\\Users\\saushind\\.kube\\config"
    2023-01-19 18:12:31 [ℹ]  no tasks
    2023-01-19 18:12:31 [✔]  all EKS cluster resources for "mmscluster" have been created
    2023-01-19 18:12:43 [ℹ]  kubectl command should work with "C:\\Users\\saushind\\.kube\\config", try 'kubectl get nodes'
    2023-01-19 18:12:43 [✔]  EKS cluster "mmscluster" in "us-east-2" region is ready
ADD NODEGROUP
Create Linux Nodegroup
    eksctl create nodegroup \
        --name $CLUSTER-nodes \
        --nodes-min 2 \
        --nodes-max 4 \
        --node-volume-size 200 \
        --cluster $CLUSTER \
        --node-type t3.2xlarge \
        --region $REGION_NAME
Create Windows Nodegroup (optional: only required for Statistica scoring service)
    eksctl utils install-vpc-controllers \
        --cluster $CLUSTER \
        --region $REGION_NAME \
        --approve
    eksctl create nodegroup \
        --name $CLUSTER"-windows-nodes \
        --region $REGION \
        --cluster $CLUSTER \
        --node-ami-family WindowsServer2019FullContainer \
        --node-type t3.2xlarge \
        --nodes-min 2 \
        --nodes-max 4 \
        --node-volume-size 100 \
        --managed=false
This command will takes several minutes. When it completes, you will see a message such as:
    2023-01-19 18:13:36 [ℹ]  will use version 1.24 for new nodegroup(s) based on control plane version
    2023-01-19 18:13:52 [ℹ]  nodegroup "mmscluster-nodes" will use "" [AmazonLinux2/1.24]
    2023-01-19 18:13:59 [ℹ]  1 nodegroup (mmscluster-nodes) was included (based on the include/exclude rules)
    2023-01-19 18:13:59 [ℹ]  will create a CloudFormation stack for each of 1 managed nodegroups in cluster "mmscluster"
    2023-01-19 18:14:00 [ℹ]
    2 sequential tasks: { fix cluster compatibility, 1 task: { 1 task: { create managed nodegroup "mmscluster-nodes" } }
    }
    2023-01-19 18:14:00 [ℹ]  checking cluster stack for missing resources
    2023-01-19 18:14:02 [ℹ]  cluster stack has all required resources
    2023-01-19 18:14:04 [ℹ]  building managed nodegroup stack "eksctl-mmscluster-nodegroup-mmscluster-nodes"
    2023-01-19 18:14:04 [ℹ]  deploying stack "eksctl-mmscluster-nodegroup-mmscluster-nodes"
    2023-01-19 18:14:05 [ℹ]  waiting for CloudFormation stack "eksctl-mmscluster-nodegroup-mmscluster-nodes"
    2023-01-19 18:14:36 [ℹ]  waiting for CloudFormation stack "eksctl-mmscluster-nodegroup-mmscluster-nodes"
    2023-01-19 18:15:22 [ℹ]  waiting for CloudFormation stack "eksctl-mmscluster-nodegroup-mmscluster-nodes"
    2023-01-19 18:16:32 [ℹ]  waiting for CloudFormation stack "eksctl-mmscluster-nodegroup-mmscluster-nodes"
    2023-01-19 18:17:07 [ℹ]  waiting for CloudFormation stack "eksctl-mmscluster-nodegroup-mmscluster-nodes"
    2023-01-19 18:17:07 [ℹ]  no tasks
    2023-01-19 18:17:07 [✔]  created 0 nodegroup(s) in cluster "mmscluster"
    2023-01-19 18:17:09 [ℹ]  nodegroup "mmscluster-nodes" has 2 node(s)
    2023-01-19 18:17:09 [ℹ]  node "ip-192-168-58-112.us-east-2.compute.internal" is ready
    2023-01-19 18:17:09 [ℹ]  node "ip-192-168-69-14.us-east-2.compute.internal" is ready
    2023-01-19 18:17:09 [ℹ]  waiting for at least 2 node(s) to become ready in "mmscluster-nodes"
    2023-01-19 18:17:09 [ℹ]  nodegroup "mmscluster-nodes" has 2 node(s)
    2023-01-19 18:17:09 [ℹ]  node "ip-192-168-58-112.us-east-2.compute.internal" is ready
    2023-01-19 18:17:09 [ℹ]  node "ip-192-168-69-14.us-east-2.compute.internal" is ready
    2023-01-19 18:17:09 [✔]  created 1 managed nodegroup(s) in cluster "mmscluster"
    2023-01-19 18:17:11 [ℹ]  checking security group configuration for all nodegroups
    2023-01-19 18:17:11 [ℹ]  all nodegroups have up-to-date cloudformation templates
VERIFY NODEGROUP
Execute these commands to get the nodegroup:
    eksctl get nodegroup \
        --cluster $CLUSTER \
        --region $REGION_NAME
Output from above command should be akin to this:
    2021-09-23 16:10:24 [ℹ]  eksctl version 0.62.0
    2021-09-23 16:10:24 [ℹ]  using region us-west-1
    CLUSTER         NODEGROUP               STATUS  CREATED                 MIN SIZE        MAX SIZE        DESIRED CAPACITY        INSTANCE TYPE   IMAGE ID        ASG NAME                                                        TYPE
    mmscluster     mmscluster-nodes       ACTIVE  2023-01-19T12:44:28Z    2               4               2                       t3.2xlarge      AL2_x86_64      eks-mmscluster-nodes-10c2e507-90ef-5c74-290d-6ffcab6ec50f      managed
Attach service account for EBS volumes
Amazon Elastic Block Store (Amazon EBS) Container Storage Interface (CSI) driver allows Amazon Elastic Kubernetes Service (Amazon EKS) clusters to manage the lifecycle of Amazon EBS volumes for persistent volumes. In order to use this driver we need to create a service account and attach a role to it. This is done using below command.
    eksctl create iamserviceaccount \
        --name ebs-csi-controller-sa \
        --namespace kube-system \
        --cluster $CLUSTER \
        --region $REGION_NAME \
        --attach-policy-arn arn:aws:iam::aws:policy/service-role/AmazonEBSCSIDriverPolicy \
        --approve \
        --role-only \
        --role-name AmazonEKS_EBS_CSI_DriverRole
Once a role is created add a driver to the cluster
    eksctl create addon \
        --name aws-ebs-csi-driver \
        --cluster $CLUSTER \
        --service-account-role-arn arn:aws:iam::111122223333:role/AmazonEKS_EBS_CSI_DriverRole \
        --force \
        --region $REGION_NAME
ASSIGN IAM POLICIES
VALUES TO BE EXTRACTED FROM THIS STEP
- rolename
ADDITIONAL VALUES REQUIRED FOR THIS STEP
Issue the following command to extract rolename:
aws iam list-roles | jq -r '.Roles| .[] | .RoleName' | grep eksctl-$CLUSTER-nodegroup
You should see output such as this (Two rolenames will be created if windows node is added else only one rolename for linux):
    eksctl-mmscluster-nodegroup-devm-NodeInstanceRole-1GV0F2NT37D6U
    eksctl-mmscluster-nodegroup-devm-NodeInstanceRole-9OXZ2QBHWDQ
Assign below two IAM Policies to eksctl rolename from the output
Rolename 1:
        aws iam attach-role-policy \
            --policy-arn arn:aws:iam::aws:policy/AmazonEC2ContainerRegistryFullAccess \
            --role-name eksctl-mmscluster-nodegroup-devm-NodeInstanceRole-1GV0F2NT37D6U
        aws iam attach-role-policy \
            --policy-arn arn:aws:iam::aws:policy/AmazonElasticContainerRegistryPublicFullAccess \
            --role-name eksctl-mmscluster-nodegroup-devm-NodeInstanceRole-1GV0F2NT37D6U
Rolename 2:
        aws iam attach-role-policy --policy-arn arn:aws:iam::aws:policy/AmazonEC2ContainerRegistryFullAccess \
            --role-name eksctl-mmscluster-nodegroup-devm-NodeInstanceRole-1GV0F2NT37D6U
        aws iam attach-role-policy --policy-arn arn:aws:iam::aws:policy/AmazonElasticContainerRegistryPublicFullAccess \
            --role-name eksctl-mmscluster-nodegroup-devm-NodeInstanceRole-9OXZ2QBHWDQ
CONFIGURE KUBECTL
        aws eks --region $REGION_NAME \
            update-kubeconfig \
            --name $CLUSTER
Verify
kubectl get node
This command runs quickly and should produce output such as:
    NAME                                           STATUS   ROLES    AGE   VERSION
    ip-192-168-1-209.us-west-1.compute.internal    Ready    <none>   40s   v1.24.2-eks-55daa9d
    ip-192-168-8-66.us-west-1.compute.internal     Ready    <none>   10m   v1.24.2-eks-55daa9d
    ip-192-168-82-134.us-west-1.compute.internal   Ready    <none>   10m   v1.24.2-eks-55daa9d
    ip-192-168-86-29.us-west-1.compute.internal    Ready    <none>   40s   v1.24.2-eks-55daa9d
ASSIGN TAINT TO WINDOWS NODE
VALUES TO BE EXTRACTED FROM THIS STEP
- windowsnode
ADDITIONAL VALUES REQUIRED FOR THIS STEP
This step is only required when windows nodes are added. Issue the following command to extract windows node name:
kubectl get nodes -o wide|grep Windows | awk '{print $1}'
You should see output such as this:
    ip-192-168-1-209.us-west-1.compute.internal
    ip-192-168-86-29.us-west-1.compute.internal
Assign Tain to below two windows node:
    kubectl taint nodes ip-192-168-1-209.us-west-1.compute.internal  os=windows:NoSchedule
    kubectl taint nodes ip-192-168-86-29.us-west-1.compute.internal  os=windows:NoSchedule
CREATE MMS NAMESPACE
kubectl create namespace mms
You should see a message:
“namespace/mms created”
INSTALL THE SECRETS
ADDITIONAL VALUES REQUIRED FOR THIS STEP
- ELASTIC_PW
- GIT_SERVER_PW
- NEXUS_SERVER_PW
- PROMETHEUS_PW
- SCORING_ADMIN_PW
- ARTIFACT_MANAGEMENT_PW
- Oauth2 server details
In order to avoid clear text passwords, Kubernetes provides a Secrets facility. So prior to installation, Kubernetes Secrets have to be created to contain the passwords required by MMS.
Assign each of the names above to some value, then issue the following commands to set up the secrets.
NOTE: without secrets installed, the [helm installation] (#install-helm-chart) step will be in a wait mode and eventually time out.
Clear out any old secrets that may exist with this series of delete secret commands:
    kubectl delete secret git-server --namespace mms
    kubectl delete secret nexus-server --namespace mms
    kubectl delete secret prometheus-server --namespace mms
    kubectl delete secret scoring-admin --namespace mms
    kubectl delete secret oauth2 --namespace mms
    kubectl delete secret artifact-management --namespace mms
    kubectl delete secret artifact-management-env --namespace mms
Create new secrets:
    kubectl create secret generic elasticsearch-es-elastic-user \
        --from-literal=elastic=$ELASTIC_PW \
        --namespace mms --dry-run=client --output=yaml 2>/dev/null > secret.yaml
    kubectl apply --filename secret.yaml
    kubectl create secret generic git-server \
        --from-literal=streaming-web=$GIT_SERVER_PW \
        --namespace mms
    kubectl create secret generic nexus-server \
        --from-literal=admin=$NEXUS_SERVER_PW \
        --namespace mms
    kubectl create secret generic prometheus-server \
        --from-literal=admin=$PROMETHEUS_PW \
        --namespace mms
    kubectl create secret generic scoring-admin \
        --from-literal=admin=$SCORING_ADMIN_PW \
        --namespace mms
    kubectl create secret generic artifact-management \
        --from-literal=admin=$ARTIFACT_MANAGEMENT_PW \
        --namespace mms
    kubectl create secret generic artifact-management-env --namespace mms
NOTE: The Elasticsearch password is limited to alphanumeric, “.”, “_”, “~”, and “-” characters, i.e. it must conform to this regular expression (‘^[a-zA-Z0-9._~-]+$’)).
NOTE: The prometheus-server secret is only used if you are not using OAuth2 authentication; if using OAuth2, this secret need not be created.
It should consist of name value pairs where each name is a user name, and each value is the corresponding password. These are used to secure
the Prometheus ingress with basic authentication.
The oauth2 secret depends on the type of authentication server used.
For Azure, the authentication server administrator should supply the Azure tenant id ($AZURE_TENANT_ID), app id ($AZURE_APP_ID) and client secret ($AZURE_CLIENT_SECRET). The secret is created with:
    kubectl create secret generic oauth2 \
        --from-literal=TENANT_ID=$AZURE_TENANT_ID \
        --from-literal=CLIENT_ID=$AZURE_APP_ID \
        --from-literal=CLIENT_SECRET=$AZURE_CLIENT_SECRET \
        --namespace mms
For Cognito, the authentication server administrator should supply the Cognito region ($COGNITO_REGION), pool id ($COGNITO_POOL_ID), client id ($COGNITO_CLIENT_ID), client secret ($COGNITO_CLIENT_SECRET) and the domain ($COGNITO_DOMAIN). The secret is created with:
    kubectl create secret generic oauth2 \
        --from-literal=REGION=$COGNITO_REGION \
        --from-literal=POOL_ID=$COGNITO_POOL_ID \
        --from-literal=CLIENT_ID=$COGNITO_CLIENT_ID \
        --from-literal=CLIENT_SECRET=$COGNITO_CLIENT_SECRET \
        --from-literal=DOMAIN=$COGNITO_DOMAIN \
        --namespace mms
For Okta, the authentication server administrator should supply the Okta client id ($OKTA_CLIENT_ID), client secret ($OKTA_CLIENT_SECRET), the domain ($OKTA_DOMAIN), and the authorization server id ($OKTA_AUTH_SERVER). The secret is created with:
    kubectl create secret generic oauth2 \
        --from-literal=CLIENT_ID=$OKTA_CLIENT_ID \
        --from-literal=CLIENT_SECRET=$OKTA_CLIENT_SECRET \
        --from-literal=DOMAIN=$OKTA_DOMAIN \
        --from-literal=AUTH_SERVER_ID=$OKTA_AUTH_SERVER \
        --namespace mms
INSTALL THE HELM CHART
ADDITIONAL VALUES REQUIRED FOR THIS STEP
-
hostedzone
A real-world value would be a domain that you bought from a domain name registrar. Eg: xyzcloud.com
-
mms_home
The directory where MMS is installed on your machine. For instance, on windows, c:\TIBCO\str*n.m*
-
name
This is NOT the display name of the application registered at the beginning of this process. Rather, this is usually set to be the same as $CLUSTER
-
domain
Assign to this the combination of existing parameters: $CLUSTER.$DOMAIN
-
subdomain
This is an optional variable where you can specify the desired subdomain name. If it's not defined, the default value will be ‘mms’.
-
network_exposure
Assign to this the string “ingress” (without the quotes)
-
oauth2_server_type
One of azure, cognito, or okta to use an external Oauth2 authentication server.
Leave blank if no authentication server is required. -
EKS_ROLE_ARN
ExternalDNS makes Kubernetes resources discoverable via public DNS servers. We need some access added to the cluster.
IAMpolicy The following IAM Policy document allows ExternalDNS to update Route53 Resource Record Sets and Hosted Zones. You'll want to create this Policy in IAM first. In our example, we'll call the policy AllowExternalDNSUpdates (but you can call it whatever you prefer). If you prefer, you may fine-tune the policy to permit updates only to explicit Hosted Zone ID
      {
          "Version": "2012-10-17",
          "Statement": [
              {
              "Effect": "Allow",
              "Action": [
                  "route53:ChangeResourceRecordSets"
              ],
              "Resource": [
                  "arn:aws:route53:::hostedzone/*"
              ]
              },
              {
              "Effect": "Allow",
              "Action": [
                  "route53:ListHostedZones",
                  "route53:ListResourceRecordSets"
              ],
              "Resource": [
                  "*"
              ]
              }
          ]
      }
If you are using the AWS CLI, you can run the following to install the above policy (saved as policy.json). This can be use in subsequent steps to allow ExternalDNS to access Route53 zones.
      aws iam create-policy --policy-name "AllowExternalDNSUpdates" --policy-document file://policy.json
      # example: arn:aws:iam::XXXXXXXXXXXX:policy/AllowExternalDNSUpdates
      export POLICY_ARN=$(aws iam list-policies \
          --query 'Policies[?PolicyName==`AllowExternalDNSUpdates`].Arn' --output text)
Create a role with above policy attached to it
      $ACCOUNT_ID=$(aws sts get-caller-identity \
                          --query "Account" --output text)
      $OIDC_PROVIDER=$(aws eks describe-cluster --name $EKS_CLUSTER_NAME \
                          --query "cluster.identity.oidc.issuer" --output text | sed -e 's|^https://||')

      $cat <<-EOF > trust.json
          {
              "Version": "2012-10-17",
              "Statement": [
              {
                  "Effect": "Allow",
                  "Principal": {
                      "Federated": "arn:aws:iam::$ACCOUNT_ID:oidc-provider/$OIDC_PROVIDER"
                  },
                  "Action": "sts:AssumeRoleWithWebIdentity",
                  "Condition": {
                      "StringEquals": {
                          "$OIDC_PROVIDER:sub": "system:serviceaccount:mms:external-dns",
                          "$OIDC_PROVIDER:aud": "sts.amazonaws.com"
                      }
                  }
              }
              ]
          }
          EOF

          IRSA_ROLE="external-dns-irsa-role"
          aws iam create-role --role-name $IRSA_ROLE --assume-role-policy-document file://trust.json
          aws iam attach-role-policy --role-name $IRSA_ROLE --policy-arn $POLICY_ARN
Enable Oauth2
This file provides instructions for enabling OAuth2 during the installation process. For enabling OAuth2, refer to the Cognito documentation at the following link: Cognito
This section of the documentation provides the callback URL for Microsoft Entra ID. The callback URL is used for OAuth2 authentication.
Example: “fqdn”: “mms-server.lkvaks.streamingaz.tibcocloud.com/oauth2/callback”
Assign each of the names above to an appropriate value, then issue the following command:
    helm upgrade \
        --install mms $MMS_HOME/mms/kubernetes-installer-1.4.0.tgz \
        --atomic \
        --set cloud=eks \
	    --set eks.externalDNS=aws \
	    --set externalDNS.aws.eksRoleArn=$EKS_ROLE_ARN \
        --set eks.containerRegistry=$SHARED_ACCOUNT_ID.dkr.ecr.$REGION_NAME.amazonaws.com \
        --set eks.containerRegistryPrefix=$CONTAINER_PREFIX \
        --set eks.region=$REGION_NAME \
        --namespace mms \
        --set eks.networkExposure=$NETWORK_EXPOSURE \
        --set eks.ingressDomain=$DOMAIN \
        --set eks.ingressSubdomain=$subdomain \
        --set eks.oauth2=$OUTH2_SERVER_TYPE \
        --timeout 10m0s \
        --set eks.awsTokenId=IQoJb3JpZ2luX2VjEKT//////////wEaCXVzLWVhc3QtMiJHasdasdaMEUCIEEvv0raHD7CahCXa95brWPyKBR8gAu7izrMAiEAsrY9sZOizSn81OZTiU0YqCDhsV79h1MdzvBIqBudLhAqngII/f//////////ARADGgwzMDk0OTI2MjM0NjkiDOEHEsy0mtHDwfAkryryAWPZbcONL+ohB7SfdQrQKcAXukkGNOb0OSLESMLL1pIP5GyPkFGKPyCs/A5dFQnJPp96u2ZuhjDerkkqKrWp0CzJHs3+GyEmfjydnbyDsOvpLm10yT1SnvluNZUf9ZgNwkb2++YxUxBIfUeW3hKHM/aDbQ85X8wswpaQ98X0BgdgV1l68PK+qw2u9b/ndzb3T5Mvw0ic063YJt3ZASZCH593+UK/dFfXOiQc4gUmd8QYYbqbpYSjncJSWoWmO/kwzy7GiEs8DVv2f3Bk9TW4BVL6xg6eACYBCrh+eD7AGq1Fxg8KdkIzgu/I67tytr0Jy5s7MIHdqooGOp0BPwISyZc6Zlq7JO5tZQ0tJNQ1eeaQPRgfppB+/+VfYu+qHiS/BZyWsHYZZ7OS50WBNxcWsLP8FhRpmoIsyCXnfWRkOhdizb5noT7F/p+nVvQp/X7F1o7/2ys9J+kZphLfp4A535fKTqkRi9dtQawJryyHgZ4zR891tO2cVAjQo7jRCFhOC3NxgpFxJmRyFvbiEtx2HkhJZr1fSSDIIQ== \
        --set eks.awsSecretAccessKey=GrowYTjtvgrMjpdWrW0wDa5YcpOzQRLaUq2e3/Ry+6csZs4 \
        --set eks.awsAccessKeyID=ASIAUQDZSVBWS5ETW7ET
The above command will produce a series of warnings, user can ignore those warnings. Then a series of lines of output, including a thank you, and ending with a note for how to track the progress of the installation pipeline. See [monitoring the installation] (#monitor-installation) for more details.
NOTE: If users do not wish to use oauth authentication, remove the –set eks.oauth2=$OUTH2_SERVER_TYPE command while execution.
COPY MAVEN ARTIFACTS (using kubectl)
On Windows, you must change directory to the maven artifacts subdirectory of your MMS installation to run this command.
cd c:\TIBCO\str\n.m\distrib\tibco\mms\repo
On Mac/Linux you can give a fully qualified path name to the mavenrepo.zip file.
    kubectl cp \
        product-repository-mavenrepo.zip \
        mavenrepo-0:/tmp/ \
        --namespace mms
This command takes some time to run, and gives no output.
MONITOR INSTALLATION PROCESS (with tkn)
tkn pipelinerun logs bootstrap --follow --namespace mms
This pipelinerun command takes SOME time to complete and gives copious amounts of output. When this command completes, you can then ask to see the task list:
tkn taskrun list --namespace mms
Cleaning Up Completed TaskRuns and Jobs
After running the pipeline, you may want to clean up completed TaskRuns and jobs to free up resources and keep your namespace tidy. Here are some commands to help you do that:
Delete all completed TaskRuns in the namespace
tkn tr list --namespace mms -o name | sed 's#taskrun.tekton.dev/##' | xargs -I {} tkn tr delete {} --namespace mms -f
Delete all completed jobs in the namespace
kubectl delete jobs --all --namespace mms
If you want to keep some tasks or jobs for debugging purposes, you can use the following command to keep specific TaskRuns & jobs:
List all TaskRuns in the specified namespace, filter out the one to keep, and delete the rest
tkn tr list --namespace mms -o name | sed 's#taskrun.tekton.dev/##' | grep -v -E "$taskrun1_to_keep|taskrun2_to_keep" | xargs -I {} tkn tr delete {} --namespace mms -f
Replace ‘job1-to-keep’ and ‘job2-to-keep’ with the names of the jobs you want to keep
kubectl get jobs --namespace mms -o jsonpath='{.items[*].metadata.name}' | tr ' ' '\n' | grep -v -E '^(job1-to-keep|job2-to-keep)$' | xargs -I {} kubectl delete job --namespace mms {}
UPDATE DNS
This step is only required if automatic updating of DNS is not enabled with the eks.externalDNS installation option.
VALUES TO BE EXTRACTED FROM THIS STEP
- ingress_lb_ip
- hosted_zone_id
ADDITIONAL VALUES REQUIRED FOR THIS STEP
- Issue the following command to extract ingress_lb_ip:
kubectl get service/nginx-ingress-ingress-nginx-controller -o jsonpath='{.status.loadBalancer.ingress[0].hostname}' --namespace mms
You should see output such as this:
a754a322be44b4d68b27eeewwwe103ce583-731052421.us-west-1.elb.amazonaws.com%
Assign the output of the above command to ingress_lb_ip (without % sign) Example: set ingress_lb_ip=a754a322be44b4d68b27eeewwwe103ce583-731052421.us-west-1.elb.amazonaws.com
- Issue the following command to extract hosted_zone_id:
        aws route53 list-hosted-zones-by-name | jq --arg name "${Domain}." -r '.HostedZones | .[] | select(.Name=="\($name)") | .Id'
>
You should see output such as this:
/hostedzone/Z0415WEWR1C17NACM6JCG
Assign the output of the above command to hosted_zone_id Example: set hosted_zone_id=/hostedzone/Z0415WEWR1C17NACM6JCG
Once ingress_lb_ip and hosted_zone_id parameter is set, modify the record-sets by issuing the following command:
    aws route53 change-resource-record-sets \
            --hosted-zone-id ${hosted_zone_id}  \
            --change-batch '{ "Comment": "Updating a record",
                              "Changes": [ {
                                    "Action": "UPSERT",
                                    "ResourceRecordSet": {
                                        "Name": "mms.'"$domain"'",
                                        "Type": "CNAME",
                                        "TTL": 300,
                                        "ResourceRecords": [ {
                                            "Value": "'"$ingress_lb_ip"'" } ] } } ] }'
You should see output such as this:
        {
           "ChangeInfo": {
            "Id": "/change/C08087523NGIM5VVMOYKU",
            "Status": "PENDING",
            "SubmittedAt": "2021-10-13T13:50:20.565000+00:00",
            "Comment": "Updating a record"
            }
        }
- If Hosted zone is not present then first you have to create it.
        aws route53 create-hosted-zone \
            --name ${domain} \
            --caller-reference $RANDOM \
            --hosted-zone-config \
            Comment="Creating HostedZone"
Issue the following command to extract hosted_zone_id:
aws route53 list-hosted-zones-by-name | jq --arg name "${Domain}." -r '.HostedZones | .[] | select(.Name=="\($name)") | .Id'
You should see output such as this:
/hostedzone/Z0415WEWR1C17NACM6JCG
Assign the output of the above command to hosted_zone_id Example: set hosted_zone_id=/hostedzone/Z0415WEWR1C17NACM6JCG
Once your ingress_lb_ip and hosted_zone_id parameter is set, modeify the record-sets by issuing the following command:
        aws route53 change-resource-record-sets \
            --hosted-zone-id ${hosted_zone_id}  \
             --change-batch '{ "Comment": "Creating a record",
                              "Changes": [ {
                                    "Action": "CREATE",
                                    "ResourceRecordSet": {
                                        "Name": "mms.'"$domain"'",
                                        "Type": "CNAME",
                                        "TTL": 300,
                                        "ResourceRecords": [ {
                                            "Value": "'"$ingress_lb_ip"'" } ] } } ] }'
You should see output such as this:
        {
           "ChangeInfo": {
            "Id": "/change/C04087802ADO55OR1VNCN",
            "Status": "PENDING",
            "SubmittedAt": "2021-10-12T07:53:21.930000+00:00",
            "Comment": "Creating a record"
            }
        }
If API v1 integration is required to Team Studio, the mms-1 host should also be added to DNS in a similar way:
        aws route53 change-resource-record-sets \
            --hosted-zone-id ${hosted_zone_id}  \
             --change-batch '{ "Comment": "Creating a record",
                              "Changes": [ {
                                    "Action": "CREATE",
                                    "ResourceRecordSet": {
                                        "Name": "mms-1.'"$domain"'",
                                        "Type": "CNAME",
                                        "TTL": 300,
                                        "ResourceRecords": [ {
                                            "Value": "'"$ingress_lb_ip"'" } ] } } ] }'
CLUSTER MANAGEMENT
This action will stop your control plane and agent nodes altogether, allowing you to save on all the compute costs, while maintaining all your objects and cluster state stored for when you start it again. You can then pick up right where you left off after a weekend, or only run your cluster while you run your batch jobs.
Limitations
When using the cluster start/stop feature, the following restrictions apply:
- This feature is only supported for Virtual Machine Scale Sets backed clusters.
- The cluster state of a stopped AKS cluster is preserved for up to 12 months. If your cluster is stopped for more than 12 months, the cluster state cannot be recovered.
- You can only start or delete a stopped AKS cluster. To perform any operation like scale or upgrade, start your cluster first.
- The customer provisioned PrivateEndpoints linked to private cluster need to be deleted and recreated again when you start a stopped AKS cluster.
Stop Cluster
You can use the eksctl command to stop a running EKS cluster's nodes. The following example stops a cluster:
eksctl scale nodegroup --cluster $CLUSTER --name $CLUSTER-nodes --nodes 0 --nodes-max 1 --nodes-min 0
Start Cluster
You can use the eksctl command to start a stopped AKS cluster's nodes and control plane. The cluster is
restarted with the previous control plane state and number of agent nodes.
The following example start a cluster:
eksctl scale nodegroup --cluster $CLUSTER --name $CLUSTER-nodes --nodes 2 --nodes-max 4 --nodes-min 2
NOTE: If the provisioning State shows Starting that means your cluster hasn't fully started yet. It takes around 6-7 minutes for the cluster to completely provision into the Succeeded status which ensure that your cluster is up and running.
CLEANUP
Use of the AWS services costs money. If you are not using your services any longer, you should clean up and remove them. For these delete commands to succeed, you must use the name that you created in your creation steps. To check what names you have, you have two options:
a) log in via command line and issue the following command:
aws eks list-clusters --region $REGION_NAME
The output from this option should look like this:
    {
        "clusters": [
            "devmms",
            "sbxmms"
        ]
    }
b) log into the portal and choose Kubernetes services:
Once you have your name set correctly, detach the assigned policies:
VALUES TO BE EXTRACTED FROM THIS STEP
- rolename
Issue the following command to extract rolename:
aws iam list-roles | jq -r '.Roles| .[] | .RoleName' | grep eksctl-$CLUSTER-nodegroup
You should see output such as this (Two rolenames will be displayed if windows node is added else only one rolename for linux):
    eksctl-devmms-nodegroup-devm-NodeInstanceRole-1GV0F2NT37D6U
    eksctl-devmms-nodegroup-devm-NodeInstanceRole-9OXZ2QBHWDQ
Detach below two IAM Policies from eksctl rolename
    Rolename 1:
        aws iam detach-role-policy \
            --policy-arn arn:aws:iam::aws:policy/AmazonEC2ContainerRegistryFullAccess \
            --role-name eksctl-devmms-nodegroup-devm-NodeInstanceRole-1GV0F2NT37D6U
aws iam detach-role-policy \
            --policy-arn arn:aws:iam::aws:policy/AmazonElasticContainerRegistryPublicFullAccess \
            --role-name eksctl-devmms-nodegroup-devm-NodeInstanceRole-1GV0F2NT37D6U
Rolename 2:
        aws iam detach-role-policy --policy-arn arn:aws:iam::aws:policy/AmazonEC2ContainerRegistryFullAccess \
            --role-name eksctl-devmms-nodegroup-devm-NodeInstanceRole-1GV0F2NT37D6U
aws iam detach-role-policy --policy-arn arn:aws:iam::aws:policy/AmazonElasticContainerRegistryPublicFullAccess \
            --role-name eksctl-devmms-nodegroup-devm-NodeInstanceRole-9OXZ2QBHWDQ
To delete the Cluster resources issue the following commands:
    eksctl delete cluster \
        --name $CLUSTER  \
        --region $REGION_NAME \
        --wait \
        --force
VARIABLE REFERENCE
| Variable | Source of Value | Description |
|---|---|---|
| ELASTIC_CONTAINER_REGISTRY | AWS Elastic Container Registry (ECR) which provides cloud-based container image building for platforms including Linux, Windows. Use Elastic container registries with your existing container development and deployment pipelines, or use Elastic Container Registry Tasks to build container images in AWS. | This is a user selected meaningful name which the user creates as explained below while creating ECR. |
| CLUSTER | Elastic Kubernetes Service (EKS) is a managed Kubernetes service that lets users quickly deploy, scale and manage clusters. It reduces the complexity for deployment and core management tasks, including coordinating upgrades. The EKS control plane is managed by the AWS platform, and user only pay for the EKS nodes that run your applications. EKS is built on top of the open-source AWS Kubernetes Service Engine. | The user gives the cluster name while creating EKS. |
| NAMESPACE | Kubernetes resources, such as pods and Deployments, are logically grouped into a namespace. These groupings provide a way to logically divide an EKS cluster and restrict access to create, view, or manage resources. Users can create namespaces to separate business groups | At the time of namespace creation an user can give any value to the namespace eg development, production etc |
| LOCATION | When the user create an organization, user can choose the region your organization is hosted in AWS. You may choose your organization's region based on locality and network latency, or because you have sovereignty requirements for data centers. Your organization's default location is based on the closest Microsoft Azure region available. | Eg: eastus |
| AWS_WINPASSWORD and AWS_WINUSER | These values set the admin credentials for any Windows Server containers created on the cluster and must meet Windows Server password requirements. If you don't specify the windows-admin-password parameter, you will be prompted to provide a value. | Eg: azure_winpassword=P@ssw0rd1234567! and azure_winuser=azureuser |
| HOSTEDZONE | HostedZone is the name of the DNS which was used to create a hostedzones in Rout53. The Hostedzone name can be any value that is not already configured on the AWS Rout53. | A real-world value would be a domain that you bought from a domain name registrar. Eg: xyzcloud.com |
| DOMAIN | Domain is the public DNS exposed to access MMS service. | The DNS registered in Hostedzone for the respective EKS. Eg: devmms.tibcocloud.com |
| NETWORK_EXPOSURE | It is the type in which user requires the k8s service to be exposed. | MMS is currently using “ingress”. Eg: ingress, loadBalancer, etc. |
| REGION_NAME | It is the AWS region in which EKS service is deployed | i.e us-east-2 |
| CONTAINER_PREFIX | This prefix helps in discrimination installer and product images | i.e artifact-management |
TROUBLESHOOTING REFERENCE
[Helm install failure on pre-install] (#install-helm-chart)
    Error: an error occurred while uninstalling the release. original install error:
    failed pre-install: timed out waiting for the condition: timed out waiting for the condition
This error indicates that a pre-install tasks failed - this part of the install process installs the operators, so chances are something failed in there. The command kubectl logs job/operators –namespace mms should give some more info.
One possible cause of this error is a problem [installing secrets] (#install-secrets).
[Helm install failure] (#install-helm-chart)
    Error: rendered manifests contain a resource that already exists.  Unable to continue with install:
    Namespace "production" in namespace "" exists and cannot be imported into the current release:
    invalid ownership metadata; label validation error: missing key "app.kubernetes.io/managed-by": must be set to
    "Helm"; annotation validation error: missing key "meta.helm.sh/release-name": must be set to "mms";
    annotation validation error: missing key "meta.helm.sh.release-namespace": must be set to "production"
This error is caused by using a namespace value of “production”.
The MMS product reserves these namespaces and thus those names are not available for use:
- development
- testing
- production
- mms
[Copy Maven Artifacts] (#copy-maven-artifacts)
On Windows, without the change directory, you can expect this error:
error: mms-repo-11.2.0-mavenrepo.zip doesn't exist in local filesystem
On Windows an attempt to give fully qualified path name to the mavenrep.zip on the C drive can expect this error:
error: one of src or dest must be a local file specification
[Resolving DNS records] (#dns-zone)
The following steps help you investigate why DNS resolution is failing for a DNS record in a hosted zone in AWS Route53.
- Confirm that the DNS records have been configured correctly in AWS Route53. Review the DNS records in the AWS portal, checking that the Hostedzone name, record name, and record type are correct.
- Be sure to specify the correct name servers for your Hosted zone, as shown in the AWS portal.
- Check that the DNS name is correct (you have to specify the fully qualified name, including the zone name) and the record type is correct.
- Confirm that the DNS domain name has been correctly delegated to the AWS Route53 name servers. More information on delegation can be found in the AWS documentation available [here] (https://docs.aws.amazon.com/Route53/latest/DeveloperGuide/route-53-concepts.html).
HELM CHART REFERENCE
Below command give detailed helm chart parameters. In case if any default parameter needs to be over written pass it in helm install command i.e –set eks.oauth2=google
$ helm show values kubernetes-installer-1.4.0.tgz
Maintenance Tasks
Maintenance tasks are essential activities that need to be performed periodically to ensure the smooth operation and security of your deployed application. In this section, we focus on changing passwords for critical services.
Change-secret-passwords
One of the common maintenance tasks is changing the passwords for critical services like git-server and nexus-server. Follow the steps below to change the passwords for these services after the initial deployment:
Change git-server Password After Deployment
If you need to change the password for the git-server after the deployment of the application, follow these steps:
- Execute the following command to access the
git-servercontainer:
kubectl exec -it --namespace mms git-server-pod-name -c git-server -- sh -c "clear; (bash || ash || sh)"
- List the users to find the username for which you want to change the password:
gitea admin user list
This command will display a list of users similar to the following:
ID   Username      Email                   IsActive IsAdmin 2FA
1    streaming-web streaming-web@tibco.com true     true    false
- Change the password for the desired user:
gitea admin user change-password --username username --password new-password
After changing the password, exit the shell by typing exit
- Delete the existing
git-serversecret:
kubectl delete secret git-server --namespace mms
- Create a new
git-serversecret with the updated password:
kubectl create secret generic git-server --from-literal=streaming-web=NewP@ssw0rd --namespace mms
This will update the password for the git-server user and create a new secret with the updated password.
Finally, restart the git-server deployment to apply the changes:
kubectl rollout restart deployment git-server --namespace mms
Additionally, restart the artifact-management deployment to ensure the changes work correctly for the MMS application:
kubectl rollout restart deployment artifact-management --namespace mms
Change Nexus-Server Password After Deployment
If you need to change the password for the nexus-server after the deployment of the application, follow these steps:
- Port-forward to the
artifact-repository:
kubectl port-forward --namespace mms svc/artifact-repository 8081:80
-
Open your browser and go to
http://localhost:8081. Log in with your current credentials. -
Go to
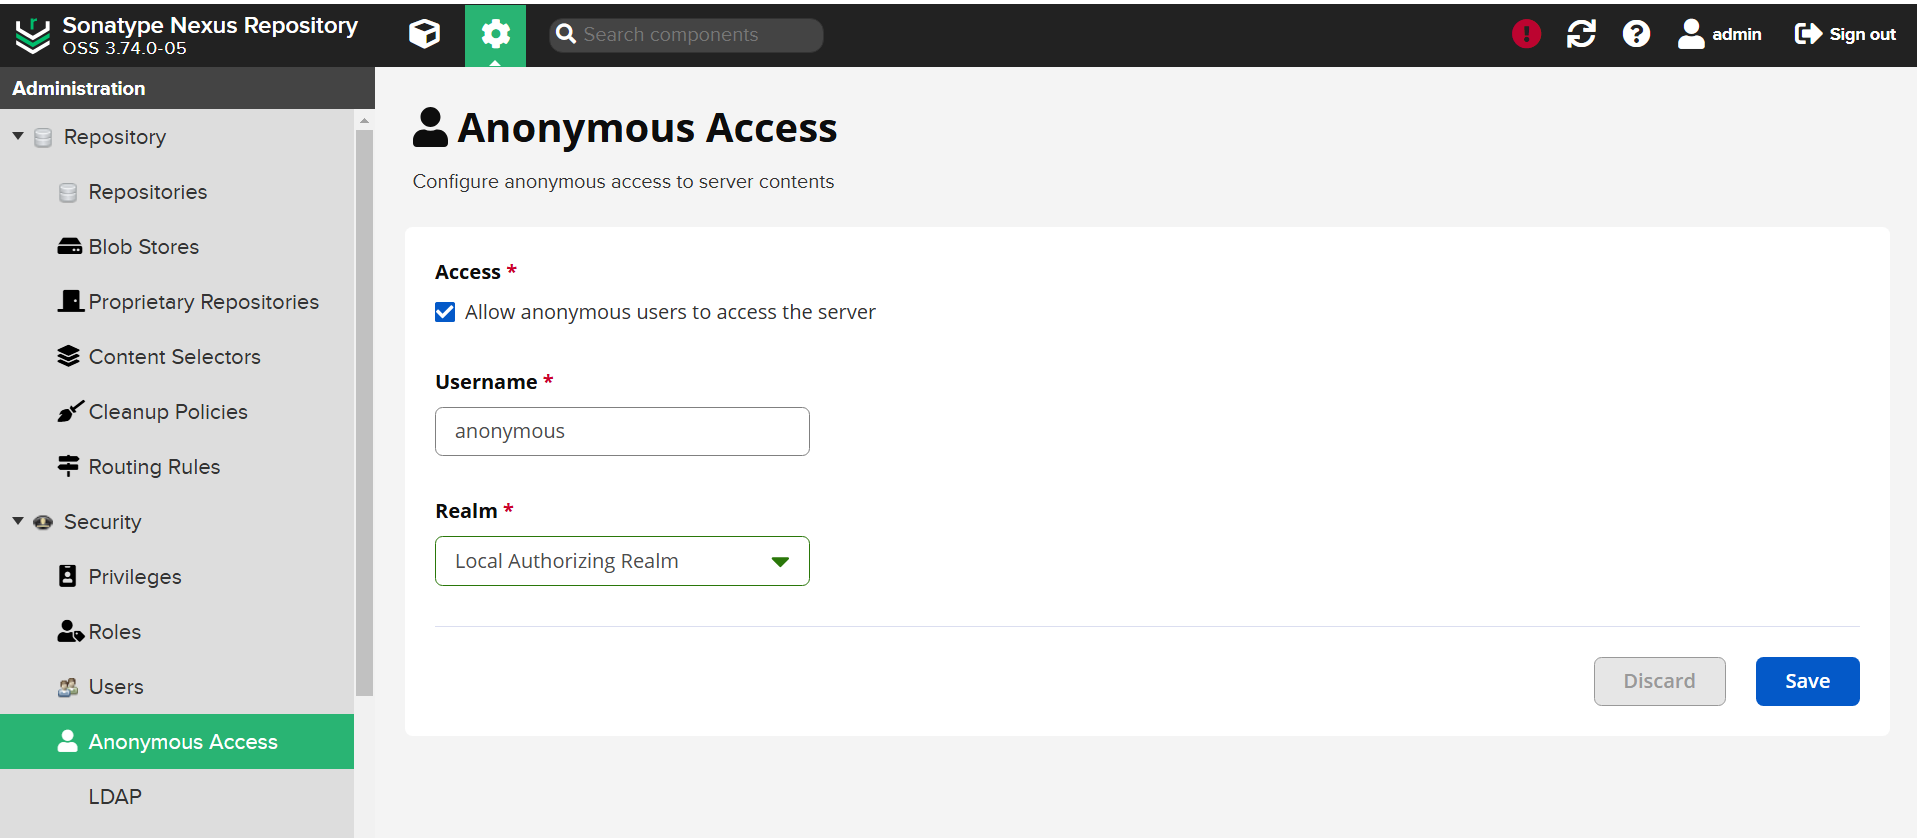
Server Administration and Configuration settings. -
Under the
Securitydropdown, selectAnonymous Accessand uncheckAllow anonymous users to access the serverand save the settings:
-
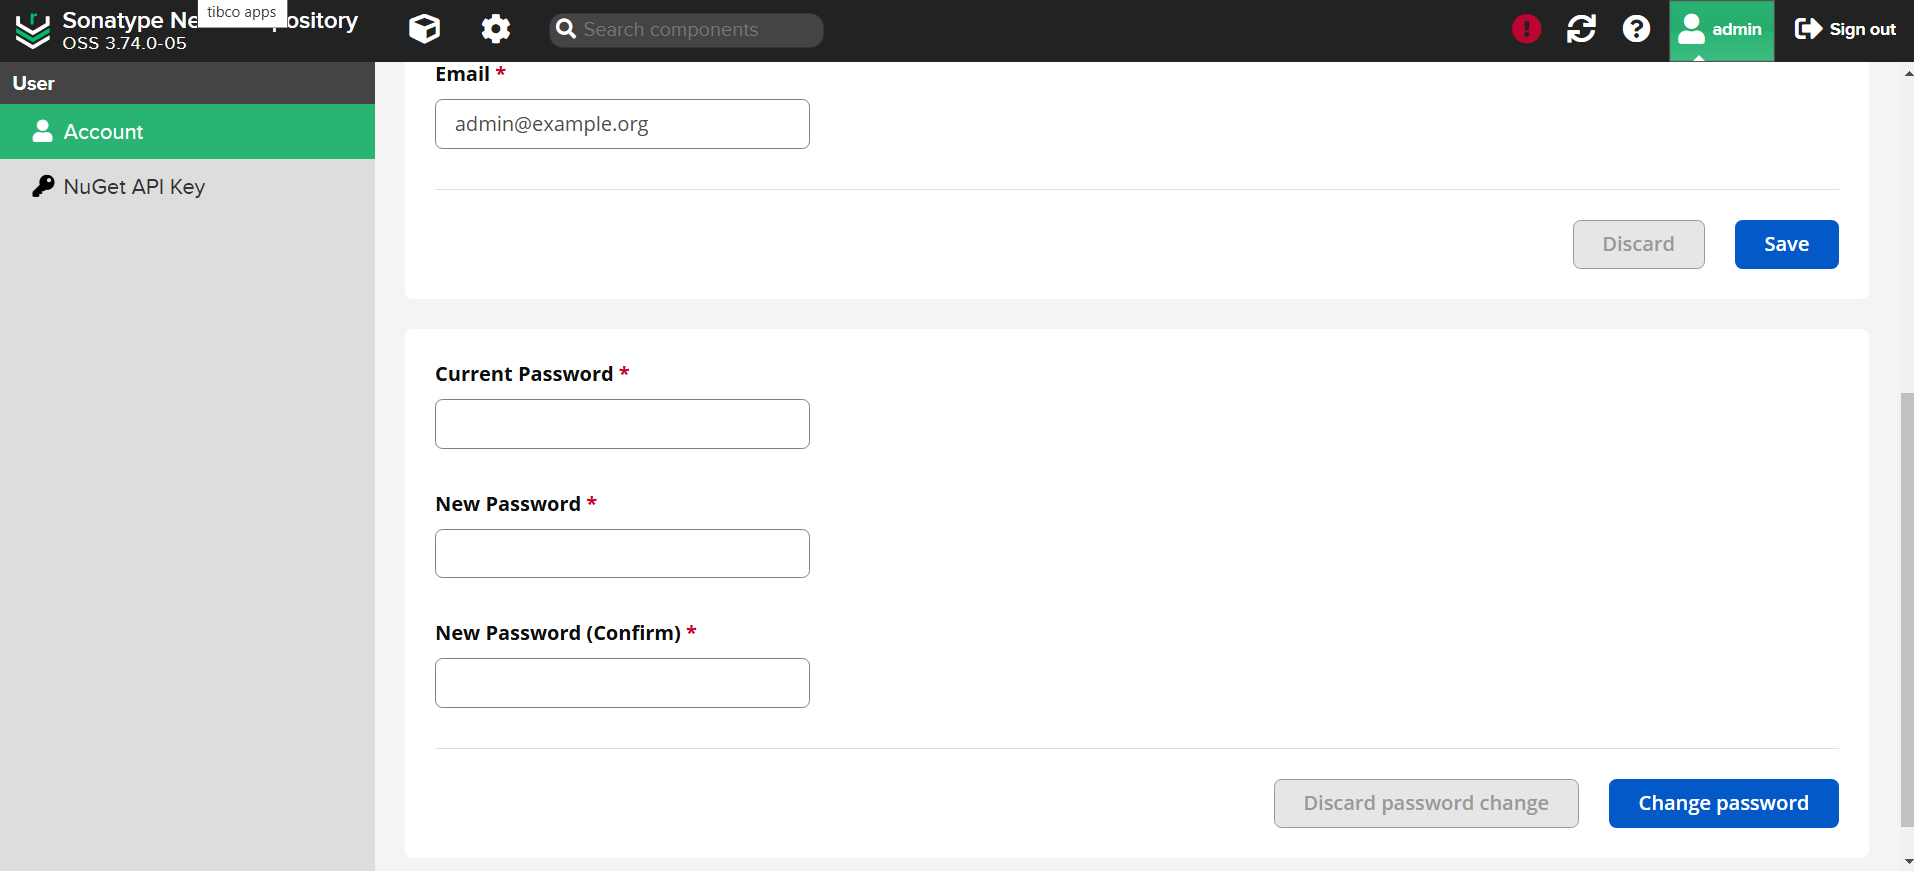
Change the password for the admin user:
- Select the
Admintab on the top right corner. - Go to
Accountand change the password.
- Select the
-
Re-enable
Anonymous Access(check and save). -
Stop the port-forwarding by pressing
Ctrl+Cin the terminal where the port-forward command is running. -
Update the
nexus-serversecret with the new password:
kubectl delete secret nexus-server --namespace mms
kubectl create secret generic nexus-server --from-literal=streaming-web=NewP@ssw0rd --namespace mms
Finally, restart the artifact-repository deployment to apply the changes:
kubectl rollout restart deployment artifact-repository --namespace mms
Additionally, restart the artifact-management deployment to ensure the changes work correctly for the MMS application:
kubectl rollout restart deployment artifact-management --namespace mms