Contents
StreamBase Studio supports two methods for taking a schema from one location and reusing it in another location:
- Copy Schema From Dialog
-
Use the Copy Schema From dialog to insert an existing schema into the Fields grid of an Edit Schema tab in the Properties view, or in an Edit Named Schema or Edit Table Schema dialog. Copy Schema From is also available in the Properties view for arcs when you select the Declare option.
- Export Schema to Clipboard Command
-
Use the command to copy an existing schema to the system clipboard in JSON (default) or XML format. This feature, discussed below, is designed to help you work with external applications that need to interact with StreamBase or LiveView streams, or to paste a schema definition into a StreamBase JUnit test file, if required.
Copying schemas allows you to use an existing schema to avoid manually entering its fields. The copied fields are only copies, and are inserted as a private schema into the currently selected field grid. If the original schema changes, the copy does not change. For most purposes, It is a best practice to use named schemas if your goal is to implement reusable schemas.
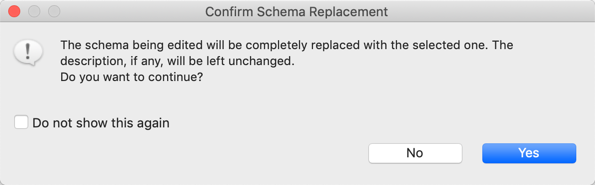
When you copy a schema into a field grid, it overwrites any schema already defined in that grid. If the currently open field grid already contains fields, a dialog prompts you to confirm that you want to replace those fields. Click to overwrite the current fields in the current schema grid.
 |
Note
Pay special attention when using this feature on a field grid with a capture field or a parent schema already in place: the Copy Schema From feature cannot be used to append to an existing schema. To work around this, copy in the incoming schema, then edit it to add the capture field or parent schema.
A field grid is a place to define schemas for a component. Field grids appear in multiple Properties views or dialogs throughout the Studio, including:
-
Input Streams.
-
Arcs and Output Streams, when using the Declare output schema option.
-
Decision Table operator.
-
Query Tables.
-
Query operator connected to a JDBC table, when using the option Explicitly declare fields below.
-
Many TIBCO Streaming adapters, such as the CSV File Reader adapter.
-
Edit Named Schema dialog.
-
Edit Table Schema dialog.
-
Feed Simulation Editor.
All the locations in this list have a ![]() Copy Schema from Existing Component button on the right side of their
field grid's toolbar:
Copy Schema from Existing Component button on the right side of their
field grid's toolbar: ![]()
Click the ![]() Copy Schema from Existing Component button to locate a schema source and copy its field definitions into the currently open field grid.
Copy Schema from Existing Component button to locate a schema source and copy its field definitions into the currently open field grid.
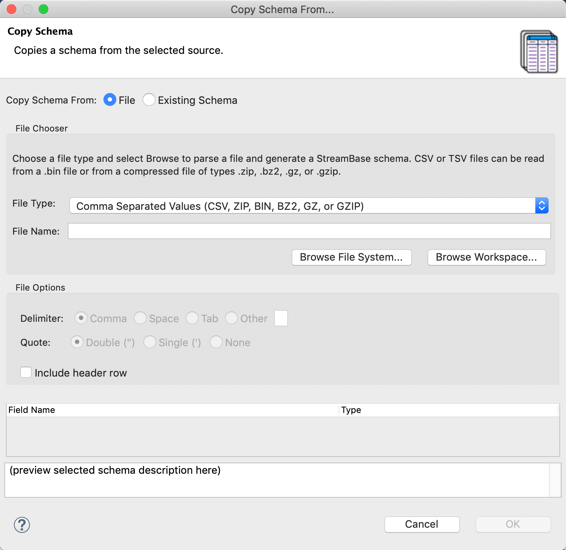 |
At the top of the Copy Schema dialog, select between the File or Existing Schema options, which are described in the next sections:
| Copy Schema from File |
| Copy Schema from Existing Schema |
You can copy schemas from a selection of supported file types, browsing either the current Studio workspace or the local file system to locate the file of interest.
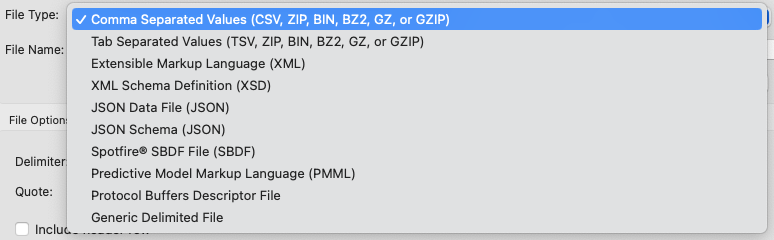 |
The File Type selection determines the file name extensions to search for. When you select either Browse Workspace or Browse File System, the list of files shown is restricted to the files with the following extensions in the current workspace:
| File Type | Extensions |
|---|---|
| CSV | .csv, .zip, .bin, .bz2, .gz, .gzip |
| TSV | .tsv, .zip, .bin, .bz2, .gz, .gzip |
| XML | .xml |
| XML Schema Definition | .xsd |
| JSON | .json |
| JSON Schema | .json |
| Spotfire® SBDF | .sbdf |
| PMML | .pmml |
| Protocol Buffers Descriptor File | .desc |
| Generic Delimited | Any |
If you have a file to import with one of these file types but a different file name extension, temporarily rename the file for use with the Copy Export From dialog.
- CSV or TSV
-
Select a CSV or TSV file from the workspace or file system. For these two file types, Studio can also import from an archive file that contains exactly one CSV or TSV file. Supported archive formats are Zip, BZip2, and Gnu Zip.
CSV files must use the comma field separators, TSV files must use tab separators, and both files must use the double quote character when quotes are required.
When a valid file is selected, Studio shows a preview of the file's schema. If Studio finds an error in the file, it reports an error and does not continue.
The only File Option for these two file types is whether to read the file's header row to determine the field names of the incoming schema. Without the header row, Studio generates
field_nplaceholder names.When you click , Studio attempts to infer data types from the first few column values; you can change the inferred data type later. Auto-detection of int, double, boolean, string, timestamp, and tuples are supported, but not lists or functions.
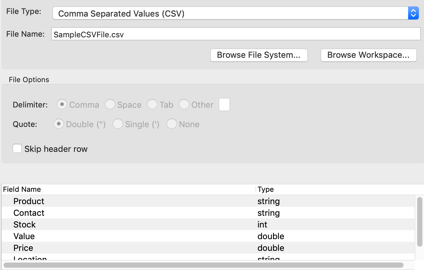
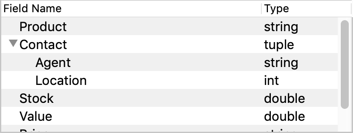
Studio supports hierarchical CSV and TSV files with subfields imported as the StreamBase tuple data type. For this to work, the file must have a header row, which you cannot skip. Edit the header row to specify all tuple fields and their sub-fields using dot notation. For example, the following CSV file specifies seven fields, of which the Contact field has Agent and Location sub-fields:
Product,Contact.Agent,Contact.Location,Stock,Value,Price,Category
"HEPA Air Purifier","Carlos Soltero,Northwest",515,30.94,21.78,Appliances
This imports with the following schema:
- Generic Delimited File
-
Select this option if you have a CSV or TSV file with non-standard features. With this file type, the File Options section becomes active, allowing you to specify Space or another character as field delimiter, or to specify single quotes when quotes are required, or no quote symbol.
- XML
-
For XML files, Studio attempts to infer data types from attribute values for elements.
- XSD
-
For XSD files, Studio uses the XSD data type definitions to generate the schema. XSD files are used by several TIBCO products to save schema structure information. Use this feature to migrate schemas in XSD format from other TIBCO products.
- JSON
-
Use the Copy Schema dialog with JSON files that specify a consistent schema, including those with nested arrays. The following excerpt shows a portion of a retail product record in JSON format:
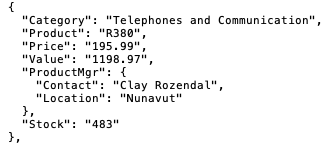
The file that contains this excerpt is imported with the tuple field correctly recognized, but with the fields out of order compared to the JSON original:
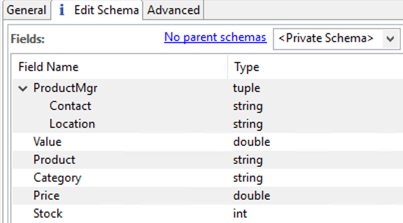
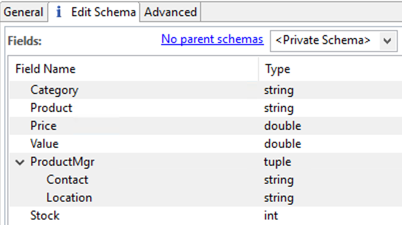
If field order is important to your application, after import, you can use the up and down arrows in the field grid to rearrange the fields in the JSON file's order:
Instead of a JSON data file, you can select a JSON schema file. This has the benefit of the schema being translated exactly as written, with fields in order and having correct data types, which may not be possible with a JSON data file. Additionally, this can be used if there is no data present yet and only the schema is known.
- Spotfire SBDF
-
Spotfire Binary Data File (SBDF) format files are written by one or more TIBCO products. The following table shows the mapping between SBDF and StreamBase data types:
Spotfire SBDF Data Type StreamBase® Data Type INT int STRING string DOUBLE double DATETIME timestamp BOOL boolean LONG long DATE timestamp BINARY blob DECIMAL int FLOAT double TIME timestamp TIMESPAN timestamp - PMML
-
Predictive Model Markup Language files are an XML-based predictive model interchange format.
- Protocol Buffers Descriptor File
-
Protocol Buffers (protobuf) are a binary data interchange format created by Google. Since protobuf data is binary, the protobuf schema file (ending in
.proto) must be compiled first using the protoc command.For example, if you have a protobuf file called company.proto with the following contents:
syntax = "proto3";

message Company {
    string Category = 1;
    string Product = 2;
    double Price = 3;
    double Value = 4;
    ProductManager ProductMgr = 5;
    int32 Stock = 6;
}

message ProductManager {
    string Contact = 1;
    string Location = 2;
}
You can run the Shell command
protoc --descriptor_set_out=company.desc
                                                 company.proto
to compile company.proto into company.desc, which can be imported by this wizard. After import, you will see the schema converted to StreamBase tuple format.
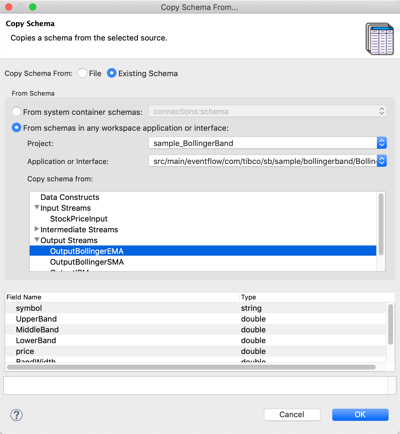
You can copy an Existing Schema from any component in a EventFlow module or interface file in the current workspace. Select the Studio project of interest, then the module or interface file to inspect. You can also copy from a named schema defined in the selected file's Definitions tab.
 |
If you select a schema defined with one or more parent schemas, Studio shows the resolved schema and displays a warning message to make sure the resolved schema is your intention.
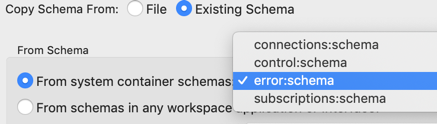
- From system container schemas
-
Copy from the schema of one of the streams emitted by the global system container that runs in every EventFlow engine process. For example, you can copy the schema of the standard StreamBase error tuple by selecting error:schema from the dropdown list after selecting the From system container schemas radio button.
- From schemas in any workspace application or interface
-
Copy from the schema of any component in any EventFlow application or interface in any project in the current Studio workspace. You can copy the schemas from the named schemas defined in the current module, or from any intermediate stream in any module.
-
Select the project of interest from the Project dropdown control.
-
Select an application or interface based on the project selected in the previous step.
-
Select a schema from one of the components listed in the Copy schema from the section. Click the chevron to expand component sections to see the available schemas of each type.
-
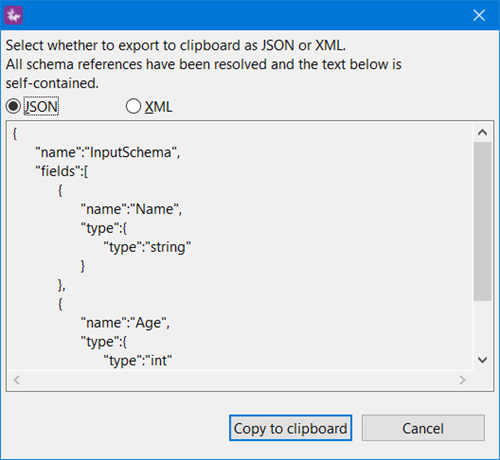
Exporting schemas to the system clipboard allows you to copy and paste an existing schema to avoid manually entering its fields. This feature is designed to help you work with external applications that need to interact with StreamBase or LiveView streams, or to paste a schema definition into a StreamBase JUnit test file, if required.
Note
To re-use a schema within the processing logic of an EventFlow fragment, use the named schema feature instead of copying the schema.
-
Select a component on the EventFlow Editor canvas that has a self-contained schema, then right-click and select Export Schema to Clipboard. You can also select the name of a named schema in the Definitions tab of the editor.
The Export Schema to Clipboard menu item does not appear if you select a component that lacks an easily discernible single schema. To isolate a schema at a certain point in the stream, select an arc entering or exiting a component. (Arcs always have self-contained schemas.) For example, select the arc exiting a Decision Table component to copy its schema.
The Export Schema to Clipboard menu item does not appear if you select two or more components that have different schemas. You can select two or more components that have the same schema, such as a Union operator and arcs on either side of it. The rule is that the schema of all selected components must be the same before Export Schema to Clipboard appears in the context menu.
-
Select JSON (default) or XML format.
-
Click .
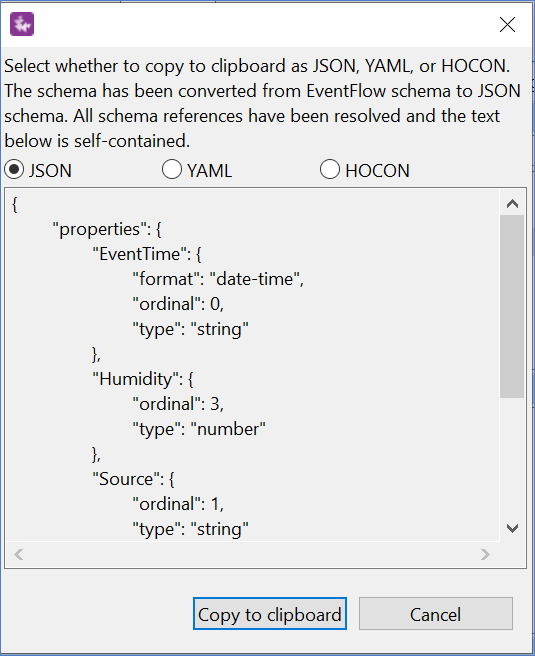
The Copy as JSON Schema to Clipboard feature allows you to convert an EventFlow schema to JSON schema format, along with the ability to copy this schema to the clipboard as JSON, YAML, or HOCON. To copy an EventFlow schema to JSON:
-
Select a component on the EventFlow Editor canvas that has a self-contained schema. Right-click and select Copy as JSON Schema to Clipboard. You can also select the name of a Named Schema in the Definitions tab of the editor. This feature is applicable for Named Schemas and not for Table Schemas. The Copy as JSON Schema to Clipboard menu item does not appear if you select two or more components.
-
Select JSON (default), YAML, or HOCON format.
-
Select .