Contents
![]() The Map operator accepts a single input stream and creates a single output stream with an arbitrary number of output tuple
fields, based on the evaluation of expressions. This one-to-one expression execution is the core idea. Often a Map operator
is used to add to, modify, or drop fields from a data stream.
The Map operator accepts a single input stream and creates a single output stream with an arbitrary number of output tuple
fields, based on the evaluation of expressions. This one-to-one expression execution is the core idea. Often a Map operator
is used to add to, modify, or drop fields from a data stream.
In the single output stream produced by Map, there can be one or more output fields, named anything, with any computable value. The set of output fields may include all, some, or none of the input fields, as well as any desired additional fields. The Map operator is not order sensitive.
For example, an input stream might contain an item's price in U.S. dollars (USD). You can uses a Map operator to convert the prices to Euros (EUR) by applying the current conversion rate. The output stream could contain both the USD input price and the EUR equivalent (by passing the input field and adding the output field), or it could just contain the EUR price.
Tip
As you build the transformations applied by a Map operator, use the Streams tab of the Properties view to compare the schemas of incoming and outgoing tuples. You can switch back and forth between the Input and Output sub-tabs after each change you add to the Map operator, for instant visual feedback on the outgoing tuple.
"Map" is a common name for this kind of operation in programming languages; that is, the idea of applying an expression to a sequence to create a new sequence. The concept and name originates with Lisp, and exists in many languages including Perl and Python. In languages where the concept does not exist by this name "Map" (for example, in C or Java), the concept generally does not exist at all.
This topic describes the actions you can take on each tab of the Map operator's Properties view.
Name: Use this required field to specify or change the name of this instance of this component. The name must be unique within the current EventFlow module. The name can contain alphanumeric characters, underscores, and escaped special characters. Special characters can be escaped as described in Identifier Naming Rules. The first character must be alphabetic or an underscore.
Enable Error Output Port: Select this checkbox to add an Error Port to this component. In the EventFlow canvas, the Error Port shows as a red output port, always the last port for the component. See Using Error Ports to learn about Error Ports.
Description: Optionally, enter text to briefly describe the purpose and function of the component. In the EventFlow Editor canvas, you can see the description by pressing Ctrl while the component's tooltip is displayed.
Use the Output Settings tab to assemble the fields of this Map operator's outgoing tuple, field by field. You specify output fields from the following sets of fields in the following order:
-
Fields in this operator's input tuple
-
Additional fields specified, calculated, or extracted with expressions
The two sets of fields are represented as field grids in the Output Settings tab.
The Input Field grid in the Output Settings tab is collapsed by default, as illustrated here:
 |
If your goal is to specify all fields in the input tuple, or none, you do not need to open the grid. Use the All or None radio buttons in the grid's label row. To specify a deviation from the grid's All or None setting, open the grid and enter a field row as described below. A grid with a deviation is marked in the label row as a change when the grid is closed again.
The changes you specify in this tab are applied in top-down order in two ways: top to bottom in the order of grids in the tab, and top to bottom in the order of field expressions in each grid. That is, the output tuple is assembled in the following way:
-
Fields in the input tuple, if any are specified.
-
Any additions, subtractions, or reorderings for input tuple fields.
-
Any additions, subtractions, or reorderings for any of the above fields as determined by expressions in the Additional Expressions grid.
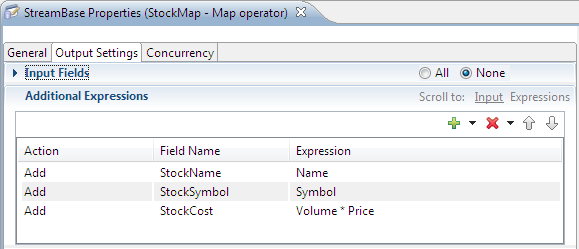
The example above of an edited Additional Expressions grid shows that the None radio button is selected for the Input Fields grid, which means no fields from the input stream are to be copied to the output stream. The only fields in the preceding example of an output stream are the three fields added with Add actions in the Additional Expressions grid.
Field grid have the following editing features:
-
Field grids are resizable. Grab the bottom row of any grid with the mouse to resize it within the Output Settings tab to show fewer rows or to show more rows without scroll bars.
-
The Input Field grid has Prefix and Suffix controls, which are blank by default for the Map operator. You can use either field to specify a leading or trailing string to add to the names of all fields emitted from that field grid.
-
The Input Field grid has All and None controls. Use the All control to start with the full set of input stream fields, and then narrow down the list with individual Action lines. Use the None control to start with nothing, then build up the fields you want to include or modify with individual Action lines.
-
To add an Action line, use the green plus button, then select the type of action in the Action drop-down list.
-
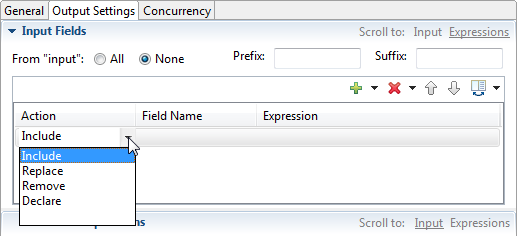
Available actions for the Input Field grid are: , , , and , as shown below.
-
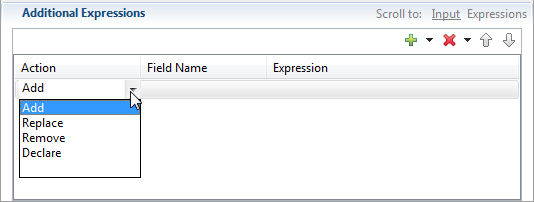
Available actions for the Additional Expressions grid are: , , , and , as shown below.
-
Use the action to define a local variable that has the narrow scope of this grid in this operator. The variable can then be used to save typing in expressions later in the same grid. Use the Field Name column to name your variable. Use the Expression column to specify an expression that defines your variable, which can be a simple expression or, in an aggregate context, an aggregate expression.
Expressions for declared variables are evaluated as necessary to compute the output fields that use the variable. In many cases expressions are evaluated once per output tuple. However, expressions for unused declared variables are not evaluated, and in some cases an expression for a declared variable may be evaluated multiple times.
-
To add an entry to a Field Name cell for the Input Field grid, use Ctrl+Space to invoke autocompletion. This shows a list of the available field names.
-
You can enter an asterisk in the Field Name field to specify all fields. When you use an asterisk in a Field Name cell, you must also have one in the Expression cell for that row.
-
For rows in the Input Field grid:
-
When using the or actions, you must specify a field name, but you cannot enter an expression.
-
When using the Replace action, you must specify a field name, and you must enter an expression in the Expression cell for that row.
-
-
In the Additional Expressions grid, you must enter an expression in the Expression cell for every action row.
-
When referencing fields in expression cells, use
input.orinput1.as a qualifier for field names in the input tuple to distinguish same-named fields.
The following table describes the buttons at the top of the Field grids.
| Button | Name | Description | |
|---|---|---|---|
|
|
Add | Adds a row below the currently selected row, or to the end of the grid if none are selected. Click the arrow on the button's
right to specify whether the row should be added above or below the currently selected row.
When you add a row, the newly created row is highlighted. To start entering information, click in the cell you want to edit. (Some cells are not user-editable.) |
|
|
|
Remove | Removes the currently selected row. Click the arrow on the button's right to remove all rows or all currently selected rows. | |
|
|
Move Up, Move Down | moves the selected row up by one row. moves the selected row down by one row. | |
|
|
Select Fields | Click to open the Select Fields to Replace dialog that shows available fields for the Input Fields grids. Click the down arrow to select the alternate actions Include, Replace, or Remove. Each action opens a dialog that lets you select a set of fields to quickly add to the grid with the specified action pre-selected for each field. |
Use the Concurrency tab to specify parallel regions for this instance of this component, or multiplicity options, or both. The Concurrency tab settings are described in Concurrency Options, and dispatch styles are described in Dispatch Styles.
Caution
Concurrency settings are not suitable for every application, and using these settings requires a thorough analysis of your application. For details, see Execution Order and Concurrency, which includes important guidelines for using the concurrency options.