Contents
- Introduction
- Associating a Query Operator with a Query Table
- Properties: General Tab
- Properties: Query Tab
- Properties: Operation Tab
- Properties: Fallback Tab
- Properties: Output Tab
- Properties: Group Options Tab
- The metadata Qualifier
- Null Values
- Properties View Tabs Only for JDBC Tables
- Related Topics
Each Query operator connects to and interacts with one StreamBase data construct per Query operator. You can connect a Query operator to a JDBC Table or Query Table. The Query operator shows different tabs in its Properties view, and shows different controls on each tab, depending on which data construct it is connected to and the options selected.
Note
This page describes the Query operator only when used with Query Table data constructs.
See Using the Query Operator with JDBC Tables to learn about the Query operator when associated with JDBC Tables.
![]() The Query operator allows you to perform Read,
Write, Update, and Delete operations on data in a Query Table.
The Query operator allows you to perform Read,
Write, Update, and Delete operations on data in a Query Table.
A Query operator connected to a Query Table has two sources of incoming data: the stream of tuples on its input port, and rows of data retrieved from the associated table. You can use the Query operator with a Query Table to accomplish many tasks, including:
-
Send a query to the associated Query Table and emit the retrieved rows on the operator's output stream.
-
Send a query to the associated Query Table, perform calculations on the aggregate retrieved rows, and emit the results of the calculation on the output stream.
-
Add, replace, or supplement rows in the Query Table with fields from the input stream.
-
Store incoming tuple data in the Query Table.
-
Form the output stream by adding data to the input stream or replace data from the associated Query Table into the input stream.
-
For Read operations that return more than one row, group the output by field.
On the EventFlow canvas, the Query operator has an overlay icon to show whether it represents a Read, Write, or Delete operation. The arcs that connect it to Query Tables also have distinctive styles that indicate the type of operation.
| Query operation type | Overlay image | Icon with overlay | Arc style | Arc image |
|---|---|---|---|---|
| Read | open book | dashed line |  |
|
| Write | pencil | dotted line |  |
|
| Delete | eraser | dash-dot |  |
These overlays do not appear for Query operators associated with a JDBC Table. This form of Query operators are described on a separate page.
To associate a Query operator with a Query Table in StreamBase Studio, create an arc connecting the gray bottom port of the operator and the gray port on the top of the Query Table. Each Query operator can be associated with only one Query Table, but a single Query Table can be associated with multiple Query operators.
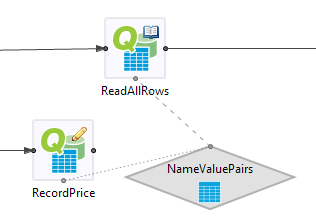
Before you can define Query operator properties, the associated data construct must be defined and configured. For the steps to set up a Query Table, see Query Table.
You can also associate a Query operator with a Module Reference that contains a shared Query Table. In this case, the Module Reference has the gray data connection port at the top of its icon.
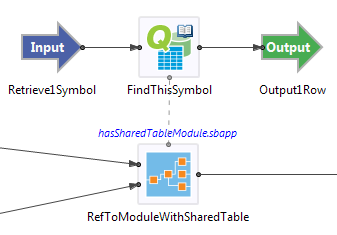
The remainder of this topic describes the actions you can take on each tab of the Query operator's Properties View.
Name: Use this required field to specify or change the name of this instance of this component. The name must be unique within the current EventFlow module. The name can contain alphanumeric characters, underscores, and escaped special characters. Special characters can be escaped as described in Identifier Naming Rules. The first character must be alphabetic or an underscore.
Enable Error Output Port: Select this checkbox to add an Error Port to this component. In the EventFlow canvas, the Error Port shows as a red output port, always the last port for the component. See Using Error Ports to learn about Error Ports.
Description: Optionally, enter text to briefly describe the purpose and function of the component. In the EventFlow Editor canvas, you can see the description by pressing Ctrl while the component's tooltip is displayed.
This section discusses the Query tab for Query operators associated with Query Tables.
Note
Click this link to see the Query tab for Query operators associated with JDBC Tables.
Use the Query tab to specify whether this query is a read, write, or delete operation. This tab shows a different set of fields and controls, depending on the settings of the Operation and Where fields. In addition, the settings on this tab determine the contents of the Operation Settings and Output tabs.
Specifies whether this query performs a Read, Write, or Delete operation on the associated table. For Write operations, you must also specify Insert or Update on the Operation tab.
This is the primary determination of query type. Your choice in this field and on the Operation tab determine what is shown in the other fields in this tab and in other tabs in the Properties view.
| Query Tab | Operation Tab |
|---|---|
| Read | |
|
Write |
Insert |
| Update | |
| Delete |
The Scope control is only shown when the Operation control is set to Read or Delete.
When shown, the Scope control is enabled if the associated Query Table's Type control is set to In transactional memory on its Table Settings tab, or the associated Query Table is a placeholder Query Table. The Scope control is dimmed and unavailable when the associated Query Table's Type control is set to On heap or On disk.
An associated placeholder Query Table must reference a concrete Query Table with Type of In transactional memory, or typecheck will fail when the EventFlow fragment is deployed.
When Scope control is enabled, you can specify the Scope setting of Cluster-wide to have the Read or Delete operation apply to all instances of this Query Table in the cluster, or to the Local node only.

Query Tables In transactional memory have this query Operation behavior.
| Operation | Behavior |
|---|---|
| Delete | Local node scope will only delete the row if it is on the local node. Cluster-wide scope will delete the row on any node in the cluster. |
| Read | Local node scope performs the query on the local node only. The rows must exist (either primary, replica, or cached copies) on the local node to be returned by the query. Cluster-wide scope performs the query on all nodes in the cluster. |
| Write - Insert | Row is created on the active node based on the data distribution policy. This is the local node, if no data distribution policy is configured. |
| Write - Update | Row is updated on the active node based on the data distribution policy. This is the local node, if no data distribution policy is configured. |
For a Read operation, the Where drop-down list offers the following options:
| Where Selection | Selection | Activates These Controls | |||
|---|---|---|---|---|---|
| Primary Index (unordered) | Selects the row that matches the expression you specify. |
|
|||
| Primary Index (ordered) | Selects the row or rows that match the range of values you specify. |
|
|||
| Secondary Index (unordered) | Selects the row or rows that match the expression you specify. |
|
|||
| Secondary Index (ordered) | Selects the row or rows that match the range of values you specify. |
|
|||
| All Rows | Selects all rows, independent of keys. |
|
|||
| Expression | Selects any row that matches the specified expression, independent of keys. |
|
For a Delete operation, the Where drop-down list offers the same options as a Read operation, with one exception:
| Where Selection | Selection | Activates These Controls | |
|---|---|---|---|
| All Rows | Selects all rows, independent of keys. |
|
For a Write operation, the Where drop-down list only offers the Primary Index selection:
| Where Selection | Selection | Activates These Controls | |
|---|---|---|---|
| Primary Index | Selects the row that matches the expression you specify. |
|
The Order control is only active under certain circumstances:
-
The Query tab specifies a Read or Delete operation.
-
The associated Query Table has either a primary or secondary index that uses btree indexing.
The control shows as Order: (Not applicable) for Read and Delete operations on Query Tables with no indexes or with all unordered (hash) indexes.
The control does not appear at all on the Output tab when the Query tab specifies a Write operation.
To use the Order control, select the By radio button. The following rules then apply to the Index drop-down list that follows the By control:
-
If the Where control specifies Primary Index or Secondary Index, then the same index is pre-selected for you in the Order control. You can only specify Ascending or Descending for that index.
-
If the Where control specifies All Rows or Expression, then you can select an index to sort on from the dropdown list. If the associated Query Table is configured with only one index, that index is pre-selected.
The Order control specifies the ordering of the Read or Delete operation's initial selection of rows from the Query Table. It does not rearrange the order of rows after processing by the Operation, Fallback, or Output tabs.
The selection of rows ordered by the Order control can be further limited by the Limit control. Operations are performed in the following sequence:
-
Rows are selected from the associated Query Table by the Where specification.
-
The collection of selected rows, if any, is then ordered according to the Order specification.
-
The number of rows returned is then truncated to the number specified in the Limit control.
This sequence can be illustrated with a simple Query operator test setup configured as follows:
-
Start with a module in which a Query Table is loaded automatically (such as the
Query.sbappapplication in the Operator sample group), or a module in which you manually populate two or three rows of a Query Table that uses btree indexing on its primary index. -
Configure a Query operator as a Read operation on All Rows.
-
Set the Limit number of rows control to 1.
-
Set the Order control on the table's primary index, with Ascending sort order.
-
Run this module, send a triggering tuple to the Query operator, and the output stream emits the first row in the table.
-
Stop the module, reset the Order control to Descending sort order.
-
Run the module again, and the output stream now emits the last row in the table.
For Read and Delete operations, if you chose a Where setting that returns more than one row, you can specify a limit to the number of rows returned by your query. To do so, enable the Limit option and enter a StreamBase expression that evaluates to a positive integer, which is taken as the maximum number of rows to return.
The Limit option is dimmed and unavailable for write operations, or for operations where the query returns only one row, such as when matching against a primary index.
If used, the limit applies to the initial selection of rows from the associated data construct. If this Query operator uses aggregate expressions and grouping, the limit is applied before aggregation and grouping occur.
Your limit expression can be a simple integer, or a more complex
expression that calculates a row limit based on conditions upstream. You
can specify the row limit at runtime by using an expression such as
${RowLimit} in this field, then specifying a
module parameter for the containing module named
RowLimit.
 |
When you specify the parameter in the Parameters tab of the EventFlow Editor, you can specify a default value:
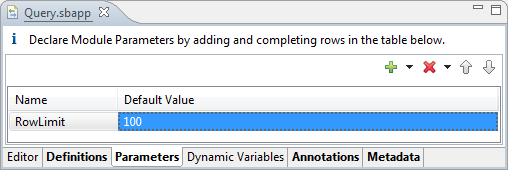 |
Use this option to retrieve a list of the top
n rows, or to maintain a Query Table by
deleting n top or bottom values. With this
limit set, the query ends after the specified number of rows have been
returned. If fewer than the specified number of rows can be returned,
the query ends without returning values for the missing rows.
See also the discussion above of the Order control that appears under certain circumstances. If used, the Order control can limit the initial selection of rows before the Limit control takes effect.
The area at the bottom of the Query tab takes on different forms, depending on the settings of the Operation and Where controls.
- Matches (grid)
-
The Matches grid is shown when the Where selection is either Primary Index or Secondary Index for an index with an unordered (hash) key.
The field name and data type of each table field in the key are filled in for you, one field per row. Enter an expression for each row to match against values in that table field. The expression for each row must resolve to a value of the same data type as that row's field. If the key has more than one field and you enter match-against expressions for each field, then a table row must match all expressions to be selected by this query.
For example, let's say a table's primary key has one field, which is the table's Symbol field with type string. To match against a field also named Symbol in the input tuple, fill in the Matches grid as follows:
Field Name Type Expression Symbol string input.Symbol - Range Specification (grid)
-
The Range Specification grid is shown when the Where selection is either Primary Index or Secondary Index for an index with an ordered (btree) key. See Using the Range Specification Grid for instructions on filling in this table.
- Lookup Expression (field)
-
Enter a lookup expression to select data. For example,
stock==input.symbolreturns all table rows that match the value specified at runtime for the symbol field in the input stream. The lookup expression can include themetadatakeyword, as described below in The metadata Qualifier.Caution
Using lookup expressions that do not reference any columns that appear in an index can cause complete table scans, which may adversely impact performance.
This section explains how to specify ranges for ordered (btree) primary or secondary index keys when using the Range Specification grid in the Query tab.
The Field Name and Type columns are filled in for you with the name and type of the table fields marked as index fields. The range specification is evaluated using the input tuple against the data stored in the Query Table. The result of the query is the ANDing of all the field range specifications. There is no support for ORing the range specifications.
Set a range for each field. You must enter an operation and an expression for each field in the index, as follows:
-
Choose a lower boundary operation in the Start Operation column:
= (equality) > (greater than) ≥ (greater than or equal) begin (unbounded lower range) -
Specify a lower boundary expression in the Start Expression column. Range expressions can be constants, input tuple fields, or dynamic variables.
-
If your lower boundary operation is equality (=), an upper boundary is not needed, and its column is not editable.
-
If your lower boundary operation is begin or your upper boundary operation is end, the associated expression column is not editable.
-
-
Choose an upper boundary operation in the End Operation column:
< (less than) ≤ (less than or equal) end (unbounded upper range) -
Specify an upper boundary expression in the End Expression column.
Including primary and secondary index fields in boundary expressions improves query efficiency. If a range expression matches fields in a table index, table scans can be avoided or bracketed. The query planner first selects matching records using the indexed fields and then scans only that subset to match the unindexed fields. For example, suppose you have a query of this type:
(NonIndexedField1 == 1 || NonIndexedField2 == 2) && (PrimaryIndexField > 10)
and in the Query operator's Query tab you set the following
properties: Order by Primary Index, Limit
20.
As the table is sorted by its primary index, at runtime only those non-indexed fields having a primary key greater than 10 are scanned to match the preceding part of the predicate, and the scan halts as soon as 20 records are found.
The Operation tab specifies operations to perform during the query. The available operations depend on the query Operation type you specified in the Query tab:
| Operation Tab for Read and Delete Operations |
| Operation Tab for Write Operations |
For Read and Delete operations, use the Operation tab to specify what to do if the operation fails. For Read operations, you are specifying what to do if no matching rows were found in the query. For Delete operations, you are specifying what to do if the specified rows to be deleted were not found.
The options for this tab provide downstream components with some flexibility for detecting a Read or Delete failure in this Query operator. To detect a failure, your downstream components can test for null values in the output tuple, or for a miscount between input and output tuples, or for a particular set of values you inject into the output tuple, as required by your application design.
For both Read and Delete operations, select among the following options:
- match input with null values
-
On Read or Delete failure, set to null all fields in the output tuple corresponding to a row of the associated data construct. These null values are not actually seen in the output tuple unless the output tuple's schema explicitly includes those fields. This is the default selection.
- output nothing
-
On Read or Delete failure, do not emit an output tuple. For failure cases, this option overrides the Output tab and suppresses the entire output tuple.
- match input values in "Fallback"
-
On Read or Delete failure, if the output tuple includes any fields from the associated Query Table, set the value of each field as specified in the grid on the Fallback tab.
Notes
For the error handling settings on this tab to be visible in this operator's output, you must use the Output tab to specify the fields of the associated data construct that you want to appear in the output tuple. The default settings for the Output tab specify that no table rows are included in the output tuple. Thus, if you specify explicit settings in the Operation tab, but then leave the Output tab in its default state, you will not see any Operation tab changes in the output tuple.
The settings on this tab are only triggered if a query finds no matching rows. This tab's settings are not triggered when a query finds any matching rows but does not return them because you limited the number of output rows in the Query tab.
If you specify an aggregate expression in the Output tab, the expression is applied to the no-match value before the output is generated.
For Write operations, use the Operation tab to define what is written to the associated data construct. Write operations can be row inserts or row updates.
Each section of the Operation tab is discussed in the following subsections:
| Overview |
| Type of Write |
| Table Fields Section |
| Input Fields Control |
| Additional Expressions Control |
| Write-Insert: Row Already Exists |
| Write-Update: Row Not Found |
For Query Write operations, the Operation
tab looks like the following example, where the incoming tuple has the
schema: (Symbol, Price, Description). The Query tab
specifies matching the table field Symbol against
the input tuple's Symbol field.
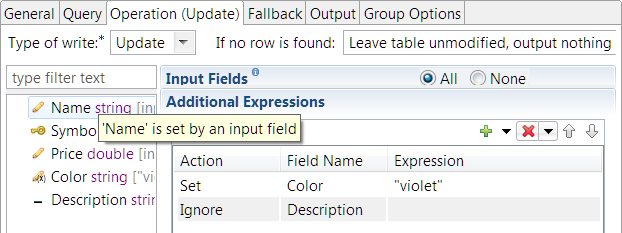
In this example, the table fields section in the lower left shows the schema of the associated data construct, and shows what is expected to happen to each field of the selected table row for this Write-Update operation, as follows:
-
The
Namefield was not in the input tuple, and is not otherwise specified on this tab. Thus, the table'sNamefield is not changed in any way by this Query operation. -
The
Symbolfield is the primary key, marked with the key icon. Primary keys are always included in Write-Update and Write-Insert operations. -
The
Pricefield is to be updated from this operator's input stream. This is specified with the Input Fields: All selection. -
The
Colorfield was not in the input tuple, but is set with a value specified in the Additional Expressions grid. -
The
Descriptionfield was in the input tuple, but is overridden with an Ignore action in the Additional Expressions grid. Thus, the table'sDescriptionfield is not changed by this operation.
Finally, in the upper right, the If no row is found control specifies what to do if there is no match for the expression specified on the Query tab.
Select the Type of write: either Insert or Update. Insert is the default setting.
Remember that when you specified a Write
operation in the Query tab, you could only select Primary
Index from the Where control. This
means that this Write operation has selected
exactly one row from the associated data construct, the row that
matches that expression compared against the table's primary index
column.
So for a Write-Update, the Operation tab specifies what fields to update in the matching row in the table, if found.
For a Write-Insert, this tab specifies the contents of a new row to insert. But first, it compares the Query tab's expression against the index to make sure the new row does not already exist.
The table fields section of the Operation tab shows the schema of the associated data construct. Icons and gray text explain the operation that occur for each field of the selected row.
At the top of the section is a filter field. If the associated table has a large schema, use the filter field to narrow the fields shown.
When you first open the Operation tab, the table fields section takes on different appearances, depending on upstream components:
-
The Operation tab for a new Query operator that has no upstream connection shows the primary key marked with a key icon and all other fields unset:
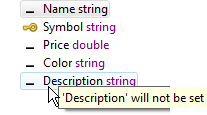
-
The default setting for the Input Fields control is All. Accordingly, if a new Query operator's incoming component has a schema that includes one or more same-named fields, then the Operation tab automatically configures each table field to be set by its corresponding input field. In the following image, the incoming stream has
SymbolandPricefields:
Icons decorate table fields as follows:
| Icon | Meaning |
|---|---|
| Primary key |
The data construct's primary key. Primary key values are always included in Write-Update and Write-Insert operations. |
| Value from input stream |
Table field is set with the same-named field from this operator's input stream. |
| Value from expression |
Table field is set with an expression in the Additional Expressions grid. |
| Not set |
Table field is not set and will not be changed by this Query operator. |
The context menu in the table fields section operates on the selected row, or on the section as a whole, if no current selection.
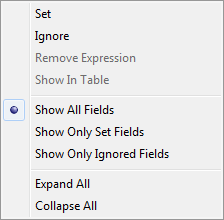 |
The four context menu items at the top operate on the currently selected field in the table fields section.
- Set
-
Copies the current table field to the Additional Expressions grid, filling in the Action and Field Name fields. Enter an expression that resolves to the field name or value you want to set for this field.
Tip
Double-click any row in the table field section as an alias for the Set context menu action.
- Ignore
-
Copies the current table field to the grid, filling in the Ignore action for that field.
Tip
Double-click any row in the table field section to place the current table field in the Additional Expressions grid; then change the Action column from Set to Ignore.
- Remove Expression
-
Removes from the Additional Expressions grid the row for the current table field. The grid row must be complete and must include a valid expression before this menu action works. You can also remove rows from the grid using the red X (
 ) control.
- Show in Table
-
When the Additional Expressions grid has many entries, including some off screen, use the Show in Table menu command to jump to the grid row for the current table field.
The remaining context menu items are self-explanatory, and operate on the table fields section as a whole.
The Input Fields control shows when this Query operator has an incoming stream whose schema includes at least one field that matches a table field by exact name. The data type of the incoming field must be the same as the table field, or must be compatibly coercible.
If these conditions are not met, the Input Fields control is dimmed and unavailable, or is not present in the Operation tab at all.
With the conditions met, selecting All
specifies that all input fields whose names and types match a table
field are used to set the values of those table fields. Look for
[input] in gray text after the name of each table
field so affected.
Use the None setting to specify that no
input field's value is update a table field, even if the names and
types match. Use None to remove the
[input] settings placed manually or with the
All setting.
The default setting of the Input Fields control is All. This means that a component connected upstream of this Query operator automatically updates or inserts its field values into same-named table fields by default. Use expressions in the Additional Expressions grid to override or suppress the default action of the Input Fields control.
Use the Additional Expressions grid to:
-
Override a table field set from the input stream by the Input Fields control. You can:
-
Set the table field with a different value by defining an expression. (Action = Set)
-
Remove a table field from being updated at all. (Action = Ignore)
-
Define a local variable for use only in this Additional Expressions grid. (Action = Declare)
-
-
Set values for table fields that are not included in this operator's input stream.
The Set action requires you to fill the Expression field for that row. When you use the Ignore action, the Expression field is not editable.
Any expression you specify must resolve to a value compatible with the table field you are setting. Thus, for a string field, your expression must resolve to a string. For a numeric field, the expression must resolve to a number of the same data type, or a type that can be coerced to match the table field's type.
Your expressions can be as simple as the keyword
null, or a literal value ("IBM",
24.68, 100L), or as complex as needed. Your expression can use values
from the input stream (input.Price*1.02,
input.Name+"_source"), and can include dynamic
variables or parameters in the form
$(ParamName).
In all ways, the Additional Expressions grid is a standard StreamBase field grid. See Using Field Grids below for details.
For Write - Insert operations, the behavior-on-failure control is labeled If a row already exists. These options specify what to do when you attempt to insert a row, but values matching the new row are already in the table. Choose one of the following options from the dropdown list:
- Leave table unmodified, output nothing
-
This is the default behavior. The table remains unchanged and no value is returned for the row.
Note
With this setting, all values with the "new" prefix in the Output Settings tab are null.
- Update existing row using values below
-
Change the insert to an update. Use the values specified in this tab to update the existing row.
- Update existing row using values in "Fallback"
-
Change the insert to an update. Use the values specified in the Fallback tab to update the existing row.
- Use values in "Fallback" as "new" output tuple
-
Use the values in the Fallback tab to re-populate the new input tuple you were trying to insert, using alternate values that indicate the insert failure. Use this option to emit an error-reporting tuple when a Write-Insert fails.
Notice that the contents of the new row are not automatically emitted on this Query operator's output stream. You must still specify which new row fields, if any, to include in this operator's output tuple, using the New Table Fields grid in the Output tab. The default behavior of that tab is to exclude the New Table Fields from the output tuple, which means the error-reporting tuple is not seen by default.
For Write - Update operations, the behavior-on-failure control is labeled If no row is found. These options specify what to do when you attempt to update an existing row, that row cannot be located in the table. Choose one of the following options from the dropdown list:
- Leave table unmodified, output nothing
-
This is the default behavior. The table remains unchanged and no value is returned for the row.
Note
With this setting, all values with the "new" prefix in the Output Settings tab are null.
- Insert new row using values below
-
Change the update to an insert. Use the values specified in this tab to insert a new row.
- Insert new row using values in "Fallback"
-
Change the update to an insert. Use the values specified in the Fallback tab to insert a new row.
- Use values in "Fallback" as "new" output tuple
-
Use the values in the Fallback tab to re-populate the new input tuple you were trying to update with, using alternate values that indicate the update failure. Use this option to emit an error-reporting tuple when a Write-Update fails.
Notice that the contents of the new row are not automatically emitted on this Query operator's output stream. You must still specify which new row fields, if any, to include in this operator's output tuple, using the New Table Fields grid in the Output tab. The default behavior of that tab is to exclude the New Table Fields from the output tuple, which means the error-reporting tuple is not seen by default.
Use the Fallback tab to define values to use if the operation specified in the Operation tab fails or cannot be performed. Values in the Fallback tab might be used to update a table row if a Write-Insert failed, to insert a table row if a Write-Update failed, or to populate the output tuple with an error message on failure of a Read or Delete operation.
With one exception, use the controls in the Fallback tab the same as described above for the Operation Tab for Write Operations.
The exception is that the Fallback tab can include the Copy from Operations tab control, if you have specified table field settings on the Operations tab. In this case, click the Copy from link to copy the same settings to the Fallback tab. You can then use the same settings as a starting point for your fallback settings.
The following shows the Fallback tab for the
ReadNasdaq100Table Query operator in the
Query.sbapp sample in the Operator sample
group.
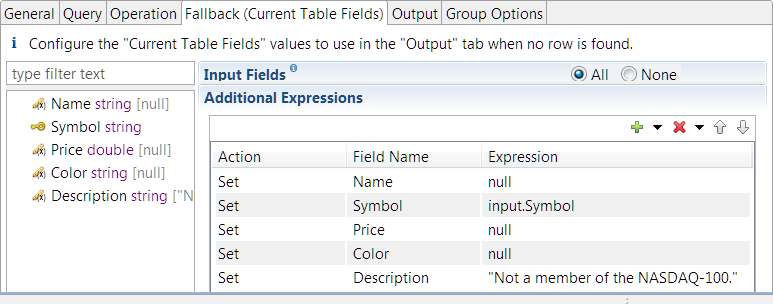
In the second row, the expression input.Symbol
replaces the table field Symbol. In this example, this
tab specifies what happens when a Read operation fails to find a match for
the input stream's Symbol field in the Query Table.
This means the table's Symbol field is always empty
under these error conditions. To include in the output tuple the symbol
that failed the match, this example specifies the input stream's
Symbol field, not the (empty) table's
Symbol field.
In the first, third, and fourth rows, the expressions are
null. In the fifth row, the expression specifies a
string value that is to serve as an error message.
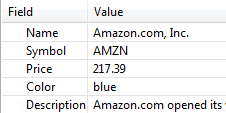
The following image shows the results in the Details Pane of the
Output Streams view when the sample is run and you send
AMZN to the SymbolStream input
stream. AMZN matches a row in the associated Query
Table, so the query returns the fields of that row:
 |
By contrast, the following image shows the results of sending the
string HP to the same input stream.
HP does not match any rows in the Query Table, which
triggers a no-match error condition. StreamBase replaces values in the
output tuple with the ones specified in the Fallback tab:
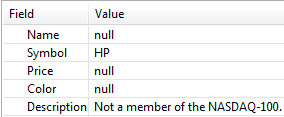 |
Use the Output tab to assemble the fields of this Query operator's outgoing tuple, field by field. You specify output fields from the following groups of fields in the following order.
-
Fields in this operator's input tuple.
-
Fields in the row or rows selected from the associated data construct.
-
Additional fields specified, calculated, or extracted with expressions.
The groups of fields are represented as field grids in the Output tab.
Important
The default settings for the Output tab specify the following output tuple:
-
All fields from the input tuple in the order received.
-
No fields from any associated data construct rows.
-
No additional fields specified with expressions.
This is the starting point for adding or subtracting fields that are to appear in the output tuple.
Subsections include:
| Using Aggregate Functions |
| Output Tuple Assembly Order |
| Field Grids |
| Using Field Grids |
A Query operator with Write or Delete operation type can specify only simple functions in expressions in the Operation Settings and Output tabs. A typecheck error results if you attempt to use an aggregate function with Query-Write or Query-Delete.
A Query operator with Read operation type can use either simple functions or aggregate functions in expressions, but not both at the same time. The type of functions you use on the Output tab determines whether this operator emits the rows retrieved by the Read operation or emits calculated information about the rows retrieved. There are three cases:
-
If your goal is to emit one or more rows retrieved by the Read operation, then you can only use simple functions in expressions in this tab's field grids.
-
If your goal is to emit one or more calculated statistics about the rows retrieved by the Read operation, then any expressions used must resolve to an aggregate function. (A complex expression might contain both simple and aggregate functions, but the overall expression must end up as an aggregate function.)
-
If you want to group your output by one or more fields as specified in the Group Options tab, then you must use one or more expressions that resolve to aggregate functions in the Additional Expressions grid.
For Query-Read operators, it is a typecheck error to try to use
expressions that resolve to simple functions and expressions that
resolve to aggregate functions on the same Output tab. For typechecking
purposes, an expression consisting of only a field name, including a
qualified field name such as input1.Price, is
considered a simple function.
For example, a module might load a Query Table from a CSV file at
startup, with one row for each member of the NASDAQ 100 list (as is done
in the Query.sbapp sample included in StreamBase).
For such a table:
-
A Query Read operation that specifies Read All Rows of the table would emit 100 tuples, one for each row.
-
A Query Read operation that specifies
count()in a row of the Additional Expressions grid would emit one tuple containing a count of 100. -
A Query Read operation that specifies a Group based on the Color field and also specifies
count()in a row of the Additional Expressions grid would emit three tuples, one each forblue,yellow, andred, each tuple showing the count of rows that have that color value.
Aggregate functions are listed on the Expression Language Functions page, starting with Aggregate Functions Overview.
The changes you specify in this tab are applied in top-down order in two ways: top to bottom in the order of grids in the tab, and top to bottom in the order of field expressions in each grid. That is, the output tuple is assembled in the following way:
-
Fields in the input tuple, if any are specified.
-
Any additions, subtractions, or reorderings for input tuple fields.
-
Fields selected from a data construct row, if any are specified.
-
Any additions, subtractions, or reorderings for data construct fields.
-
Any additions, subtractions, or reorderings for any of the above fields as determined by expressions in the Additional Expressions grid.
If you specify one or more aggregate expressions in the Additional Expressions grid, but do not specify a Group By field, the output tuple is assembled as follows:
-
Fields in the input tuple, if any are specified.
-
Any additions, subtractions, or reorderings for input tuple fields.
-
Fields for each aggregate expression in the Additional Expressions grid.
If you specify one or more Group By fields in the Group Options tab, the output tuple is assembled as follows:
-
The Output Field Name specified for the first Group By field.
-
The Output Field Name specified for subsequent Group By fields, if any.
-
Fields in the input tuple, if any are specified.
-
Any additions, subtractions, or reorderings for input tuple fields.
-
Fields for each aggregate expression in the Additional Expressions grid.
The upper field grids in the Output tab are collapsed by default, as illustrated here:

If your goal is to specify all fields in a grid, or none, you do not need to open the field grid. Use the All or None radio buttons in the grid's label row. To specify a difference from a grid's All or None setting, open the grid and enter a field row as described below. A grid with a difference is marked in the label row as a change when the grid is closed again. In the illustration below, the Input Fields grid specifies adding all fields to the output tuple, with one difference as specified in the grid body (here unseen).

The grids that appear in the Output tab vary depending on the query operation specified in the Query tab. All operation types have Input Fields and Additional Expressions grids, but the field grids that affect data construct rows vary as shown in the following table:
| Query Operation | Field Grids in the Operation tab | ||||
|---|---|---|---|---|---|
| Read |
|
||||
| Write - Insert |
|
||||
| Write - Update |
|
||||
| Delete |
|
The following example of an edited Input Field grid shows that all fields in the input tuple are to be included as-is, except the Description field, which is removed. For the Price field, the operator compares the value in the input tuple with the value of the same-named field in the selected table row, and places the higher of the two prices in the output tuple.
 |
Field grids have the following editing features:
-
Field grids are resizable. Grab the bottom row of any grid with the mouse to resize it within the Output tab to show fewer rows or to show rows without needing scroll bars.
-
Input Field and Table Field grids have Prefix and Suffix controls, which are blank by default. You can use either field to specify a leading or trailing string to add to the names of all fields emitted from that field grid. For example, you could prefix
QT_to the names of fields added to the output tuple from Query Table rows to distinguish same-named fields. -
Input Field and Table Field grids have All and None controls. Use the All control to start with the full set of fields for that grid, and then narrow down the list with individual Action lines. Use the None control to start with nothing, then build up the fields you want to include or modify with individual Action lines.
-
To add an Action line, use the green plus button, then select the type of action in the Action drop-down list.
-
Actions for Input Field and Table Field grids are: Include, Replace, Remove, and Declare.
-
Actions for the Additional Expressions grid are: Add, Replace, Remove, and Declare.
-
Use the Declare action to define a local variable that has the narrow scope of this grid in this operator. The variable can then be used to save typing in expressions later in the same grid. Use the Field Name column to name your variable; use the Expression column to specify an expression that defines your variable. Expressions for declared variables are evaluated as necessary to compute the output fields that use the variable. In many cases, expressions are evaluated once per output tuple. However, expressions for unused declared variables are not evaluated.
-
To add an entry to the Field Name field, use Ctrl+Space to invoke autocompletion. This shows a list of the available field names.
-
You can enter an asterisk in the Field Name field to specify all fields. When you use an asterisk in the Field Name field, you must also have one in the Expression field.
-
In the Input Field and Table Field grids:
-
When using the Include or Remove actions, you must specify a field name, but you cannot enter an expression.
-
When using the Replace action, you must specify a field name, and you must enter an expression in the Expression field for that row.
-
-
In the Additional Expressions grid, you must enter an expression in the Expression field for all actions.
-
In any expression, use the following qualifiers to distinguish same-named fields:
input. Field from the input tuple. current. In Read operations, a field from the selected data construct row. old. In Delete, Write-Insert, and Write-Update operations, a field from the selected data construct row. new. In Write-Insert and Write-Update operations, a field from the placeholder row called new that is to be written to the associated data construct.
The following table describes the buttons at the top of each Field grid.
| Button | Name | Description | |
|---|---|---|---|
|
|
Add | Adds a row below the currently selected row, or to the
end of the grid if no row is selected. Click the arrow on the
button's right to specify whether the row should be added above
or below the currently selected row.
When you add a row, the newly created row is highlighted. To start entering information, click in the cell you want to edit. (Some cells are not user-editable.) |
|
|
|
Remove | Removes the currently selected row. Click the arrow on the button's right to remove all rows or all currently selected rows. | |
|
|
Move Up, Move Down | moves the selected row up by one row. moves the selected row down by one row. | |
|
|
Select Fields | Click to open the Select Fields to Replace dialog that shows available fields for the Input Fields or Table Fields grids. Click the down arrow to select the alternate actions Include or Remove, which open the Select Fields to Include and Select Fields to Remove dialogs, respectively. |
This tab is only displayed when the Query operator is connected to a Query Table. This tab is not provided when connected to a JDBC Table, where you would instead use a GROUP BY clause in your SQL statement. The tab is active only when the Query tab specifies a Read operation, and is dimmed and inactive for Write and Delete operations.
Grouping only applies when the Query Read operation returns more than one row from the associated data construct. This tab performs a similar task to the GROUP BY clause in standard SQL: it organizes multi-row output into groups classified by the field or fields you specify.
A Query operator that specifies grouping emits one tuple for each group. For example, in a Read All Rows operation on a Query Table containing stock bids, you can specify the field containing the stock symbol as the Group By field. Thus, instead of emitting all rows in the table, the Query operator emits one tuple per stock symbol, showing aggregate calculations for that symbol.
When you specify more than one group-by row, the operator emits one
tuple for each unique combination of matching rows. In the following
example, if the data construct has either blue or
red in the Color field, then the
operator emits four rows: one for each color, and one for each true or
false match of the SmallPrice group for each
color.
 |
Note
The order in which grouped output tuples are emitted is undefined.
Any Group-By fields you specify in the Additional Expressions grid of the Output tab must be aggregate expressions. The aggregate expressions specify the calculations to be emitted for each specified group, such as a count() of rows or the avg() value of a field. For more information, see Using Aggregate Functions.
Click the button to add a row, and enter the fields you want to group by. In each row:
-
In the Output Field Name column, enter the name of a field you want to appear in the output stream. This field is prepended to the output tuple, and contains the value that selected the current group. For example, if the incoming tuples have a field named
Colorthat can contain eitherredorblue, you might name the output fieldColorGroup. In this example, the operator emits two tuples whose first field contains the valuesblueandred. -
In the Expression column, enter the name of a field in the associated data construct by which you want output tuples grouped, or enter an expression that selects a group of rows in the data construct based on field values.
In the following example, the expression groups the
Pricefield into decades, so that the operator emits one tuple for each price category, from $0.01 to $9.99, then $10.00 to $19.99, then $20.00 to 29.99, and so on.
You can use the metadata qualifier as part of an
expression in the Output tab when the associated data construct is a Query
Table (but not for associated JDBC tables). You can also use the
metadata keyword with some of its values in the lookup
expression for the Read query, as described in Properties: Query Tab.
The accepted values for metadata are the
following:
-
metadata.rowNumber, valid on all read queries. This returns the number of the current output row. The output row number has no relation to rows in the associated Query Table. -
metadata.tableModificationCount, valid in Read queries and lookup expressions. This returns the current maximum modification count of the table associated with this Query operator. The table modification count is a counter incremented for each Query Table change, whether update, insert, or delete. This counter increments whether or not any data was changed in the operation. That is, an update that rewrites the same values still increments the modification count, and insert or delete operations that failed because of an expression error also increment the count. -
metadata.rowModificationCount, valid in Read queries and lookup expressions. This returns the modification count for the current row in the associated Query Table. This is not a sequence number. The row modification count is a counter for each row in a Query Table that increments for every change in that row.
The tableModificationCount and
rowModificationCount values are advanced features and
are expected to be used in the context of table replication in high
availability design patterns.
For further information about aggregate expressions and available functions, see the StreamBase Expression Language Functions topic.
If the key field for a tuple record being written to a Query Table
is null, the tuple is stored. In a Query Table with a
sorted (btree) index, the null-keyed
stored records are evaluated as less (in value) than other non-null
records. On a subsequent Read operation, the null-keyed tuples can be
located. For more information, see Using Nulls.
The following table shows the Properties view tabs that only appear when the Query operator is associated with a JDBC Table data construct. Click the link to see the documentation for that tab.
| Properties View Tab | Documentation |
|---|---|
| Result Settings tab | Properties: Result Settings Tab |
| Concurrency tab | Properties: Concurrency Tab |
