This topic shows the steps to populate an empty EventFlow module, on the way toward assembling a stock trading application.
Before building your module:
-
Make sure that you are in StreamBase Studio's SB Authoring perspective, as described in step 1 of the previous page.
-
In Studio's top-level menu, invoke > (Windows) or > (macOS). In the left side contents panel, expand StreamBase Studio and open the Authoring panel. Verify that the checkbox for Automatically typecheck components is selected.
(To learn more about typechecking, see About Typechecking below.)
-
The previous page took you through the creation of a new EventFlow Fragment project named
firstapp. The new project contains a new, empty EventFlow module,firstapp.sbapp.If this module is not currently open in the EventFlow Editor, open into the package folder of the project in the Project Explorer view, and double-click
firstapp.sbappto open it.
-
Notice the Palette view on the bottom left under the Project Explorer view. Whenever an EventFlow module is open and its canvas is displayed, the palette is loaded with icons that represent the components you use to design your EventFlow module. The icons are organized in drawers of different component types, as shown in the figure below.
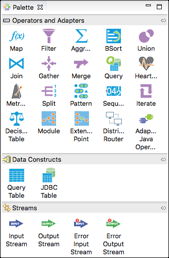
The Palette view is empty when an editor other than an EventFlow module's canvas is in the foreground.
Follow this procedure to develop the firstApp.sbapp module.
-
Add an Input Stream.
-
In the Palette view, open the Streams drawer.
-
Drag an Input Stream icon from the palette into your EventFlow canvas.
Notice the blue background of the Input Stream icon, which indicates the icon is selected.
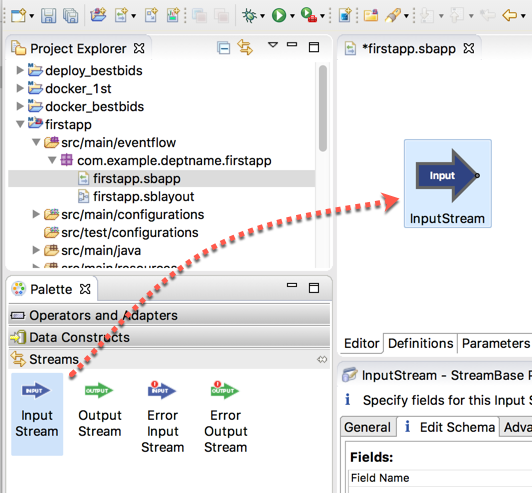
-
When you select or double-click a component on an EventFlow Editor canvas, Studio opens its Properties view. In the image above, the Properties view is seen below the Editor's canvas.
-
-
Rename the Input Stream and define its schema.
-
On the canvas, type over the default name
InputStreamto rename itTradesIn. (You can also do this by typingTradesInin the Name field of the General tab in the Properties view.)Tip
Get in the habit of naming components at the time that you create them. While StreamBase Studio always chooses default names for new components that do not conflict with others, the ideal is to rename them as you go to reflect their function or role in your module more accurately.
-
Your
TradesInInput Stream now needs a schema. In the Properties view, select the Edit Schema tab. Provide a simple two-field schema by clicking the button twice to add one row for each schema field. Enter these values in the two rows:
Field Name Type Description symbol string Stock symbol quantity int Number of shares (The description field is optional but recommended.)
-
Apply your changes by clicking a blank area on the canvas, or by clicking the Apply and Typecheck button (
 ) near the top-right area of the Properties view. This forces Studio to typecheck your module now, instead of waiting for
it to happen automatically.
) near the top-right area of the Properties view. This forces Studio to typecheck your module now, instead of waiting for
it to happen automatically.
-
Notice that typechecking does not save the module. You can write the module file to disk at any time with > or Ctrl+S (Windows) or command+S (macOS), or by clicking the Save button in the main toolbar.
-
Typechecking is StreamBase's term for validating the design of your modules as you build them. StreamBase Studio inspects each component of a module and does not run it if typechecking errors exist. One of the key advantages of designing in StreamBase Studio is that typechecking occurs constantly and automatically as you work, so you can avoid accumulating errors.
Typechecking occurs from the starting points of the module (usually the left side), and proceeds to the downstream components (typically those connected on the right). When the typecheck process finds an error condition, the background color of the failing component turns red, and downstream components cannot be typechecked further.
Typechecks can fail for a variety of reasons, including:
-
Not providing a schema for an input stream.
-
Using duplicate field names in a schema.
-
Declaring a schema for an operator that is in conflict with the schema of the previous upstream connected operator.
-
Entering a wrong or misspelled field name in an expression in a component's properties settings.
-
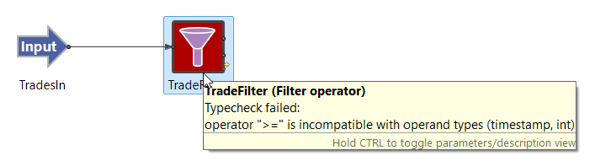
Using a field name in an inappropriate way, such as specifying an int field in an expression that expects a timestamp.
-
Using invalid expression language features, such as an invalid identifier or function name, or providing a function with too many or too few arguments.
-
Using incorrectly specified operator parameters.
When you hover the mouse pointer over an operator with a typechecking error, Studio shows a tooltip that explains the error.
 |