Contents
This topic takes you through the steps to create a new TIBCO LiveView project, create and configure a LiveView data table, generate an EventFlow application module that feeds the LiveView table, and create a feed simulation to send data into the EventFlow module's table. The steps go on to run the LiveView project, and view the results in TIBCO LiveView Desktop.
This tutorial's project has the following characteristics:
-
Has a single, three-column LiveView data table configured to contain stock symbol, price, and quantity values.
-
Has a wizard-generated StreamBase EventFlow™ module that uses a feed simulation adapter to accept input from a StreamBase feed simulation, then emits that data to an output stream.
-
Uses the LiveView Configuration Editor to create all required LiveView tables and features.
-
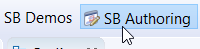
In Studio, make sure that you are in the SB Authoring perspective, which presents the views most commonly used for editing StreamBase modules. If you're in another perspective, click the button in the Perspective bar in the top right corner of the Studio window:
If this button is not visible, click the button (
 ) and select SB Authoring from the resulting dialog.
-
Click the button (
 ) in Studio's top-level toolbar, or invoke >>.
-
In the StreamBase Project panel, enter
my-first-liveview-projectin the Project name field. Select LiveView Fragment as the project type. Click .
-
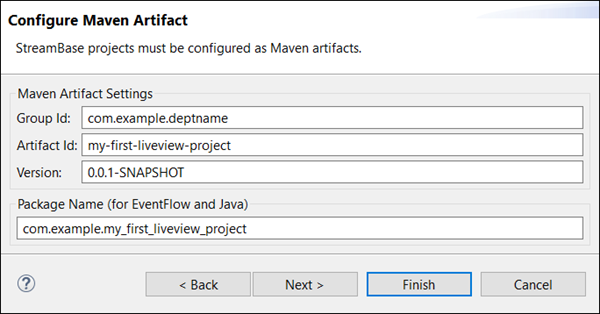
in the Configure Maven Artifact panel, enter
com.example.deptnamein the Group Id field. (If your site already has a standard Group ID for Maven projects, you can use that name instead.)Notice that the Package Name field is automatically generated by combining the Group ID and the Artifact ID, which is the same as the Project Name you specified in step 3. Hyphens in the Artifact ID are changed to underlines, according to Java and Maven package name standards. Do not change the Package Name.
-
Click to view the following panel.
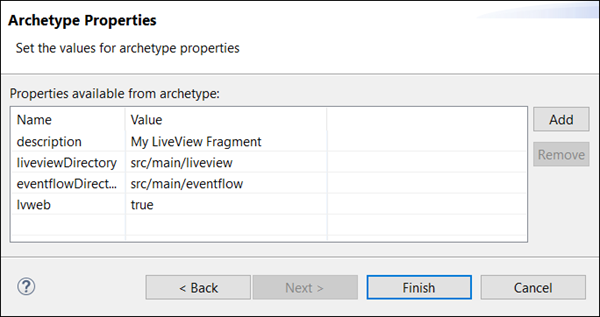
Leave these settings in place for now. Click .
-
Click . This triggers several actions:
-
A folder for the
my-first-liveview-projectappears in the Project Explorer view. -
The LiveView Project Viewer opens in the Editor space in Studio's upper right, showing an empty canvas.
-
On top of the empty Project Viewer, the New Data Table wizard opens, which is described in the next section.
-
On top of the wizard, the New LiveView Project Created dialog may appear. Read the dialog and optionally select the Do not show this again check box.
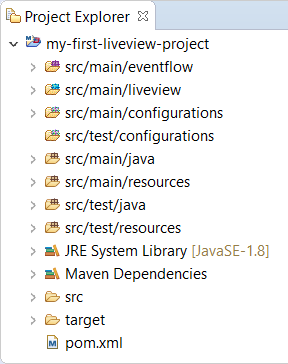
The newly created project is organized in the standard Maven project structure:
-
LiveView data tables are containers for streaming data. They can receive incoming streamed data from multiple sources, including EventFlow applications, external data sources, and other LiveView tables. This tutorial continues the New Project steps in the previous section to configure a LiveView data table with three fields.
-
The New Data Table wizard is still open from the last step in the previous section. (If not, open it with >>, or right-click the empty Project Viewer canvas and select New Data Table.)
-
Enter
Ordersin the Table Name field. -
In the Interface/Application field, define all fields locally is selected by default. In the Schema grid section, click the green plus sign to add the following fields to the grid:
Field Name Type Symbol string Price double Quantity int The Description column for each field is optional.
-
Click .
-
Make the
Symbolfield the primary key for this table in one of the following ways:-
In the Available Fields list, select
Symbol, then click the right-pointing arrow next to the Index Fields label. -
In the Available Fields list, select
Symbolthen drag it to the Index Fields area with the mouse. -
Double-click
Symbol.
-
-
Click . This adds
Orders.lvconfto thesrc/main/liveviewfolder for this project in the Project Explorer view, and places a green Data Table icon labeled Orders on the Project Viewer canvas.
The data table is now configured and ready to receive data.
StreamBase Studio provides a Data Source wizard that can generate a StreamBase EventFlow module with output stream schemas preconfigured to match a particular LiveView data table's configuration. Follow these steps:
-
On the LiveView Project Viewer's canvas, right-click and select Data Source. The New LiveView Data Source wizard opens.
-
Select
my-first-liveview-projectas the parent folder. -
In the EventFlow™ Application file name field, enter
OrdersDataSource -
Leave the Create a sample feed simulation check box selected.
-
Use the dropdown menu selector in the Target Table field to select
Orders. -
Click . This triggers several actions:
-
Three new files are added to the project in the Project Explorer view:
OrdersDataSource.sbappOrdersDataSource.sblayoutWhich are located in src/main/eventflow.Orders.sbfsWhich is located in src/main/resources. -
A purple Data Source icon is added to the Project Viewer, with an arrow linking it to the Data Table icon.
-
The wizard creates two StreamBase interface files, places them in a new
src/main/eventflow/lv-interfacesfolder.These interface files contain the schemas for the Orders data table's input and output streams. Using interface files allows the schemas to be used and reused efficiently throughout the project.
-
Studio opens the EventFlow Editor for the newly created module
OrdersDataSource.sbapp.
-
-
In the EventFlow Editor:
-
Double-click the DataOut icon, select the General tab in Properties view, and make sure the check box for Always expose Stream for Dequeue is selected.
-
Study the Data Source EventFlow module generated for you. Notice that it uses a Feed Simulation Input adapter to send generated tuples with the correct schema to its DataOut stream, which feeds into the Orders Data Table's input stream.
-
Double-click the InputAdapter icon, select the Adapter Properties tab of the Properties view, and notice that the generated file
Orders.sbfsis preselected in the Feed Simulation File field. Notice that the feed simulation is configured to start automatically when the containing EventFlow module is started.This feed simulation file uses the Default generation method, in which random string and numeric values are generated as input data. After you have tested the generated LiveView application, you can come back and specify more precise customized data for each input field.
-
-
Use > or Ctrl+S on Windows or Command+S on macOS to save the current project state.
This optional step is only to provide visual confirmation that the data source EventFlow module receives correctly formatted data from its connected feed simulation adapter.
-
Run the
OrdersDataSource.sbappapplication. Right-click in the editor canvas or on theorders.sbappfile in the Project Explorer view and select >. -
In the SB Test/Debug perspective, observe the Output Streams view. Look for the outgoing data stream to be automatically populated by the associated feed simulation.
-
Click on a row in the Output Streams view and examine the tuple contents. Each tuple shows a generated value for Symbol, Price, and Quantity fields. Click several more rows as the stream flows past.
Notice that the DataOut stream shows five LiveView-internal fields with null values for now, in addition to the Symbol, Price, and Quantity fields you configured. These last three fields receive randomly generated data.
-
When done, press F9 or click the Terminate StreamBase Launches (
 ) button in Studio's top-level toolbar.
Now you are ready to compile and run the LiveView project on an instance of LiveView Server.
-
For clarity, close the EventFlow Editor session that is editing the
OrdersDataSource.sbappmodule. -
Run the LiveView project in one of several ways:
-
In the LiveView Project Viewer, click the green button in the upper right (
 ), next to the Help button.
-
Select the
my-first-liveview-projectproject in the Project Explorer view. Right-click and select >. -
Select the
my-first-liveview-projectproject in the Project Explorer view. From Studio's top-level menu, select >>.
-
-
The Console view shows several messages as LiveView Server compiles the project and starts. This startup process can take several minutes, depending on the configuration of your computer.
-
When you see the message
All tables have been loadedin the Console view, you are ready to connect a client application to this server instance to view the stream of data flowing through this project's data table.
To see the data flowing through your running LiveView data table, you must connect a LiveView client to the server and use it to run a query using the LiveQL query language. The simplest query for this application is:
select * from Orders;
or perhaps
select * from Orders limit 50;The following LiveView Client applications are provided with LiveView or as related downloads:
-
lv-client, a command line utility, is included with LiveView.
-
TIBCO LiveView Web is a web browser based client interface licensed and downloaded as a related product.
-
TIBCO LiveView Desktop is a Windows or macOS desktop client application licensed and downloaded as a related product.
In addition, you can write LiveView clients of your own using the provided Java or JavaScript Client APIs.
The following subsections give brief instructions to connect each of these client types. The LiveView server is presumed to be running and using the default port 11080 for these sections.
Follow these steps:
-
Open a StreamBase Command Prompt on Windows or a StreamBase-configured Terminal session on macOS.
-
With the LiveView application running as described above, enter the following command at the prompt:
lv-client "select * from Orders limit 30;"
You may need to specify a LiveView URL for the running server:
lv-client -u lv://localhost:11080 "select * from Orders limit 30;"
The lvweb.war file that provides the server underpinnings of LiveView Web is installed by default with each new LiveView project. Look
for this file in the src/main/liveview/lv-user-webapps folder of your project.
With LiveView Web installed as part of your project, use any modern browser to connect to your running server. Use the following steps:
-
With LiveView Server running, connect a web browser to:
http://localhost:11080/lvweb
-
Click New Page to create a new query page, perhaps named Orders Table.
-
Click New Card to create a query card.
-
In the dark blue section on the right, provide a title for your query card to replace the Untitled 1 label, such as
Orders Table - All. Click at the end of the current label and use the backspace key to erase it, or hold down the Shift key and use the left arrow key to highlight the current label. -
Still in the dark blue section, open the Query Builder section.
-
From the Choose a table control, select Orders.
-
The default query
select * from Ordersis entered for you in the Query field. -
Click Save. This populates the
Orders Table - Allcard on the left. -
Click the X in the upper right of the dark blue configuration area to close it.
-
Grab the bottom right corner of the Orders Table -- All card to resize it.
-
Experiment with creating other pages with different queries or with a different visualization.
-
When done, close the browser tab. LiveView Web preserves your configured table in the LiveView server metadata.