Contents
You can configure a feed simulation to use the response of a SQL query to a JDBC database as the source of input tuples for the feed simulation.
Important
The JDBC generation method cannot be used to generate input data for an input stream whose schema contains a field of type list or tuple. Blob fields, however, are supported.
Important
The JDBC feedsim functionality is not meant to get data from a JDBC table into a Streaming application running in production. For production applications, use our JDBC Query Table/Operator features.
To use this option, you must obtain from the database vendor the JAR file that implements the JDBC driver for the target database. When you have downloaded the vendor's JAR file from the vendor's web site, you must either:
-
Install the JAR file in a particular location in the StreamBase installation directory, or
-
Set up the
STUDIO_BOOT_CLASSPATHenvironment variable pointing to a different installed location.
Independent of the above steps, you must also include the location of the JDBC JAR file in the standard CLASSPATH environment variable so that command-line sbfeedsim can locate and use it.
These configuration requirements are described in more detail in the following sections.
This section explains how to set up a JDBC data source to run a Feed Simulation from Studio. To run a Feed Simulation with a JDBC data source or ensure correct typechecking of EventFlow modules referring to these feed simulations, the JDBC driver to be used must be available on Studio's classpath. This is achieved by creating a JDBC driver fragment.
There are two ways to create JDBC driver fragment for Studio:
-
Using the dialog (Recommended)
-
Manually
Important
Using the dialog is the recommended way for creating JDBC driver fragment because the fragment manifest and directory structure is created automatically.
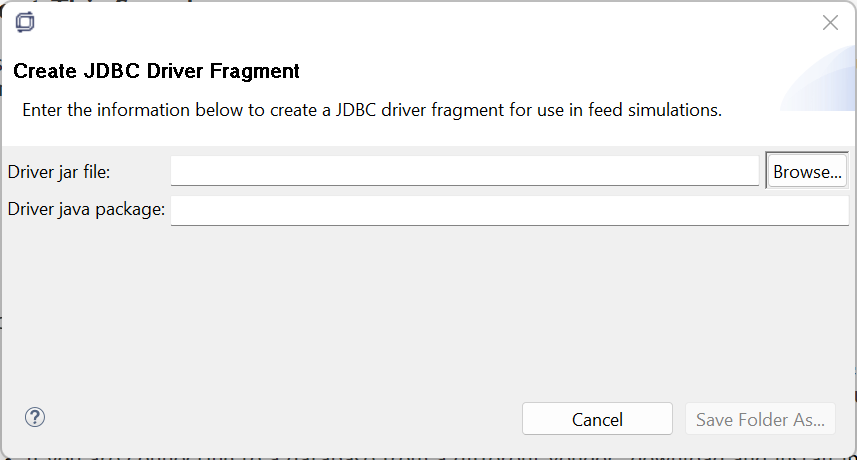
Using the dialog
-
From the top-level menu, select Help> Register JDBC Driver for Feedsim...
-
The Create JDBC Driver Fragment dialog opens.
-
Browse Driver jar file and select the driver JAR file in your system.
-
Enter the java package containing the JDBC driver class in Driver java package.
-
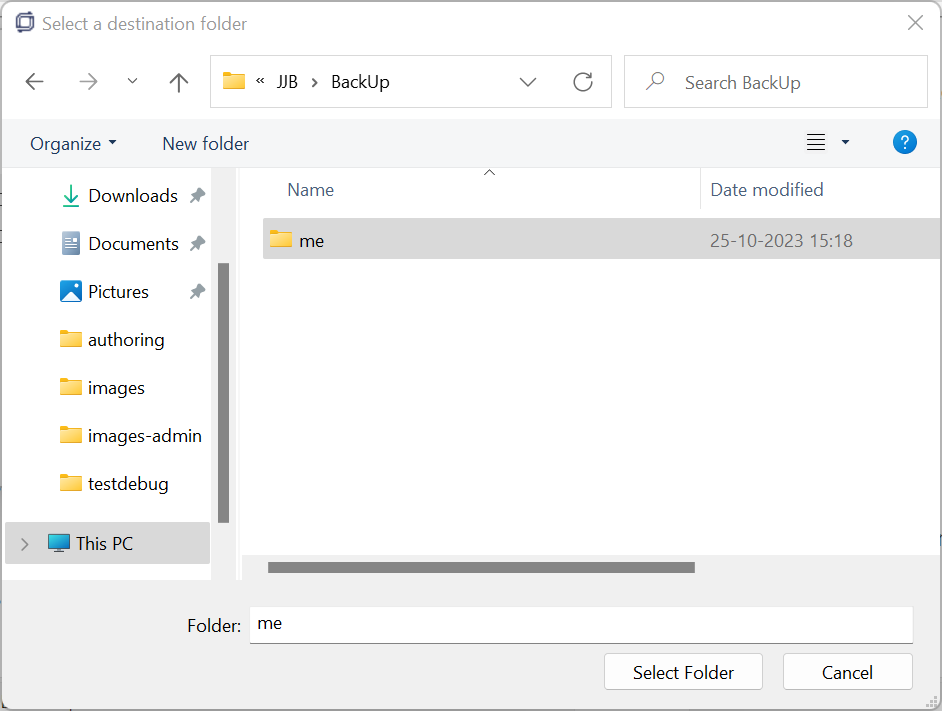
Select Save Folder As...
-
Navigate to the desired destination folder. Click Select Folder to save the fragment.
-
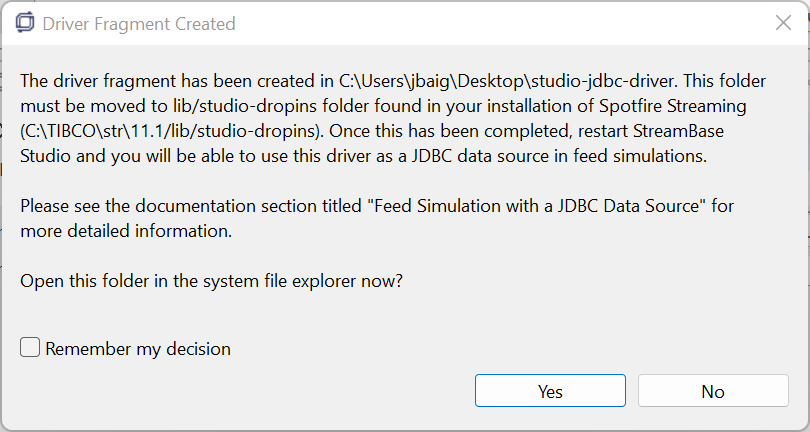
The Driver Fragment Created dialog appears. Click Yes to open the created folder in your system's file explorer.
-
Move the created "studio-jdbc-driver" folder to the l"lib/studio-dropins" folder of your TIBCO Streaming installation. If this is not possible, see the Note below about setting STREAMBASE_STUDIO_VMARGS.
-
Restart Studio for the changes to take effect.
Manually
-
Exit Studio if it is running.
-
Create a folder at any location on your computer (e.g.,
/home/me/studio-jdbc-driver). -
Create a text file
/home/me/studio-jdbc-driver/META-INF/MANIFEST.MFwith the following content (make sure to include an empty newline at the end of the file):Manifest-Version: 1.0 Bundle-ManifestVersion: 2 Bundle-Name: Studio JDBC Driver Helper Bundle-SymbolicName: com.tibco.ep.sb.studio.fragment.jdbchelper Bundle-Version: 1.0.0.qualifier Bundle-Vendor: TIBCO Software Inc. Fragment-Host: com.tibco.ep.str.rt.bnd.rt-studio Automatic-Module-Name: com.tibco.ep.sb.studio.fragment.jdbchelper Bundle-RequiredExecutionEnvironment: JavaSE-17 Bundle-ClassPath: YOUR-DRIVER.jar Export-Package: YOUR-DRIVER-PACKAGE -
Replace YOUR-DRIVER.jar with new driver with the exact filename (e.g.,
mssql-jdbc-7.2.1.jre11.jar. -
Replace the YOUR-DRIVER-PACKAGE with the package for the JDBC driver class. For example,
com.microsoft.sqlserver.jdbc(in this example, the driver class iscom.microsoft.sqlserver.jdbc.SQLServerDriver). -
Place a copy of the JDBC driver jar file (in this example,
mssql-jdbc-7.2.1.jre11.jar) in the base folder (in this example,/home/me/studio-jdbc-driver). -
Copy the entire folder (
studio-jdbc-driver) to the lib/studio-dropins folder found in your installation of TIBCO Streaming. -
Start StreamBase Studio. If you are still encountering any issues, then restart the Studio.
Note
If you continue to encounter any issues, run the Studio using VM argument (STREAMBASE_STUDIO_VMARGS):
-Dorg.eclipse.equinox.p2.reconciler.dropins.directory=/home/me/studio-jdbc-driver
(Create another folder just for dropins, similar to the folder lib/studio-dropins
in the installation directory.)
Your site may require administrator rights in order to add files to C:\Program Files on Windows or /opt on UNIX. In these cases, you may not have permission to copy the vendor's JDBC JAR file to the STREAMBASE_HOME location, as recommended in the previous section.
As an alternative, you can specify the environment variable STUDIO_BOOT_CLASSPATH, and point it to the full, absolute path to the vendor's JDBC JAR file. Use the following examples as guidelines.
- Windows
-
Either set the variable globally using the Windows
Systemcontrol panel, or set the variable in a StreamBase Command Prompt and start the sbstudio.exe process from that command prompt. If the path to the JAR file has any directories with spaces in their names, you must enclose the entire path in single quotes.The following example for Windows 7 specifies the path to an Oracle JDBC driver's JAR file. Be sure to specify the JAR file name appropriate for your target database:
set STUDIO_BOOT_CLASSPATH=C:\Users\
username\Documents\JDBC-Drivers\ojdbc14.jar - UNIX
-
Set the variable in the terminal environment from which you launch the sbstudio process. For example:
export STUDIO_BOOT_CLASSPATH=/home/
sbuser/jdbc-drivers/ojdbc14.jar
When you have saved a feed simulation file that specifies data generation from a JDBC data source, you can run that file from the command line independent of Studio, using the sbfeedsim utility.
For this to work, the JDBC driver JAR file must be in the classpath. You can set the CLASSPATH environment variable, or use another standard classpath setting method. If you use the CLASSPATH environment variable, append to the existing classpath the full path to the JDBC JAR file, using a command like the following
examples:
- Windows
set CLASSPATH=%CLASSPATH%;"C:\TIBCO\str\11.2\jdk\jre\lib\ext\ojdbc14.jar"
- UNIX
export CLASSPATH=$CLASSPATH:/opt/tibco/str/11.2/jdk/jre/lib/ext/ojdbc14.jar
In the Generation Method section of the Feed Simulation Editor, select the JDBC option, then click Options.
In the JDBC Data Source Options dialog, specify the information required to connect to a JDBC-compliant database, and specify a SQL query that will generate a response from the database to populate the selected input stream.
This dialog represents the entirety of configuration available when using a JDBC data source for a feed simulation. That is,
JDBC configuration parameters such as jdbc-fetch-size in the server configuration file only affect Query operator access to a JDBC Table data structure, and do not affect feed
simulation data sources.
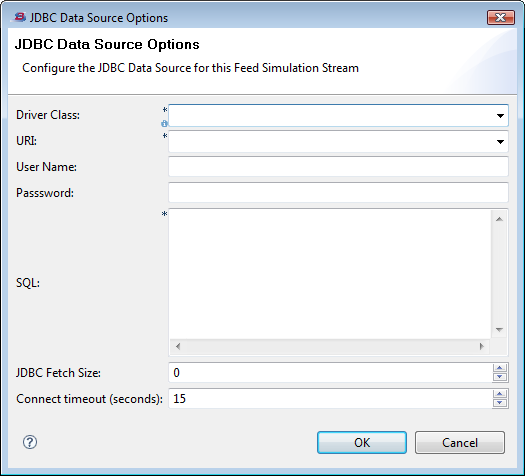 |
The table below describes the options in the JDBC Data Source Options dialog.
| Option | Default | Description |
|---|---|---|
| Driver Class | None |
Required field. Select or enter the fully qualified name of the class that implements the JDBC driver for the database you want to use. The drop-down list for this field is populated with example JDBC driver class names. The class name to enter in this field is determined by the actual JDBC driver you obtain from your database vendor and may have changed from these examples. You can select an example driver class name and then edit it, if your driver's class name has changed. |
| URI | None |
Required field. Enter (or select and edit) the JDBC URI that connects to the target database at your site. The drop-down list for this field is populated with example JDBC URI strings, with placeholders for site-specific information such as hostname and database name. These example URI strings cannot be used as provided. They must be edited to specify the correct local information for your target database. |
| User Name | None | Optional field. If access to your target database requires it, enter a user name that has the authorization level necessary to run the SQL query specified in the SQL field. |
| Password | None | Optional field. If access to your target database requires it, enter the password for the user name specified in the previous field. |
| SQL | None |
Required field. Enter a fully tested and known working SQL statement that returns rows with the columns in the correct order for the schema of the specified input stream. Use the SQL syntax of your target database to construct your SQL statement. It is a best practice using your database vendor's command line query tool or a third-party database query tool to develop the SQL query to use in this field. Get the SQL query to a known, working state outside of StreamBase Studio before attempting to use it with a feed simulation. If your SQL SELECT statement returns the right columns in the wrong order, then adjust your SQL statement to return columns that line up by data type with the schema of the specified input stream. |
| JDBC Fetch Size | 0 (disabled) |
Optional field. Specify an integer to designate a JDBC fetch size, which gives the JDBC driver a hint as to the number of rows that should be fetched from the database when more rows are needed. The fetch size is a standard feature of JDBC drivers, and does not designate a row limit. Some JDBC drivers ignore the fetch size. Consult your database vendor's documentation to learn about methods of determining the optimum fetch size for your target database. |
| Connect timeout | 15 seconds | Optional field. Specify an integer number of seconds for the JDBC driver to wait for results before declaring an error. |