Contents
- Before You Install
- Limitations and Differences
- Back Up Existing StreamBase Workspace and Configuration
- Steps to Install StreamBase on OS X
- Special Steps to Install on OS X Yosemite
- Installing Add-in Products
- How to Start StreamBase Applications
- Switching Between StreamBase Releases
- Uninstalling StreamBase on OS X
- Downgrading StreamBase Releases
- Related Topics
This page describes the installation of the TIBCO StreamBase® base kit on Macintosh OS X platforms. The base kit for OS X includes the StreamBase Studio authoring environment, StreamBase Server, support files for the StreamBase Client API, TIBCO LiveView Server, and the LiveView extensions for StreamBase Studio.
TIBCO LiveView™ Desktop and the companion Desktop Workspace Manager are installed with a separate prodecure, described in Installing LiveView Desktop.
Before you install TIBCO StreamBase, use the following checklist to make sure each target machine matches the prerequisites.
| If you are installing on OS X 10.10 Yosemite, pay attention to Special Steps to Install on OS X Yosemite. | |
| Read through the New and Noteworthy page for the current release to look for any late-breaking information about installing StreamBase on OS X. | |
| If you have used StreamBase Studio on the target machine, back up your existing Studio workspace and configuration, as described below. | |
| Confirm that the target machine is running a supported version of OS X with the latest updates. See Supported Configurations. | |
| Confirm that the target machine's RAM and disk space requirements meet or exceed the minimums listed on Supported Configurations. | |
| Depending on where you decide to install StreamBase, you may need administrator and/or sudo rights on the target machine. |
TIBCO StreamBase® Studio is provided on OS X as a client application to allow users to develop, debug, and test StreamBase applications and client applications. StreamBase installations on OS X do include a local copy of StreamBase Server for running and testing your applications locally, on the same Macintosh computer as Studio.
However, StreamBase Server is explicitly not supported for build or production deployment purposes on Apple Macintosh machines.
Expect the following important differences when working with StreamBase Studio on OS X compared to Studio on Windows:
-
StreamBase Studio supports OS X's full screen feature.
-
There is no Insert key on Macintosh keyboards, but StreamBase Studio on Windows and Linux uses Insert to add a new row in schema editor grids in Properties views and configuration editors. On OS X, use the backslash key \ for this purpose. The backslash key retains its standard meaning in other contexts, including when composing an expression in a field of the schema editor grid.
-
StreamBase documentation continues to direct you to right-click to open the context menu. On OS X, the context menu is indeed invoked with right-click if you are using a two-button or three-button mouse. On a trackpad, use a two-finger tap to invoke the context menu (depending on Trackpad Preference settings), or use Control+
click. -
External adapters and add-in products such as the High-Performance FIX Engine install as overlays into the base StreamBase kit. These packages are distributed as
.archive-binpackages. On OS X, after downloading use chmod +x to be sure you can run the installer. See below for more. -
StreamBase documentation remains focused primarily on running StreamBase Studio on Windows or Linux. In general, you can follow the documentation's instructions for Linux or UNIX as written, adapting file system paths and locations as required.
-
StreamBase Studio keyboard shortcuts are not always documented for Macintosh keyboards. In general, commands documented as Ctrl+
keyfor Windows and Linux are accomplished with Command+keyon OS X. -
On OS X, commands on the main StreamBase Studio menu and on context menus throughout Studio show the keyboard equivalent of commands using Macintosh keyboard symbols and semantics.
-
In StreamBase Studio, Command+Shift+L shows a pop-up help window of all commands and their keyboard equivalents just as Ctrl+Shift+L does on Windows and Linux.
-
StreamBase-specific EventFlow Editor keyboard shortcuts for Insert menu commands (such as O M to place a Map operator on the canvas) all work the same on OS X as on Windows and Linux.
-
Some menu items are in different places in keeping with OS X standards. In particular, when StreamBase documentation directs you to open → , on OS X open → , or use the OS X-specific keyboard equivalent Command+comma.
-
StreamBase Studio Help opens in your system default web browser instead of opening in a separate application window as on Windows and Linux. The Help system in your browser is in Eclipse Help format with a left-side navigation panel and full search capabilities.
-
When you click a Show in Help link in the Properties view's Expression Quickref tab, a new browser tab opens for each click, instead of reusing an already-open Help tab as on Windows and Linux.
If you used a previous release of StreamBase Studio on the target machine, create
backup copies of your existing Studio workspace and configuration directories,
before using StreamBase Studio in the current
release. Save the backup copy with filenames that indicate the version number of the
release you are archiving. For example, save SB-workspace-7-4-03.zip.
The default location of the StreamBase Studio workspace directory on OS X for Studio 7.5.0 and later is the following:
/Users/sbuser/Documents/StreamBase Studion.mWorkspace
Using Studio 7.4.x and earlier, the default Studio workspace directory is:
/Users/sbuser/streambase-studio-n.m-workspace
You may have specified a different directory the first time you ran StreamBase Studio.
For 7.5.0 and later, the StreamBase configuration directory is stored in a
version-specific directory under $HOME/Library. This
folder is hidden in Finder windows by default; either enable hidden files in Finder
Preferences, or navigate to the same folder in a Terminal window:
/Users/sbuser/Library/Application Support/com.streambase.sb.sbstudio/n.m.x/Configuration
For Studio 7.4.x and earlier, the configuration directory is:
/Users/sbuser/.streambase/streambase-studio-n.m.x
In these paths, n.m are the major and minor
release numbers of the currently installed StreamBase release, and x is the service pack release number.
TIBCO provides a StreamBase installer in standard Apple DMG (disk image) format. This installer includes a Java JDK for the exclusive use by TIBCO StreamBase and TIBCO Live Datamart software.
As downloaded from the TIBCO distribution site, the StreamBase and Live Datamart DMG installer is delivered in a single file named according to the following pattern:
-
TIB_sb-cep_n.m.x_macosx_x86_64.dmg
where n.m.x is the release number. The
OS X version is available for x86 64-bit only.
Remember that the installers for StreamBase 7.5.0 and later include all the components and documentation of TIBCO Live Datamart 2.0.0 and later. There is no longer a need to download and install separate StreamBase and Live Datamart installers.
To install TIBCO StreamBase and TIBCO Live Datamart, follow these steps:
-
Double-click to open the downloaded DMG file.
-
Click to accept the StreamBase license. This opens the DMG folder on your desktop containing the subfolders like the ones shown here:
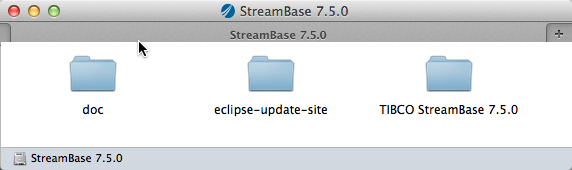
TIBCO StreamBase n.m.xThe TIBCO StreamBase installation folder, where n.m.xis the current release number inmajor.minor.servicepackformat. The inclusion of the full release number allows you to have more than one StreamBase release on your Macintosh at the same time (but using only one at a time). See Switching for details.doc Full documentation for this StreamBase and Live Datamart release in HTML format. This is a copy of the /docfolder in your installation. You can copy this folder to a public location to make StreamBase documentation available to other users.eclipse-update-site Eclipse plug-ins folder for advanced users who want to install this release of StreamBase Studio as a set of plug-ins into their existing copy of Eclipse. See the Eclipse Update Site page for instructions. -
As with all OS X program files, you are free to install StreamBase in any standard or personal location, as long as you have write access to the folder of choice. Decide on an installation location based on the following points:
-
The standard location for OS X application files is
/Applicationsat the root of the primary disk. This location has the advantage of being standard, but the disadvantage of requiring administrator access, both to install files initially, and to add files to the same location later. These permissions issues can complicate the installation of StreamBase add-ins or LiveView Desktop. -
A better location, and the one shown in examples on this page, is a folder named
Applicationsin your home directory, or/Users/. Create this folder if it does not already exist.sbuser/ApplicationsOS X locates programs in all locations on your disk based on their
.appfile name extension, not based on their presence in the standard folder. Installing in$HOME/Applicationsmeans you can overlay any StreamBase add-in without running into permissions issues.
-
-
Drag the entire TIBCO StreamBase
n.m.xfolder from the open DMG to the location you elected in the previous step. You may be prompted to enter an administrative password. -
To close the DMG folder, click anywhere in its blank space, invoke the context menu, and select Eject.
(To open the context menu, use right-click if you are using a two- or three-button mouse, or tap lightly with two fingers on a trackpad.)
-
Before running StreamBase Server or LiveView Server from within StreamBase Studio or from the command prompt, you must install a license file, as described in Configuring a StreamBase License.
-
Modify the environment of all users who will develop with StreamBase on this Macintosh by adding the following command to their shell startup files. The command is shown twice, for two installation location possibilities. Adjust the path to the StreamBase installation folder if you chose another location.
Notice that these commands use the back quote character ( ` ), not the single quote character:
$ eval `~/Applications/TIBCO StreamBase
n.m.x/bin/sb-config --env` $ eval `/Applications/TIBCO StreamBasen.m.x/bin/sb-config --env`This command sets the
STREAMBASE_HOMEenvironment variable and modifies thePATH,DYLD_LIBRARY_PATH, andMANPATHenvironment variables. You must have the StreamBase installation location'sbinfolder in your PATH in order to run the StreamBase and LiveView command-line utilities. -
To make sure this command is executed automatically for every Terminal window opened, add commands like the following to the shell initialization file for each user (such as
.bashrc,.zshrc, and so on):if [ -d ~/Applications/TIBCO\ StreamBase\
n.m.x/bin ] ; then eval `~/Applications/TIBCO\ StreamBase\n.m.x/bin/sb-config --env` else echo "No StreamBase environment detected." fi -
You might find it helpful to create a symbolic link in your
~/Applicationsor/Applicationsfolder to avoid issues with the spaces in the StreamBase folder name. For example:cd ~/Applications ln -s TIBCO\ StreamBase\ 7.5.0 streambase
With this symlink in place, you can use the following script in your shell initialization files instead:
if [ -d ~/Applications/streambase/bin ] ; then
    eval `~/Applications/streambase/bin/sb-config --env`
else
    echo "No StreamBase environment detected."
fi
StreamBase Studio and other StreamBase programs run well on OS X 10.10 Yosemite, but an Apple bug prevents certain DMG installers, including ours, from opening efficiently. If you encounter problems or a hang when installing StreamBase on Yosemite, use the following alternative installation method.
-
Download the DMG disk image file as usual.
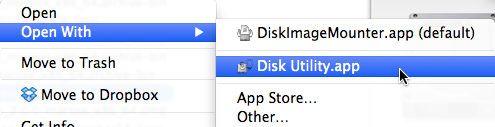
-
In a Finder window, select the DMG file, invoke the context menu, and select Open With.
(To open the context menu, use right-click if you are using a two- or three-button mouse, or tap lightly with two fingers on a trackpad.)
-
From the Open With menu, select Disk Utility.app.
-
In the Disk Utility, select the
TIB_sb-cep*file in the column of disk resources on the left. Invoke the context menu on it and select Open Disk Image.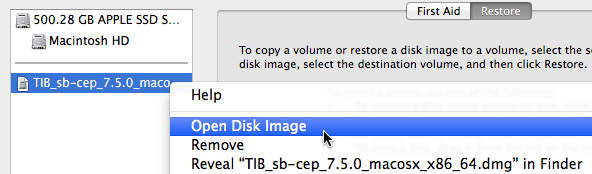
-
You are presented with the text of the TIBCO license agreement. Scroll through and read the agreement, then click the button.
-
This allows the disk image to be mounted normally in the Finder. At this point, proceed with the standard installation starting with step 3 of Steps to Install StreamBase on OS X above.
As an alternative to opening the StreamBase DMG file in the OS X Disk Utility described above, you can use the following alternative procedure:
-
Download the DMG disk image file as usual.
-
Open a Terminal prompt. Type
hdiutil attach <space> -
From a Finder window, drag the DMG file to this Terminal window, dropping the DMG at the end of the partial command typed above. OS X fills in the path to the DMG file automatically.
-
Press Enter. This opens the DMG file as if you had double-clicked it. Still in the Terminal session, you are presented with the text of the TIBCO license agreement, which pages automatically using the pager command specified in the PAGER environment variable, or with the standard more command if no PAGER is specified.
-
Type a single uppercase
Gor a single greater-than character (>) at the pager prompt. This skips to the end of the paged license text. (You can also press the space bar multiple times to read through the license text one screen page at a time, but there are hundreds of screen pages.) -
When prompted with
Agree? Y/N, type a singleY. -
This allows the disk image to be mounted normally in the Finder. At this point proceed with the standard installation starting with step 3 of Steps to Install StreamBase on OS X above.
For OS X, all add-in products and certain external adapters install as overlays
into the base StreamBase folder. The installers for these add-ins are distributed as
executable .archive-bin packages, which are standard
.tar.gz files packaged in a shell
wrapper.
These installers for Mac OS X have file names that match the following patterns:
-
Adapters:
TIB_sb-ad-name_version_macosx_64.archive-bin -
Add-ins:
TIB_sb-addin-name_version_macosx_x86_64.archive-bin
where version is the current release number
in major.minor.servicepack format.
Note
The Safari browser on OS X automatically renames .archive-bin files as a safety precaution, because it detects
that these files are unrecognized shell scripts. Safari adds the .txt extension so that these files are initially treated as text
files.
When the download is complete, you must manually rename these files to remove the
.txt extension.
After downloading one of these files, first make it executable with the chmod command. For example, for the TIBCO StreamBase Adapter for Apache Flume:
chmod +x TIB_sb-ad-flume_n.m.x_macosx_x86_64.archive-bin
For archive-bin packages, run the shell wrapper command. If you are installing into a StreamBase folder for which you do not have write privileges, run the command as root or with sudo:
sh /path/to/TIB_sb-ad-flume_n.m.x_macosx_x86_64.archive-bin
The wrapper script displays a license file for you to agree to, then prompts for the full path to your base StreamBase installation. Provide the full absolute path; you do not need to escape the spaces in the folder name. For example, enter:
/Users/sbuser/Applications/TIBCO StreamBase 7.5.3
The script then unarchives its files into the STREAMBASE_HOME location you identified.
On OS X, a StreamBase installation provides two GUI applications plus the command-line utilities listed in the StreamBase Command Reference. Man pages are provided at the shell prompt for the command-line utilities.
The two GUI applications are named as follows on the OS X file system:
-
sbstudio.app -
sbmanager.app
If you use Spotlight to launch these applications, search for these specific application names. Searching in Spotlight for an application's formal names, such as "StreamBase Studio," is likely to return results for documentation pages or image files, not the application itself.
Because the name of the TIBCO StreamBase installation folder in ~/Applications or /Applications
includes the release number, you can have more than one copy of StreamBase on your
disk at the same time, and can switch back and forth between them to use one at a
time.
The easiest way to do this is to use a symbolic link pointing to the actual
StreamBase installation folder, and to place the path to the symbolic link's
bin directory in the PATH, as recommended in step 9,
above, of the installation instructions.
This way, when you have two or more StreamBase installation, you can quickly switch between them by re-creating the symbolic link to point to the desired version.
To uninstall StreamBase on OS X, just move the ~/Applications/TIBCO StreamBase folder to the Trash, and remove any
symbolic link you created. Your project files in your StreamBase Studio workspace are
preserved when you remove the StreamBase application files.
n.m.x
When you upgrade from one StreamBase release to a new major release, on first run, StreamBase Studio automatically and silently upgrades the XML representation of your application files.
If you need to downgrade back to a previously used StreamBase release (such as to add a feature to an existing application), the older StreamBase Studio may not recognize some of the changes made to your applications by the newer Studio. Thus, if you anticipate returning to an older StreamBase release, specify a separate workspace, and either start over with new projects in StreamBase Studio, or restore your matching version-specific backup copies to the separate workspace. See above for instructions for backing up workspaces.