Deploying the TDV Helm Chart
The TDV Helm chart provisions the necessary storage for the TDV application on the Kubernetes Cluster. TIBCO Data Virtualization Container distribution includes the helm chart with certain default settings. You can run the helm chart using a pre-built script provided.
You can use an Azure CLI or a Cloud-shell to connect to Azure and execute administrative commands on the Azure resources. These tools allow the execution of commands through interactive command-line prompts or a script. Refer to the following documentation on the Azure CLI and Azure Cloud Shell for more information about using these tools:
To edit/run the helm chart and scripts using one of these tools:
1. Open the Cloud Shell interface or the Azure CLI.
2. Connect to your cluster:
— Click on the option Connect in the top menu bar of the Cluster. A window is displayed with all the connection details and the associated kubernetes commands to use in your shell.
— Use the commands in your shell interface to connect to the cluster. (for example, run these commands:
$ az account set --subscription <subscription id>
$ az aks get credentials --resource-group <resource group name> --name <user id>
— Once the connection to cluster is established, you can then issue any kubernetes command.
For example, to get information on all the pods running, type the following command:
$ kubectl get pods --all-namespaces
3. Upload your TDV Helm charts archive file (i.e. TIB_tdv_<version>_helmchart.tar.gz) to Azure using the Upload option in your Cloud shell. If you are using the Azure CLI, make sure that has access to the files extracted from the TIB_tdv_<version>_helmchart.tar.gz.
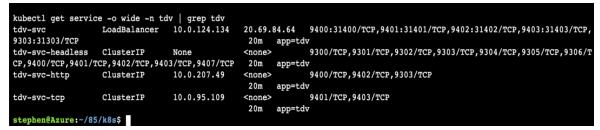
5. Azure AKS uses a load balancer service to route all client requests across all your TDV applications that are ready to fulfill those requests. Azure AKS will automatically assign an external IP for your TDV service endpoint. To get the external IP of that load balancer service run:
$ kubectl get svc -o wide -n tdv
Note: If you also deployed the TDV HAProxy application, then you will see two TDV services with external IPs. One is for the Client External IP and one for the Monitor External IP (Refer to the illustration
ClusterTDV Deployment Mode: for the Cluster TDV Deployment Mode architecture).
The screen below is a sample output of the Azure Cloud Shell displaying the load balancer service and the IP to access.