Designing a View in the Model Panel
The Model panel is a graphical tool that helps you create SQL statements (without having to write the code) to obtain useful query results from disparate data sources.
To design a view
1. Select data resources for the view by dragging and dropping tables, procedures, and transformations into a view.
2. JOIN tables by linking table columns.
3. Configure JOIN properties
a. Define the JOIN logical operators.
b. Specify the preferred join algorithms or suggest semijoin optimizations.
c. Provide estimates of table cardinality to help the query engine optimize the execution plan.
d. Include all rows from the left, the right, or both sides of the join.
e. Force join ordering or swap the order of the tables in the join.
4. Create UNIONs of SELECT statements, bringing together rows from matching tables.
5. Navigate among SELECT statements and the UNION of those SELECTs.
6. Use query hints to set the maximum number of rows to return, to set case sensitivity, to ignore trailing spaces, to mark the query as STRICT (adhere to SQL-92), or to force the query processing to disk if the query is likely to exceed memory constraints.
The following topics have more information on designing views in Studio:
Adding a Resource to the Model Panel
You can add resources such as database tables, text files, procedures, and other views to the Model panel. Only a procedure that contains either all scalar outputs or just one cursor output can be included in a view.
To add a resource to the Model panel
2. Locate a resource in the resource tree.
3. Drag and drop the resource onto the Model panel.
Note: You can use Ctrl-click or Shift-click to select multiple resources, and drag and drop them in the Model panel.
4. Rearrange the resources as needed.
Joining Tables in the Model Panel
A view that you design might involve joining tables. You can often improve query performance by refining the properties of a join process including:
• Specify how the joined columns should be compared.
• Specify the join algorithm and cardinality.
• Choose a semijoin optimization.
• Specify whether to include all rows from a specific table.
In the
Model panel, the join between the selected tables is visible as a line connecting those tables. This type of join is called an INNER JOIN. For details on tuning options, see
Performance TuningTo JOIN tables in the Model panel
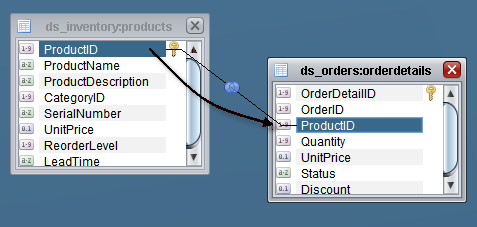
1. Select the column from one of the tables to be joined. The first column selected is the “left” side of the join, unless Swap Order is selected in the Join Properties window.
2. Hold down the mouse button and drag from the selected column in the left-side table to the column to join it with in what will be the right-side table.
3. Make sure that columns specified for JOINS are of compatible data types.
To check the data type of a column, click the Columns tab and open the Columns Panel.
4. Right-click the join icon on the JOIN line and select Properties to open the Join Properties window, or double-click the diamond graphic.
5. Select how the columns should be compared (=, <=, >, and so on) from the drop-down list in the top center of the Join Properties window.
6. In the Include rows section, check the boxes to specify the rows you want to include in the join:
— Select the upper box to specify the LEFT OUTER JOIN.
— Select the lower box to specify the RIGHT OUTER JOIN.
7. In the Join Details section:
a. From the Specify Join Algorithm drop-down list, select the algorithm to use for the join.
b. Specify the Left Cardinality constraint.
Provides cardinality hint for the left side of a join. It should be a positive numerical value, for example 50.
c. Specify the Right Cardinality constraint.
Provides cardinality hint for the right side of a join. It should be a positive numerical value, for example 500.
d. If you select the Semijoin Optimization check box, the TDV query engine attempts to use the results from the number of rows to be processed for the join is minimized, and the query engine’s performance is enhanced.
e. Select one of the following order options:
— Default Ordering—Applies the default ordering.
— Swap Order—Swaps the left and right sides of a join.
— Force Join Ordering—Overrides join ordering optimization.
f. Click OK to save the join specification.
8. Click the SQL tab to verify how the join is specified in the SQL statement, similar to the following example:
SELECT
products.ProductID,
orderdetails.UnitPrice,
orderdetails.Status
FROM
/shared/examples/ds_inventory/products products FULL OUTER { OPTION SEMIJOIN="True", LEFT_CARDINALITY="50", RIGHT_CARDINALITY="500" } JOIN
/shared/examples/ds_orders/orderdetails orderdetails
ON products.ProductID = orderdetails.ProductID INNER JOIN
/shared/examples/ds_orders/orders orders
ON orderdetails.OrderID = orders.OrderID
9. Click OK.
Enforcing Join Ordering
You can allow the query engine to reorder the query execution plan based on statistics gathered from the data source table and optimization algorithms. However, given knowledge of the table contents, it is often advantageous to force the processing order derived from the written SQL.
Note: Joins that contain any user specified options cannot be reordered.
You can direct the query engine to follow the order in which you joined the tables. For more information, see
SQL Join Reordering.
To enforce the processing order of table joins
1. Join the tables in the order you want.
3. In the Join Properties window, select Force Join Ordering.
4. This step adds the phrase {OPTION FORCE_ORDER="true"} to the FROM clause and informs the query engine to query the tables in the order in which they are specified in the FROM clause.
Creating a Union
Studio lets you graphically create a UNION between two or more tables.
To graphically create a UNION
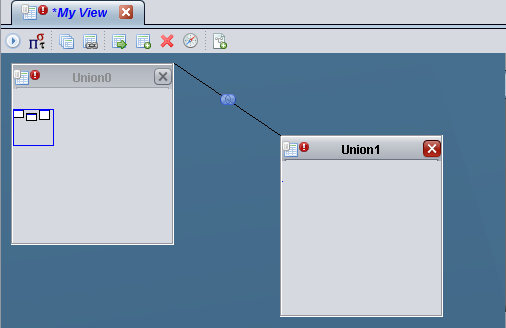
1. Create the first table for the UNION by dragging the resource onto the Model panel (if it is not already there).
2. Right-click in the background field of the Model panel and choose the Add Union option.
The resources are condensed into a Navigator window called
Union0. The tables are shown as smaller icons within the Navigator window.

3. Right-click again in the Studio design space and choose the Add Union option to open a second UNION design space, called Union1.
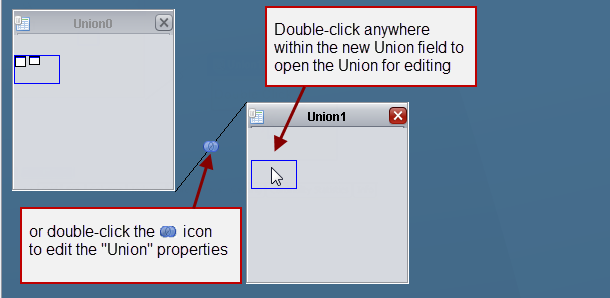
4. Double-click anywhere in Union1 to open the UNION for editing.
When you double-click Union1, the entire design space represents Union1, and is blank so that you can add resources to include in the UNION in the next step.
5. Drag and drop resources into the Union1 side of the SELECT statement.
The definition of the two tables in the UNION must have the same number of columns in the same order, and they must be of compatible data types, for the UNION to function correctly.
6. After defining the second table for the UNION, right-click anywhere in the design space and select UP to return to the top-level query view navigator.
By default the two tables are combined with a UNION ALL, but you can change that to a UNION, EXCEPT, or INTERSECT.
7. Double-click the UNION connector to open the UNION properties.
8. Make your design choices in the Union Properties window.
a. By default, the two tables are combined with a UNION ALL (the All check box is checked by default), but you can change that to a UNION, EXCEPT, or INTERSECT.
b. Optionally, check the PARALLEL, FORCE DISK, or DISABLE PUSH check boxes.
For a description of TDV supported SQL (UNION, EXCEPT, INTERSECT, the All option) and the available query engine UNION options, see the TDV Reference Guide.
c. Click OK to save the union properties.
9. Save the view.
Controlling the Number of UNION ALL and JOIN Flips
To optimize its execution plan, the query engine can flip between UNION ALL and various kinds of JOINs: INNER JOINs, LEFT OUTER JOINs, and RIGHT OUTER JOINs. If the two SELECT statements do not involve duplicates, the distributive law works for UNION DISTINCT and INNER JOINs as well.
By default, the maximum number of flips between UNIONs and JOINs is 2. You can change this maximum, although increasing it can have a negative impact on memory consumption and plan generation time.
To change the maximum number of flips between UNION ALL and JOIN
1. From Administration in the Studio main menu, select Configuration.
2. Navigate to Server > SQL Engine > Overrides.
3. Change the Value from its default of 2 to another integer.
4. Click OK at the bottom of the panel.
Navigating between Tables in the Model Panel
The Model panel is a large area that can hold many tables. Only a portion of the Model panel is visible at any given time. You can adjust the visible area using the scroll bars or by the Navigator window.
To navigate among the tables in the Model panel
1. Open the Navigator window by clicking the Navigator button.
The Navigator window opens, displaying a miniature version of the Model panel with all its tables in position.
After you first click in the Navigator window, a blue rectangle appears, showing what area is currently visible in the Model panel.
2. Click inside the blue rectangle and drag it over the area you want to see.
Specifying the DISTINCT Query Option
You can easily add the DISTINCT option to the SQL query in the Model panel. This query option ensures that duplicate rows are ignored.
To specify the DISTINCT query option in the Model panel
1. Right-click anywhere in the Model panel.
2. Choose Select Distinct.
This selection adds DISTINCT to the view’s SELECT statement, as in the following example:
SELECT DISTINCT
*
FROM
/shared/examples/ds_inventory/products products
3. Select the SQL panel and verify that the SQL statement now contains the DISTINCT option.
Specifying Query Hints
Query hints are options that you can include to optimize your SQL statement for the TDV query engine. Options specified in a query override any defaults set using the configuration parameter values.
You can specify the following query hints for the current view in the Model panel:
• Set the maximum number of rows to be fetched
• Set case sensitivity
• Set whether or not to ignore trailing spaces
• Force the Query Engine to use disk instead of memory for temporary query data storage
• Require that mathematical and string functions adhere to SQL-92 (STRICT)
Note: Many other query options can be added directly in the SQL panel. These are documented in “TDV Query Engine Options” in the TDV Reference Guide.
To specify query hints in the Model panel
1. Add however many tables you want in the Model panel.
2. Right-click anywhere in the Model panel, and select Query Hints.
3. In the Query Hints dialog box, specify the maximum number of rows to be fetched in the Max Rows Limit field.
4. Select one of the following options in the Case Sensitive drop-down list:
— Server Default—Default setting of the server.
— True—This option sets comparisons to case-sensitive mode.
— False—This option sets comparisons to ignore case.
5. Select one of the following options in the Ignore Trailing Spaces drop-down list:
— Server Default—Default setting of the server.
— True—With this option, comparisons ignore trailing spaces.
— False—With this option, comparisons do not ignore trailing spaces.
6. Select any check boxes that apply:
— Force Disk—If selected, this option forces the query engine to use disk instead of memory wherever possible.
— Strict—If selected, query engine does not push mathematical and string functions to the data source if the data source does not follow SQL-92 standards for those functions. This might affect performance.
7. Use the Clear All button if you want to clear all entries.
8. Click OK after setting the options.
9. Click the SQL tab to view the resulting options included in the SQL, as in the following example:
SELECT { OPTION MAX_ROWS_LIMIT="50", IGNORE_TRAILING_SPACES="True", CASE_SENSITIVE="True", STRICT="true", FORCE_DISK="true" }
DISTINCT products.ProductID,
products.ProductName,
products.UnitPrice
FROM /shared/examples/ds_inventory/products products