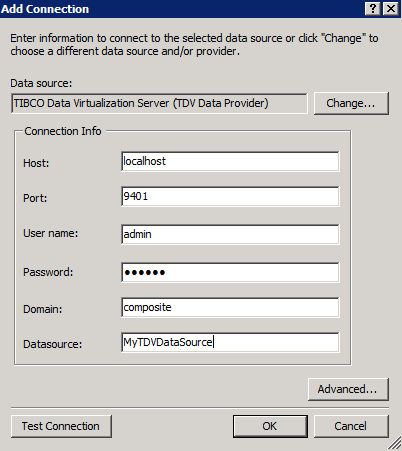


Field | Description |
Host | TDV Server host name or IP octet. Use localhost if you plan to use Visual Studio and TDV Server on the same local computer. |
Port | Use the number of the JDBC or ODBC open port (default: 9401) or the SSL protected port (default: 9403). For use of SSL, Server certificates must be installed separately. |
User Name | The TDV user name. |
Password | The TDV password. |
Domain | The TDV domain to which this data source belongs. Typically, that domain is composite for installations with locally defined users. |
Datasource | Data source refers to the TDV database name published in the Data Services node. |
Catalog | Specifies the catalog that is used for the connection. |

Parameter | Value description |
Advanced | |
AccessToken | The authorization tokens used for OAuth2 authentication. The tokens are represented in a specific format - <header>.<payload>.<signature>. Each of the parts of the token is in a JSON format. The access token is used in place of id/password credentials, with a limited lifetime & privileges. |
AccessTokenType | The type of the AccessToken. JWT (JSON Web Token) is the default supported format. JWT token is a self-contained JSON form and ideal for federation. |
ConnectTimeout | The number of seconds the client waits for a connection to be established or to fail. A value of 0 disables the timeout. |
FetchBytes | Maximum number of rows to fetch for a batch based on batch size, in bytes. Setting fetchBytes to a very large number can cause an Out Of Memory error in the server. The value set for fetchBytes affects the memory used on the JDBC client and the TDV server, so the value should be set based on the heap size configured. |
FetchRows | The maximum number of rows fetched from TDV at one time. Note: There is no relationship between FetchRows and FetchBytes. When the dbchannel gets a record, it calculates the number of fetched rows and fetched bytes. If the number of fetched rows is greater than fetchRows or the number of fetched bytes is greater than fetchBytes, dbchannel stops fetching rows and returns all fetched records. |
RequestTimeout | The number of seconds the client waits for the TDV Server to return a request. A value of 0 disables the timeout. |
SessionTimeout | Timeout for session inactivity on the server. This setting gives the TDV Server an indication of how long a session should be maintained if the connection with the client is lost without the server being notified. |
SessionToken | The location of the session token used to authenticate to the sever. |
Cluster | |
EnableReconnectOnError | Default value (false) results in an exception if the connection object dies. If you set it to true, the driver tries to create a new connection to the same server when the connection dies. When Active Clustering is in use, set this value to true, so that any failure to connect automatically initiates another attempt to connect to the server. |
PingInterval | The TDV ADO.NET driver lets you configure a ping mechanism to assess TDV status after it sends a command to the server. After the driver sends a request to the server, PingInterval initiates ping verifications repeatedly at the specified interval. Verification of status by pings helps the server avoid lengthy response times for verification of connection status—for example, when the connection might have been lost just after a command was issued. PingInterval is the number of seconds between consecutive ping status checks. The default value is 0, which disables ping verification. |
PingTimeoutWindow | This should be greater than or equal to the value of PingInterval. It means the ping timeout fails. From the time that common command send to the server, the driver sends continuous ping commands to the server. If the ping still fails after PingTimeoutWindow, an exception is thrown and the connection is closed. Otherwise, the driver waits and sends ping commands to the server to check the server’s status. Default value is 0, which means this option is not in use. |
Connection | Properties in this section are values that were set in Adding and Configuring a Connection to TDV in Visual Studio. The values of the catalog, data source name, domain, host, port, and user are populated from the values entered on that screen, and they can be changed here. |
Debug | |
ErrorLoggingEnabled | Enable ADO.NET driver log. |
StatusInterval | Log thread and connection status with a specified time interval in seconds. |
TraceFolder | Absolute directory to save trace file, the trace file name is "CsOdbcDebug_"+<DSN Name>+".log". the default folder is C:\ or $COMPOSITE_HOME. |
TraceLevel | Valid values are off, fatal, error (this is the default), debug, warn, info, debug, and all. The valid values for client-side log settings are off, fatal, error (default), warn, info, debug, all, stdout. On UNIX-based platforms, the log file CsOdbcDebug.log is created in the directory specified by the environment variable COMPOSITE_HOME. |
Pooling | |
ConnectionLifeTime | Setting ConnectionLifeTime=0 means each connection will be closed as soon as it is used. When using connection pool if you want to reuse the connection by putting the connection back to the connection pool set ‘connectionlifetime’ value to a value greater than zero. The Unit for ConnectionLifeTime is second. For example ConnectionLifeTime=60000 means 60000 seconds |
MaxPoolSize | Sets the maximum number of connections that are opened in the same pool at the same time. If the maximum is reached and no usable connection is available, subsequent requests are queued until a connection is available. |
MinPoolSize | Sets the minimum number of connections that is maintained even if inactive to avoid the time cost of recreating new connections for a new request. |
Pooling | When true, inactive connections are saved and reused as necessary. |
Security | |
Encrypt | True or False. Used for SSL security. Set to True to enable SSL security. The default is False. |
Integrated_Authentication | Specified the integrate authentication method with three values: '(Disabled)', 'Kerberos', 'NTLM'. |
Kerberos SPN | A service principal name (SPN) used by Kerberos authentication to associate a service instance with a service logon account. This allows for service authenticate of an account even if the client does not have the account name. |
KeyStoreFile | Used for SSL security. Specifies the keystore file to use for verification. The file is in the PKCS#12 format. The default keystore could be found at apps/ADO.NET/ Security/cis_ado_keystore.pfx, which includes the client certificate and private key. |
KeyStorePass | Used for SSL security. Specifies the password for the KeyStoreFile. The default value is ‘changeit’. |
User_Tokens | Authentication values that can be packaged for delivery. |
TlsVersion | The TLS Version information. |
ValidateRemoteCert | True or False. The default is False. |
ValidateRemoteHostname | True or False. The default is False. |
