Adding a Configuration Instance for PDS
Adding a configuration instance allows you to run different server configuration instances using the same server binaries. You can add up to nine additional servers.
Run ISETUP
To add a configuration instance, perform the following steps.
- Execute ISETUP again. You should have a high_level_qualifier.HOME.DATA
PDS. Use option 6 in ISPF to
execute the ISETUP member of this PDS.
Note: If this PDS is not available,
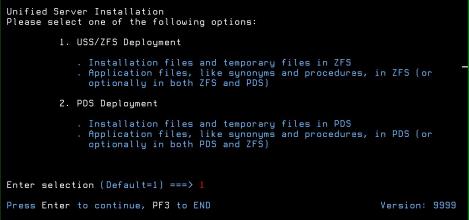
The first Installation and Configuration panel opens.
- Type 2 and press Enter to continue to
the next panel.
The following panel opens.
- Complete the first Installation and Configuration panel, as follows.
Field
Instructions
Enter selection
Choose option 2, Add Additional Configuration Instance.
Input source
This is ignored for option 2, adding a configuration instance.
Installation Userid
Shows the current logon ID. It cannot be changed.
PTH Administrator Userid
An ID is required to administer the server immediately after initial installation. This ID is defined and maintained solely in the realm of the server. It defaults to srvadmin, and it can be changed here.
For more information about running the server in secure mode, see Configure Security.
PTH Administrator Password
Password for the PTH Administrator ID. It cannot be left blank and must be matched at Retype field.
Customer ID Insert new Customer ID row above this row. Enter Job Card information
To provide JOB card information for submitting jobs to the JES queue, provide a valid job name (a maximum of seven characters following the // on the first JCL line), which defaults to the user ID that you are currently using.
This job name is used for multiple submissions (for example, jobnameA, jobnameB, jobnameC, and so on) in the JCL generated by the installation procedure.
Override JOB name checking
To provide your own JOB card information, including JOB name, enter Y and provide valid JOB card information in the Enter Job Card information field. The JOB card information that you enter will be used for each job that is submitted.
- Press Enter to continue to the next
panel.
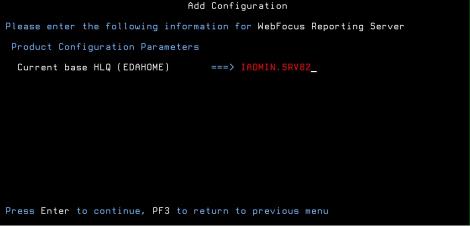
The following panel opens.
- Enter the current base high-level qualifier used for EDAHOME.
This indicates where to install the configuration (EDACONF) and where the binaries (EDAHOME) are installed. The installation procedure checks whether the required set of EDAHOME data sets exist. If the test fails, you receive a message indicating the failure and available options.
- Press Enter to continue to the next panel.
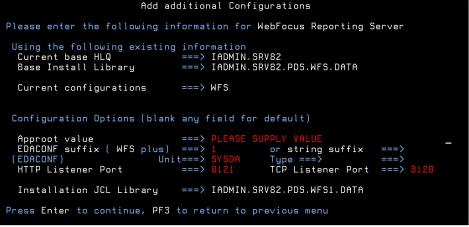
- Complete the configuration parameters on the panel as follows.
Field
Instructions
Approot value
Indicates where application components reside for this configuration. The default value is based on the value specified for Current Base HLQ (EDAHOME) on the previous panel. To specify a different location for application components, change the value of this field.
Different configurations which use the same base HLQ (high-level qualifier) libraries (EDAHOME) can share the same approot value (that is, the same application files). They can also use different approot values to have different sets of application files.
If you specify the approot value of an existing server configuration, the installation process recreates the server supplementary data sets and sample files (see Disk Space Requirements). If you do not want them to be recreated, provide a different value for approot.
Field
Instructions
EDACONF suffix
Each instance must have its own set of configuration libraries. To guarantee this, and to prevent a new set of configuration libraries from overwriting an existing set, the specified suffix is appended to the name of the WFS qualifier. For example, if you configure the second instance of a WebFOCUS Reporting Server, you can specify a suffix of "1", to make the EDACONF high-level qualifier:
IADMIN.SRV
929091.PDS.WFS1.DATAYou can add the new configuration as a numeric or string suffix to the base product type. If you supply a string, the installation procedure ignores any numeric suffix. For a:
- Numeric suffix. Enter a digit between 1 and 9. This suffix is added to the product type in the directory name and library name to distinguish it from other configuration instances.
- String suffix. Enter a one to five-character string (for example, TEST, PROD, or DEV) that does not contain embedded spaces.
You can also use the string suffix to extend the numeric numbering past 9 by supplying a number greater than 9. If you change the suffix value and press Enter, the panel refreshes with a new value for the EDACONF Library.
HTTP Listener Port
This indicates the port number that the server will use for HTTP. It is the first of three connection ports that must be available to the server.
For example, if you choose port 8101, then ports 8101, 8102, and 8103 are used by the server. Ensure that you choose ports that are not currently being used by existing WebFOCUS Reporting Server configurations, or for any other applications.
TCP Listener Port
This is the port number of the TCP Listener.
The default is one less than the port specified for the HTTP Listener, but it can be any port number other than the three reserved for HTTP.
- Press Enter to continue to the next panel.
The Data Adapter panel may open before the confirmation panel. If the Data Adapter panel opens, continue with Step 9; otherwise, skip to Step 10.
- The Data Adapter panel lists adapters that require the allocation
of libraries in IRUNJCL or environment variables in the EDAENV member.
To select specific adapters:
- Type Y next to the required adapters and press Enter.
- Supply the requested information, which is described in Collect Required Information for Adapters.
After you have finished installing and configuring the server, you can use the WebFOCUS Reporting Server browser interface to finish configuring these adapters, and to configure adapters that do not have JCL requirements.
- Press Enter to continue to the next panel.
The JSCOM3 Listener configuration panel opens.
- The panel will prompt for the path to the Java environment to be passed to either JDK_HOME or JAVA_HOME, as described in Installation Requirements for PDS, and it will also prompt for edahome_dir and edaconf_dir, as described in ZFS Home and Configuration Directory Requirements.
- Configuration of the JSCOM3 Listener is either optional or mandatory depending on which adapters were selected. If any Java-based adapters were selected (EJB, Call Java, JDBC, Microsoft SQL Server), the configuration of all three paths listed above is mandatory. If SAP-based adapters were selected (SAP or SAP BW), only edahome_dir and edaconf_dir are required.
- If no Java-based or SAP-based adapters were selected, this configuration might still be desirable to enable the server-side graphics feature. To skip the configuration, leave the path blank.
- Press Enter to continue to the next panel.
The confirmation panel opens.
- Ensure that all values on the Confirmation panel are correct,
then select one of the following options:
- N to return to the initial panel so that you can change installation values.
- C to create JCL which you can submit at a later time. The JCL is placed in your configuration library.
- S to create JCL and submit the job immediately.
- As the job is processed, validate the installation as described inTest the New Configuration Instance.
Test the New Configuration Instance
To test the configuration instance that you just added:
- Log on to TSO as iadmin.
- Submit the ISTART JCL from the configuration library to start
the server. This executes the IRUNJCL proc. The configuration library
is
high_level_qualifier.PDS.
WFS[suffix].DATAwhere:
high_level_qualifierIs the high-level qualifier to be used for all output libraries. You specified the high-level qualifier during server installation, as described in Run ISETUP, in Step 6.
suffixIf you are testing an additional instance, the new configuration library product type qualifier will have a suffix (for example, WFS1 or WFSDEV). The suffix distinguishes the new configuration library from the original one.
- Check the job output for errors. Look for the EDAPRINT message:
(EDA13023) ALL INITIAL SERVERS STARTED
- Start the WebFOCUS Reporting Server browser interface by opening a browser pointed at the listener
port of the server. The URL format is
http://host:port
where:
hostIs the name of the machine on which the server is installed.
portIs the HTTP Port Number specified during configuration.
The WebFOCUS Reporting Server browser interface opens.
- If the WebFOCUS Reporting Server browser interface opens and displays application tree folders in the left pane, the server is working because it uses its own underlying data access and reporting technologies to visualize the application tree.
- Continue with adapter configuration, as described in the ibi™ WebFOCUS® Adapter Administration manual.